

In the last post of this series (Part 1, Part 2, Part 3), we combined techniques to edge closer to a 100% NAT traversal success rate. In this final post, we’ll look at CGNATs and wrap the series with what we’ve learned.
Even with Network Address Translation (NATs) to stretch the supply of IPv4 addresses, we’re still running out of unallocated IPv4, and ISPs can no longer afford to give one entire public IP address to every home on their network. To work around this, ISPs apply Source NAT (SNAT) recursively. Your home router SNATs your devices to an ‘intermediate’ IP address, and further out in the ISP’s network a second layer of NAT devices map those intermediate IPs onto a smaller number of public IPs. This is Carrier-Grade NAT (CGNAT) for short.
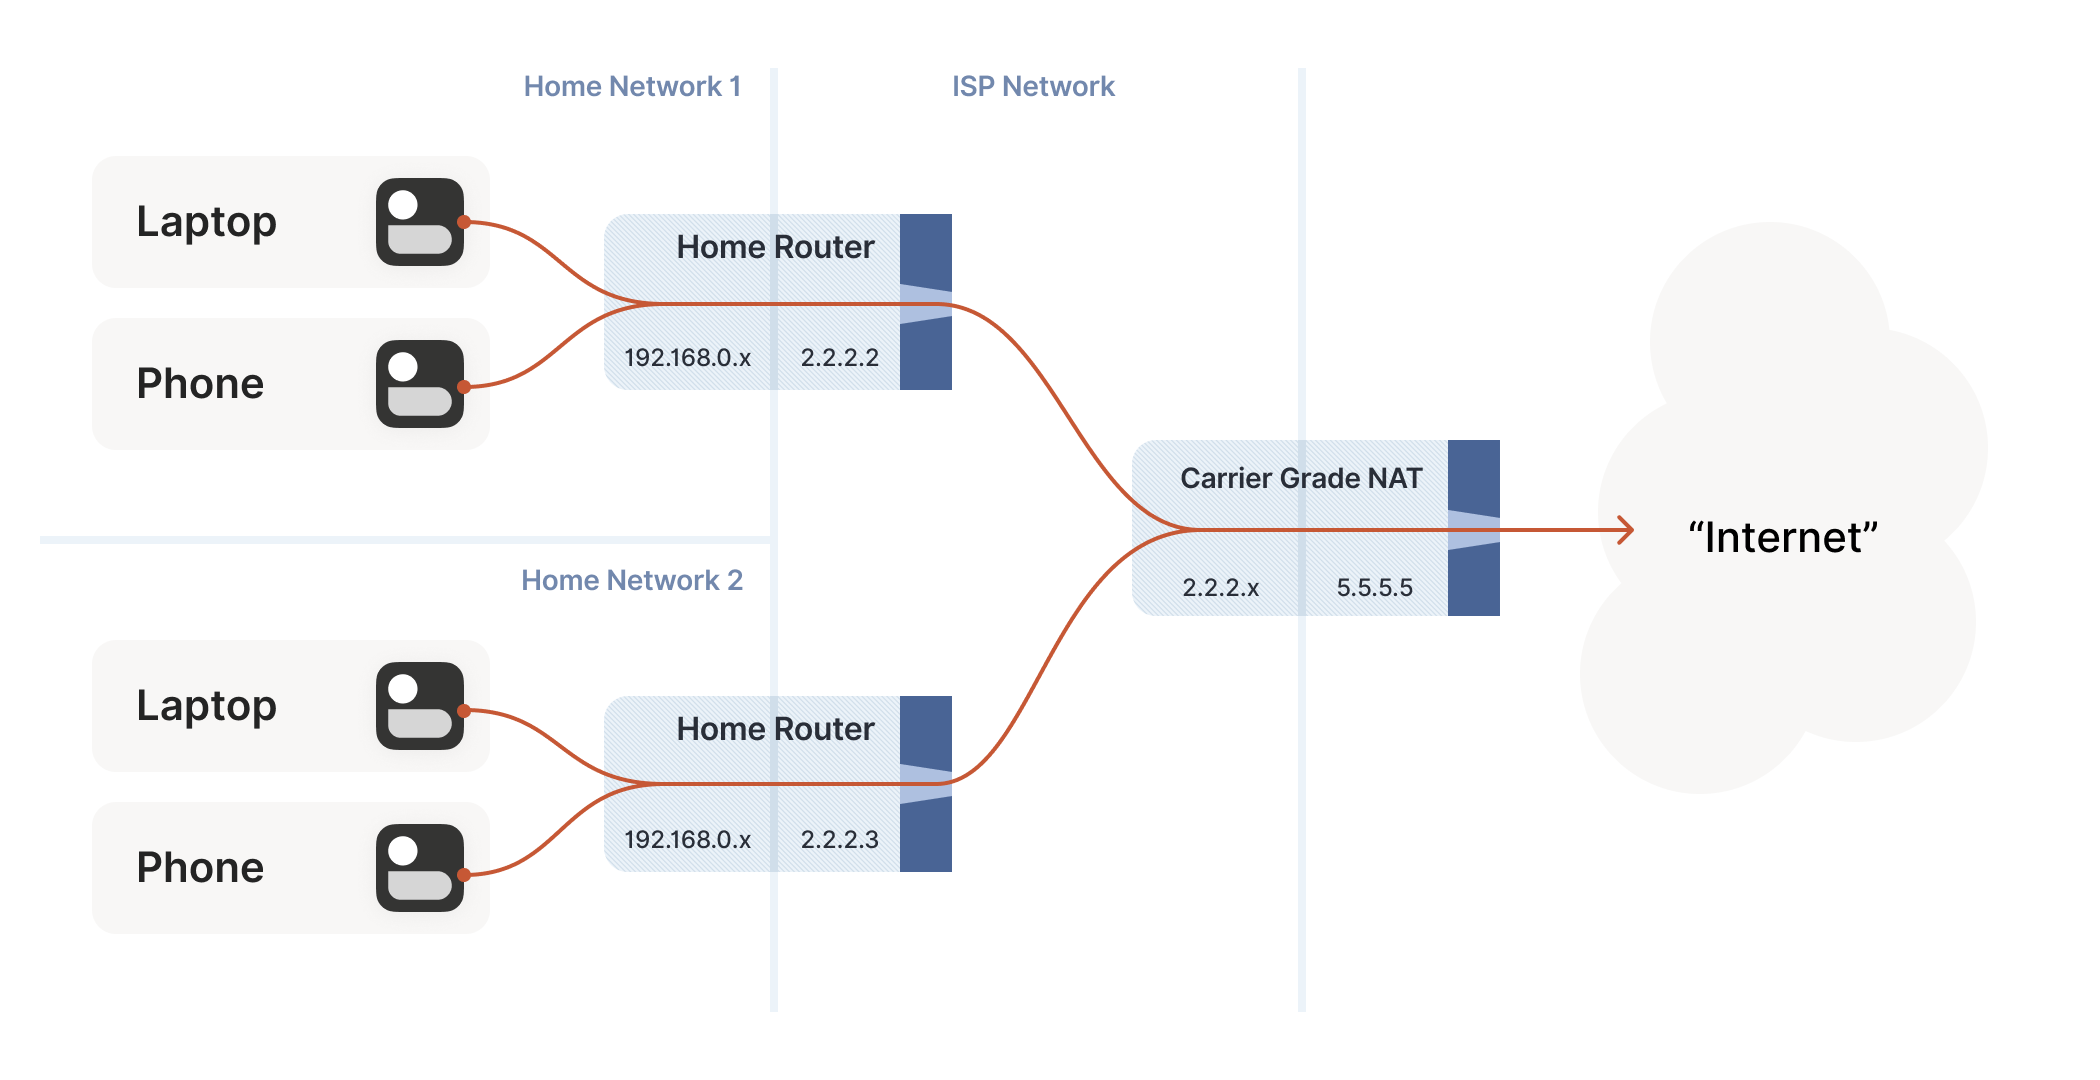
How do we connect two peers who are behind the same CGNAT, but different home NATs within?
CGNAT is an important development for NAT traversal. Before CGNAT, enterprising users could work around NAT traversal difficulties by manually configuring port forwarding on their home routers. But you can’t reconfigure the ISP’s CGNAT! Now even power users have to wrestle with the problems NATs pose.
The good news; this is a run of the mill double-NAT, and so as we covered in the last post it’s mostly okay. Some stuff won’t work as well as it could, but things work well enough that ISPs can charge money for it. Aside from the port mapping protocols, everything from our current bag of tricks works fine in a CGNAT world.
We do have to overcome a new challenge, however. How do we connect two peers who are behind the same CGNAT, but different home NATs within? That’s how we set up peers A and B in the diagram above.
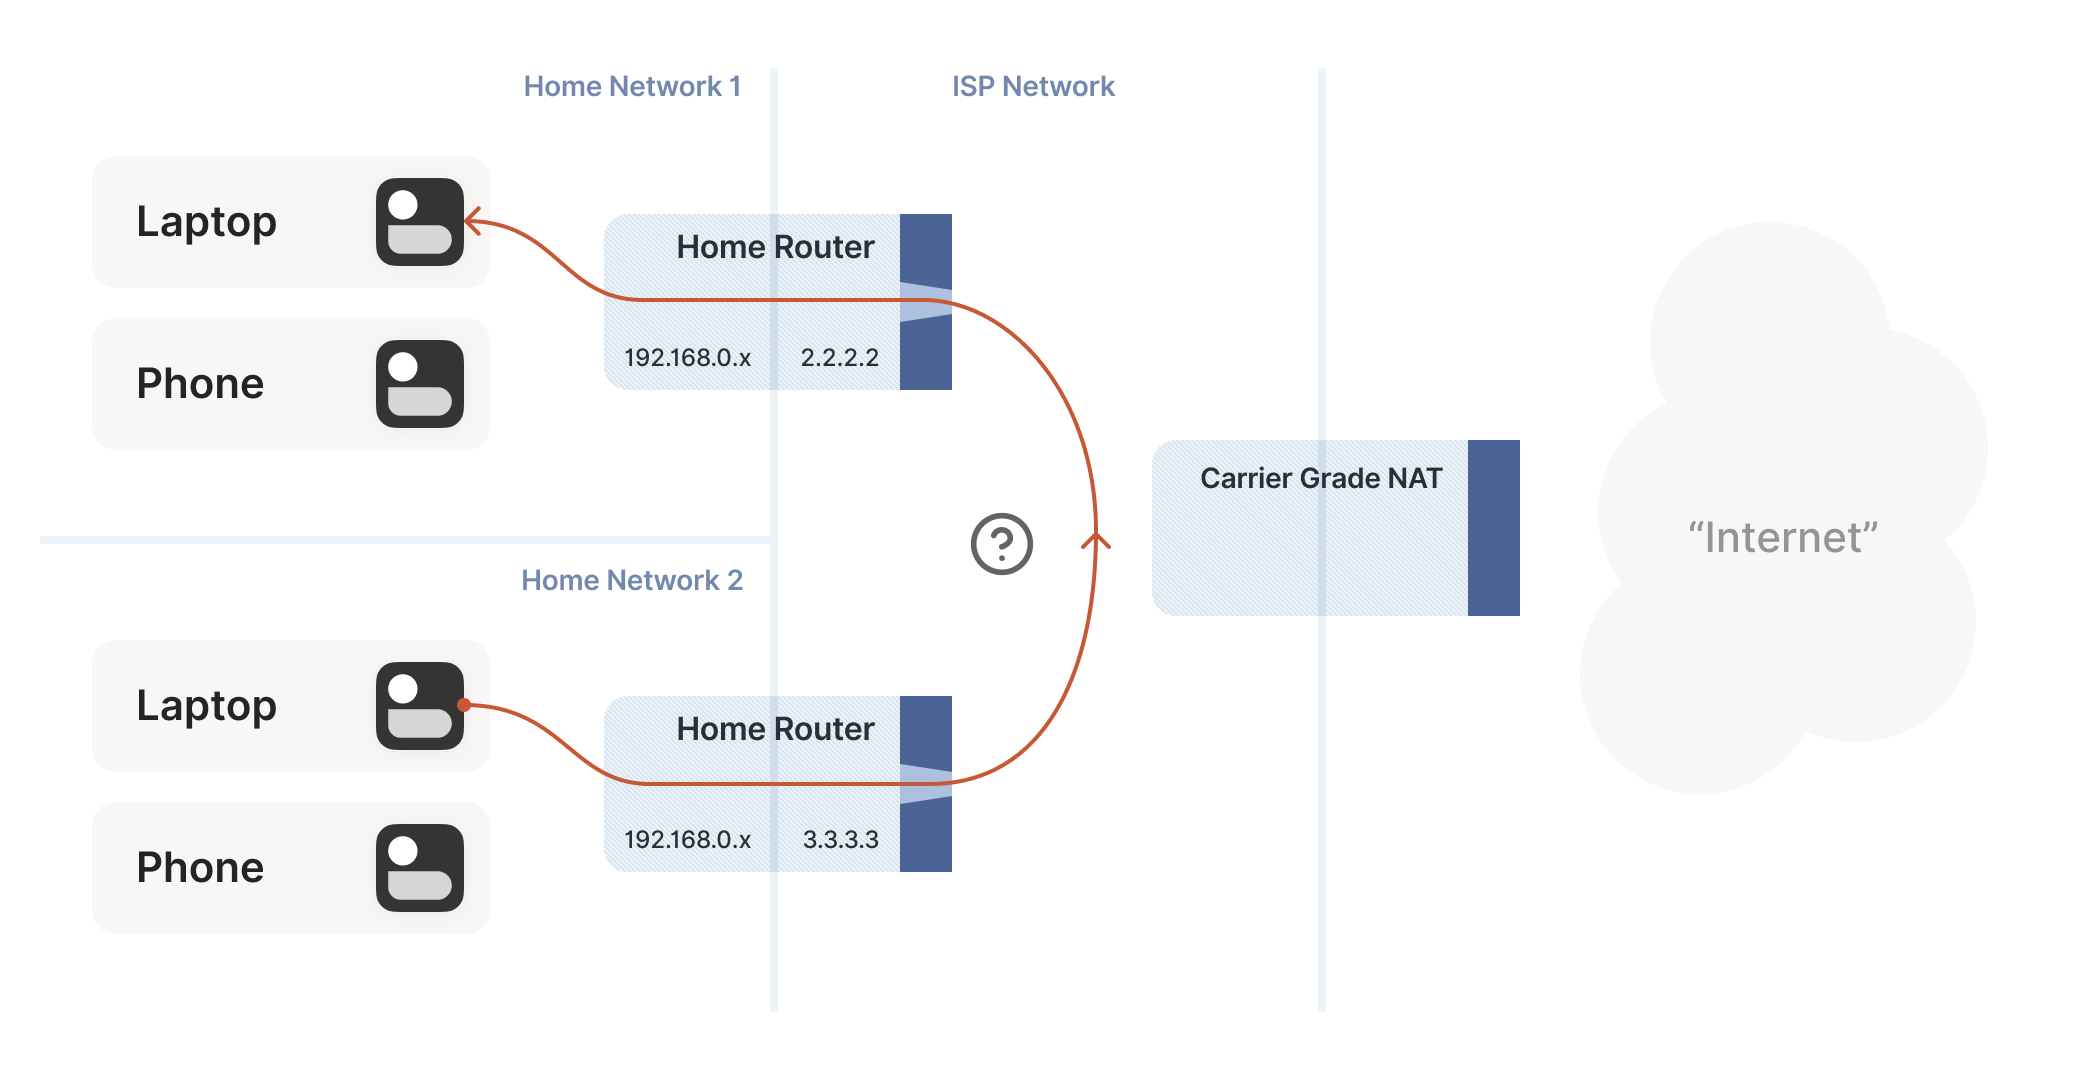
The problem here is that STUN doesn’t work the way we’d like. We’d like to find our ip:port on the ‘middle network’, because it’s effectively playing the role of a miniature Internet to our two peers. But STUN tells us what our ip:port is from the STUN server’s point of view, and the STUN server is out on the Internet, beyond the CGNAT.
If you’re thinking that port mapping protocols can help us here, you’re right! If either peer’s home NAT supports one of the port mapping protocols, we’re happy, because we have an ip:port that behaves like an un-NATed server, and connecting is trivial. Ironically, the fact that double NAT ‘breaks’ the port mapping protocols helps us! Of course, we still can’t count on these protocols helping us out, doubly so because CGNAT ISPs tend to turn them off in the equipment they put in homes in order to avoid software getting confused by the ‘wrong’ results they would get.
But what if we don’t get lucky, and can’t map ports on our NATs? Let’s go back to our STUN-based technique and see what happens. Both peers are behind the same CGNAT, so let’s say that STUN tells us that peer A is 2.2.2.2:1234, and peer B is 2.2.2.2:5678.
The question is, what happens when peer A sends a packet to 2.2.2.2:5678? We might hope that the following takes place in the CGNAT box:
- Apply peer A’s NAT mapping, rewrite the packet to be from 2.2.2.2:1234 and to 2.2.2.2:5678.
- Notice that 2.2.2.2:5678 matches peer B’s incoming NAT mapping, rewrite the packet to be from 2.2.2.2:1234 and to peer B’s private IP.
- Send the packet on to peer B, on the ‘internal’ interface rather than off towards the Internet.
This behaviour of NATs is called ‘hairpinning’, and with all this dramatic build-up you won’t be surprised to learn that hairpinning works on some NATs and not others.
In fact, a great many otherwise well-behaved NAT devices don’t support hairpinning, because they make assumptions like ‘a packet from my internal network to a non-internal IP address will always flow outwards to the Internet’ and end up dropping packets as they try to turn around within the router. These assumptions might even be baked into routing silicon, where it’s impossible to fix without new hardware.
Hairpinning, or lack thereof, is a trait of all NATs, not just CGNATs. In most cases, it doesn’t matter, because you’d expect two LAN devices to talk directly to each other rather than hairpin through their default gateway. And it’s a pity that it usually doesn’t matter, because that’s probably why hairpinning is commonly broken.
But once CGNAT is involved, hairpinning becomes vital to connectivity. Hairpinning lets you apply the same tricks that you use for Internet connectivity, without worrying about whether you’re behind a CGNAT. If both hairpinning and port mapping protocols fail, you’re stuck with relaying.
Ideally IPv6, NAT64 notwithstanding
By this point, I expect some of you are shouting at your screens that the solution to all this nonsense is IPv6. All this is happening because the pool of unallocated IPv4 is depleting, and we keep piling on NATs to work around that. A much simpler fix would be to not have an IP address shortage and make every device in the world reachable without NATs. Which is exactly what IPv6 gets us.
And you’re right! Sort of. It’s true that in an IPv6-only world, all of this becomes much simpler. Not trivial, mind you, because we’re still stuck with stateful firewalls. Your office workstation may have a globally reachable IPv6 address, but I’ll bet there’s still a corporate firewall enforcing ‘outbound connections only’ between you and the greater Internet. And on-device firewalls are still there, enforcing the same thing.
So, we still need the firewall traversal stuff from the start of the series, and a side channel so that peers can know what ip:port to talk to. We’ll probably also still want fallback relays that use a well-liked protocol like HTTP, to get out of networks that block outbound UDP. But we can get rid of STUN, the birthday paradox trick, port mapping protocols, and all the hairpinning stuff. That’s much nicer!
The big catch is that we currently don’t have an all-IPv6 world. We have a world that’s mostly IPv4, and about 33% IPv6. That 33% is very unevenly distributed, so a particular set of peers could be 100% IPv6, 0% IPv6, or anywhere in between.
What this means, unfortunately, is that IPv6 isn’t yet the solution to our problems. For now, it’s just an extra tool in our connectivity toolbox. It’ll work fantastically well with some pairs of peers, and not at all for others. If we’re aiming for ‘connectivity no matter what’, we have to also do IPv4+NAT stuff.
Meanwhile, the coexistence of IPv6 and IPv4 introduces yet another new scenario we have to account for: NAT64 devices.
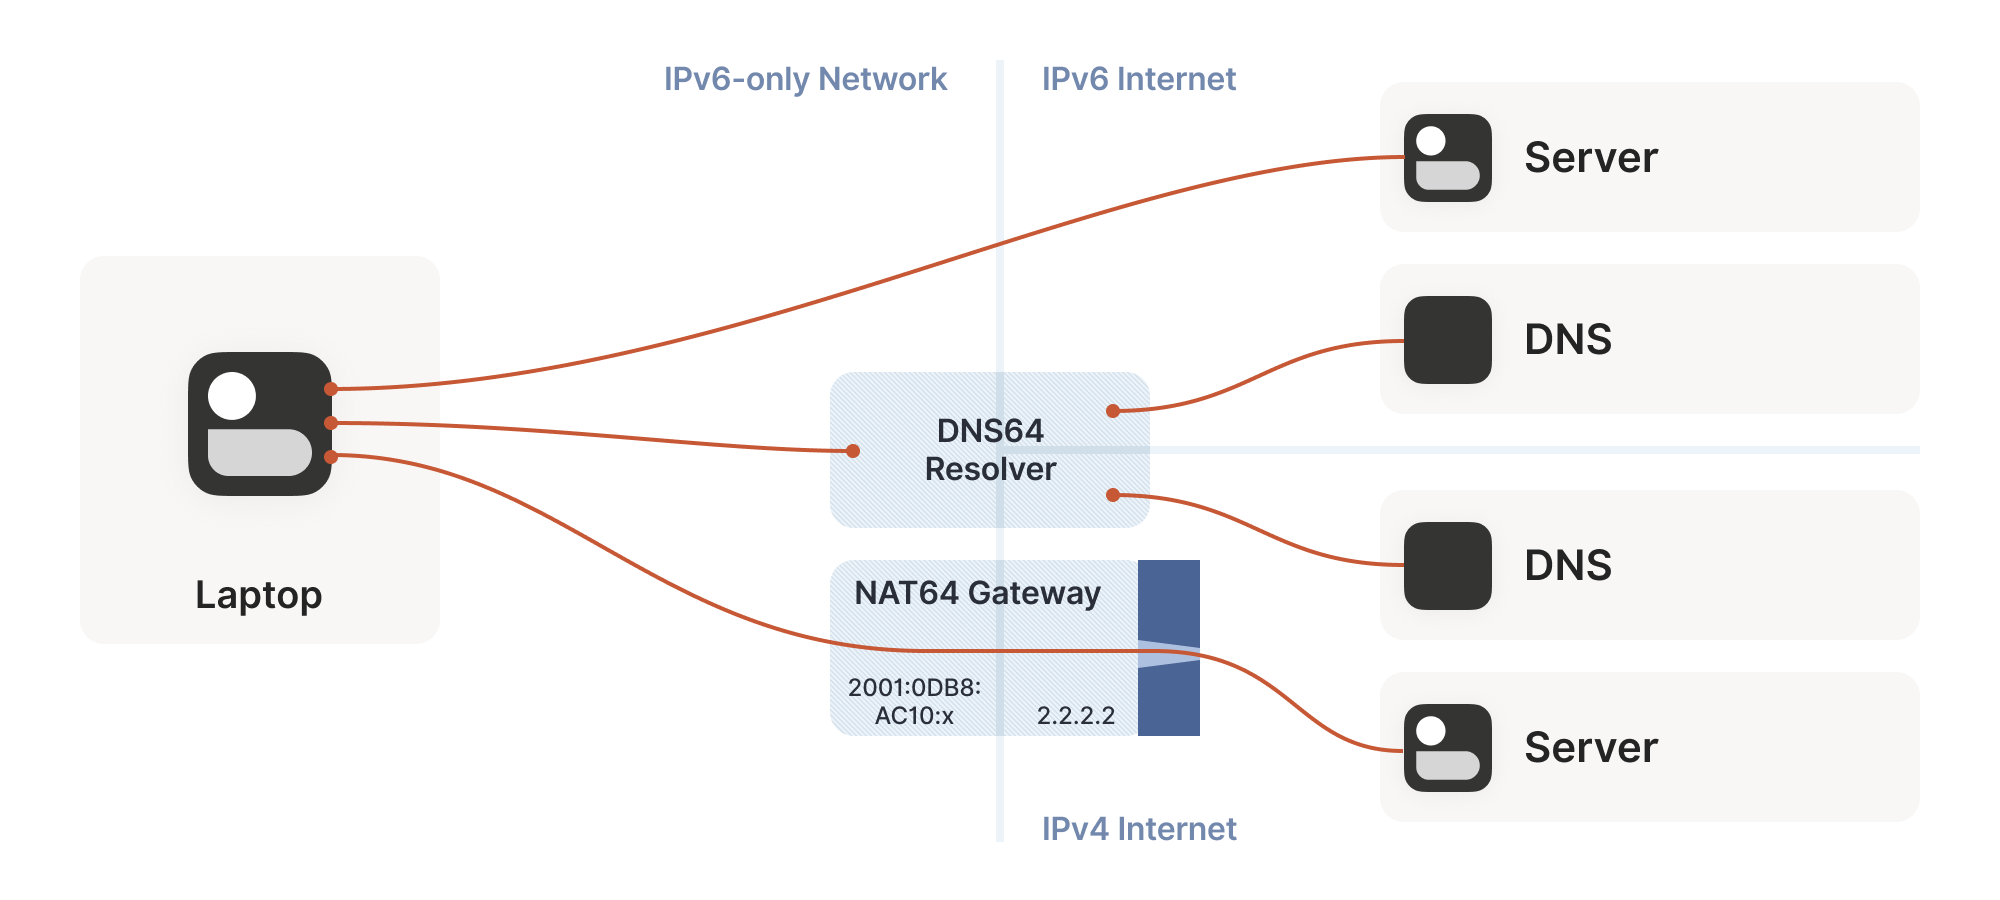
So far, the NATs we’ve looked at have been NAT44. They translate IPv4 addresses on one side to different IPv4 addresses on the other side. NAT64, as you might guess, translates between protocols. IPv6 on the internal side of the NAT becomes IPv4 on the external side. Combined with DNS64 to translate IPv4 DNS answers into IPv6, you can present an IPv6-only network to the end device, while still giving access to the IPv4 Internet.
Incidentally, you can extend this naming scheme indefinitely. There have been some experiments with NAT46; you could deploy NAT66 if you enjoy chaos; and some RFCs use NAT444 for carrier-grade NAT.
This works fine if you only deal in DNS names. If you connect to google.com, turning that into an IP address involves the DNS64 apparatus, which lets the NAT64 get involved without you being any the wiser.
But we care deeply about specific IPs and ports for our NAT and firewall traversal. What about us? If we’re lucky, our device supports Customer-side translator (CLAT — from Customer XLAT). CLAT makes the OS pretend that it has direct IPv4 connectivity, using NAT64 behind the scenes to make it work out. On CLAT devices, we don’t need to do anything special.
CLAT is very common on mobile devices, but very uncommon on desktops, laptops, and servers. On those, we have to explicitly do the work CLAT would have done — detect the existence of a NAT64+DNS64 setup and use it appropriately.
Detecting NAT64+DNS64 is easy. Send a DNS request to ipv4only.arpa. That name resolves to known, constant IPv4 addresses, and only IPv4 addresses. If you get IPv6 addresses back, you know that a DNS64 did some translation to steer you to a NAT64. That lets you figure out what the NAT64 prefix is.
From there, to talk to IPv4 addresses, send IPv6 packets to {NAT64 prefix + IPv4 address}. Similarly, if you receive traffic from {NAT64 prefix + IPv4 address}, that’s IPv4 traffic. Now speak STUN through the NAT64 to discover your public ip:port on the NAT64, and you’re back to the classic NAT traversal problem — albeit with a bit more work.
Fortunately for us, this is a fairly esoteric corner case. Most IPv6-only networks today are mobile operators, and almost all phones support CLAT. ISPs running IPv6-only networks deploy CLAT on the router they give you, and again you end up none the wiser. But if you want to get those last few opportunities for connectivity, you’ll have to explicitly support talking to IPv4-only peers from an IPv6-only network as well.


Integrating it all with ICE
We’re in the home stretch. We’ve covered stateful firewalls, simple and advanced NAT tricks, IPv4 and IPv6. So, implement all the above, and we’re done!
Except, how do you figure out which tricks to use for a particular peer? How do you figure out if this is a simple stateful firewall problem, or if it’s time to bust out the birthday paradox, or if you need to fiddle with NAT64 by hand? Or maybe the two of you are on the same Wi-Fi network, with no firewalls and no effort required.
Early research into NAT traversal had you precisely characterize the path between you and your peer and deploy a specific set of workarounds to defeat that exact path. But as it turned out, network engineers and NAT box programmers have many inventive ideas, and that stops scaling very quickly. We need something that involves a bit less thinking on our part.
Enter the Interactive Connectivity Establishment (ICE) protocol. Like STUN and TURN, ICE has its roots in the telephony world, and so the RFC is full of SIP and SDP and signalling sessions and dialling and so forth. However, if you push past that, it also specifies a stunningly elegant algorithm for figuring out the best way to get a connection.
Ready? The algorithm is — try everything at once and pick the best thing that works. That’s it. Isn’t that amazing?
Let’s look at this algorithm in a bit more detail. We’re going to deviate from the ICE spec here and there, so if you’re trying to implement an interoperable ICE client, you should go read RFC 8445 and implement that. We’ll skip all the telephony-oriented stuff to focus on the core logic and suggest a few places where you have more degrees of freedom than the ICE spec suggests.
To communicate with a peer, we start by gathering a list of candidate endpoints for our local socket. A candidate is any ip:port that our peer might, perhaps, be able to use in order to speak to us. We don’t need to be picky at this stage, the list should include at least:
- IPv6 ip:ports
- IPv4 LAN ip:ports
- IPv4 WAN ip:ports discovered by STUN (possibly via a NAT64 translator)
- IPv4 WAN ip:port allocated by a port mapping protocol
- Operator-provided endpoints (for example, for statically configured port forwards)
Then, we swap candidate lists with our peer through the side channel and start sending probe packets at each other’s endpoints. Again, at this point you don’t discriminate; if the peer provided you with 15 endpoints, you send ‘are you there?’ probes to all 15 of them.
These packets are pulling double duty. Their first function is to act as the packets that open the firewalls and pierce the NATs, like we’ve been doing for this entire series. But the other is to act as a health check. We’re exchanging (hopefully authenticated) ‘ping’ and ‘pong’ packets, to check if a particular path works end to end.
Finally, after some time has passed, we pick the ‘best’ (according to some heuristic) candidate path that was observed to work, and we’re done.
The beauty of this algorithm is that if your heuristic is right, you’ll always get an optimal answer. ICE has you score your candidates ahead of time (usually: LAN > WAN > WAN+NAT), but it doesn’t have to be that way. Starting with v0.100.0, Tailscale switched from a hardcoded preference order to round-trip latency, which tends to result in the same LAN > WAN > WAN+NAT ordering. But unlike static ordering, we discover which ‘category’ a path falls into organically, rather than having to guess ahead of time.
The ICE spec structures the protocol as a ‘probe phase’ followed by an ‘okay let’s communicate’ phase, but there’s no reason you need to strictly order them. In Tailscale, we upgrade connections on the fly as we discover better paths, and all connections start out with DERP preselected. That means you can use the connection immediately through the fallback path, while path discovery runs in parallel. Usually, after a few seconds, we’ll have found a better path, and your connection transparently upgrades to it.
One thing to be wary of is asymmetric paths. ICE goes to some effort to ensure that both peers have picked the same network path, so that there’s definite bidirectional packet flow to keep all the NATs and firewalls open. You don’t have to go to the same effort, but you do have to ensure that there’s bidirectional traffic along all paths you’re using. That can be as simple as continuing to send ping/pong probes periodically.
To be really robust, you also need to detect that your currently selected path has failed (say, because maintenance caused your NAT’s state to get dumped on the floor), and downgrade to another path. You can do this by continuing to probe all possible paths and keep a set of ‘warm’ fallbacks ready to go, but downgrades are rare enough that it’s probably more efficient to fall all the way back to your relay of last resort, then restart path discovery.
Finally, we should mention security. Throughout this series, I’ve assumed that the ‘upper layer’ protocol you’ll be running over this connection brings its own security (QUIC has TLS certs, WireGuard has its own public keys, and so on). If that’s not the case, you absolutely need to bring your own. Once you’re dynamically switching paths at runtime, IP-based security becomes meaningless (not that it was worth much in the first place), and you must have at least end-to-end authentication.
If you have security for your upper layer, strictly speaking it’s okay if your ping/pong probes are spoofable. The worst that can happen is that an attacker can persuade you to relay your traffic through them. In the presence of end-to-end encryption (e2e) security, that’s not a huge deal (although obviously it depends on your threat model). But for good measure, you might as well authenticate and encrypt the path discovery packets as well. Consult your local application security engineer for how to do that safely.
Concluding our connectivity chat
At last, we’re done. If you implement everything in this series, you’ll have state of the art NAT traversal software that can get direct connections established in the widest possible array of situations. And you’ll have your relay network to pick up the slack when traversal fails, as it likely will for a long tail of cases.
This is all quite complicated! It’s one of those problems that’s fun to explore, but quite fiddly to get right, especially if you start chasing the long tail of opportunities for just that little bit more connectivity.
The good news is that, once you’ve done it, you have something of a superpower. You get to explore the exciting and relatively under-explored world of peer-to-peer applications. So many interesting ideas for decentralized software fall at the first hurdle, when it turns out that talking to each other on the Internet is harder than expected. But now you know how to get past that, go build cool stuff!
Here’s a parting TL;DR recap: For robust NAT traversal, you need the following ingredients:
- A UDP-based protocol to augment.
- Direct access to a socket in your program.
- A communication side channel with your peers.
- A couple of STUN servers.
- A network of fallback relays (optional, but highly recommended).
Then, you need to:
- Enumerate all the ip:ports for your socket on your directly connected interfaces.
- Query STUN servers to discover WAN ip:ports and the ‘difficulty’ of your NAT, if any.
- Try using the port mapping protocols to find more WAN ip:ports.
- Check for NAT64 and discover a WAN ip:port through that as well, if applicable.
- Exchange all those ip:ports with your peer through your side channel, along with some cryptographic keys to secure everything.
- Begin communicating with your peer through fallback relays (optional, for quick connection establishment).
- Probe all of your peer’s ip:ports for connectivity and if necessary/desired; also execute birthday attacks to get through harder NATs.
- As you discover connectivity paths that are better than the one you’re currently using, transparently upgrade away from the previous paths.
- If the active path stops working, downgrade as needed to maintain connectivity.
- Make sure everything is encrypted and authenticated end-to-end.
This post is adapted from the original at Tailscale Blog.
David Anderson is a software engineer at Tailscale, interested in distributed systems and cluster management, electronics, and writing write open-source software.
The views expressed by the authors of this blog are their own and do not necessarily reflect the views of APNIC. Please note a Code of Conduct applies to this blog.
Great articles. One correction is in the sentence “Both peers are behind the same CGNAT, so let’s say that STUN tells us that peer A is 2.2.2.2:1234, and peer B is 2.2.2.2:5678.” STUN would report both those peer IP as 5.5.5.5 with who knows what ports.
In the next paragraph, “when peer A sends a packet to 2.2.2.2:5678” ought to use IP 2.2.2.3:5678 or 3.3.3.3:5678 for peer B, since you changed B’s IP between the figure 1 and 2.