

We at Tailscale covered a lot of ground in a post about how our VPN works. However, we glossed over how to get through Network Address Translators (NATs) and connect your devices directly to each other, no matter what’s standing between them. Let’s talk about that in this four-part series.
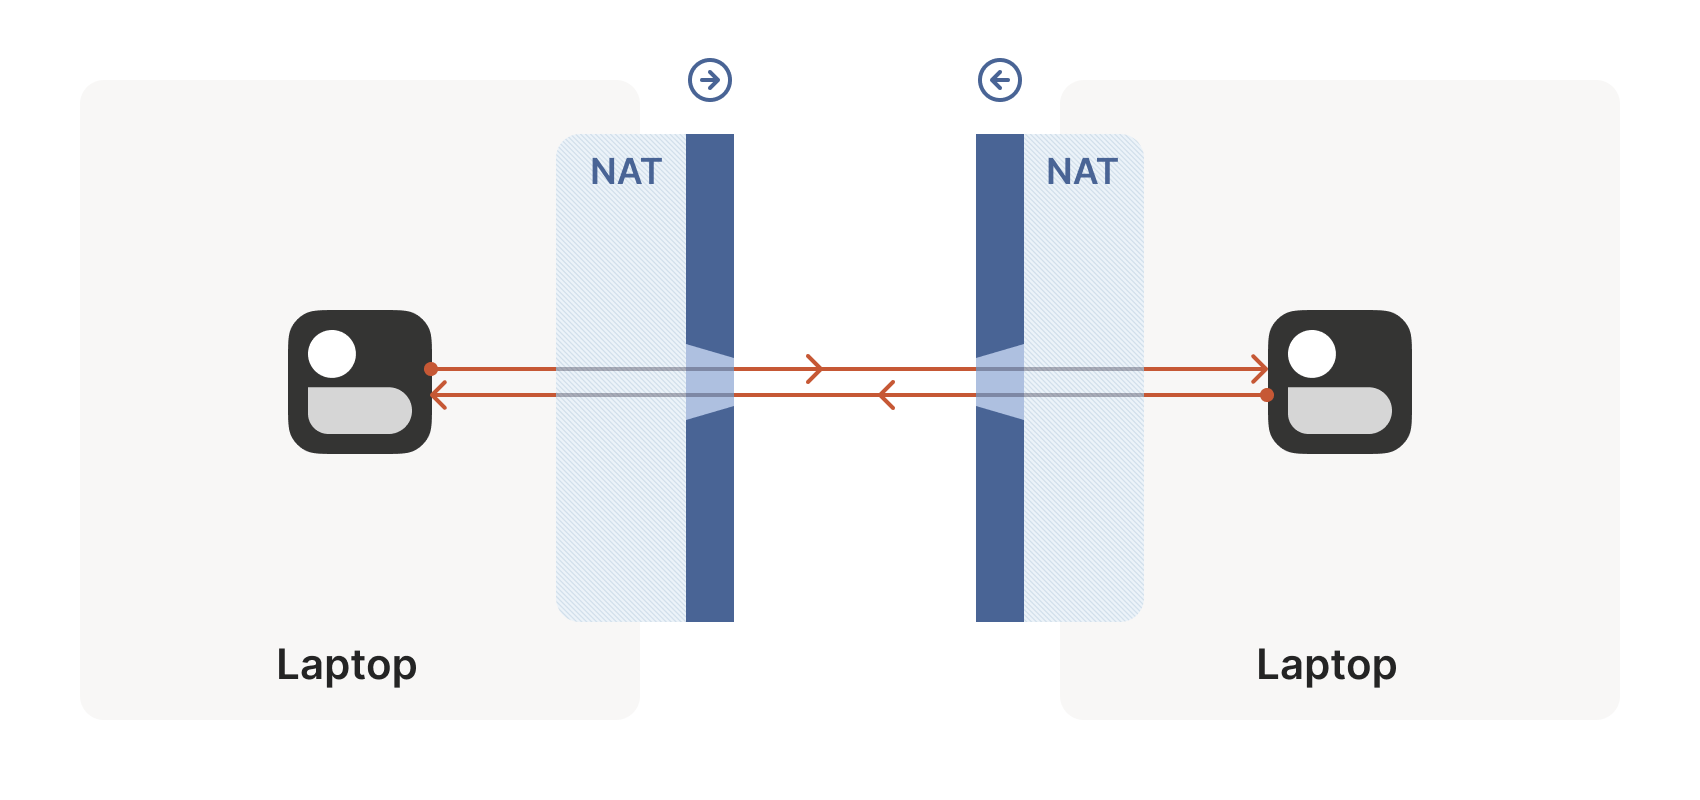
Let’s start with a simple problem: Establishing a peer-to-peer connection between two machines, as shown in Figure 1. In Tailscale’s case, we want to set up a WireGuard® tunnel, but that doesn’t really matter. The techniques we use are widely applicable and the work of many people over decades. For example, WebRTC uses this bag of tricks to send peer-to-peer audio, video, and data between web browsers. VoIP phones and some video games use similar techniques, though not always successfully.
We’ll be discussing these techniques generically, using Tailscale and others for examples where appropriate. Let’s say you’re making your own protocol and that you want NAT traversal. You need two things.
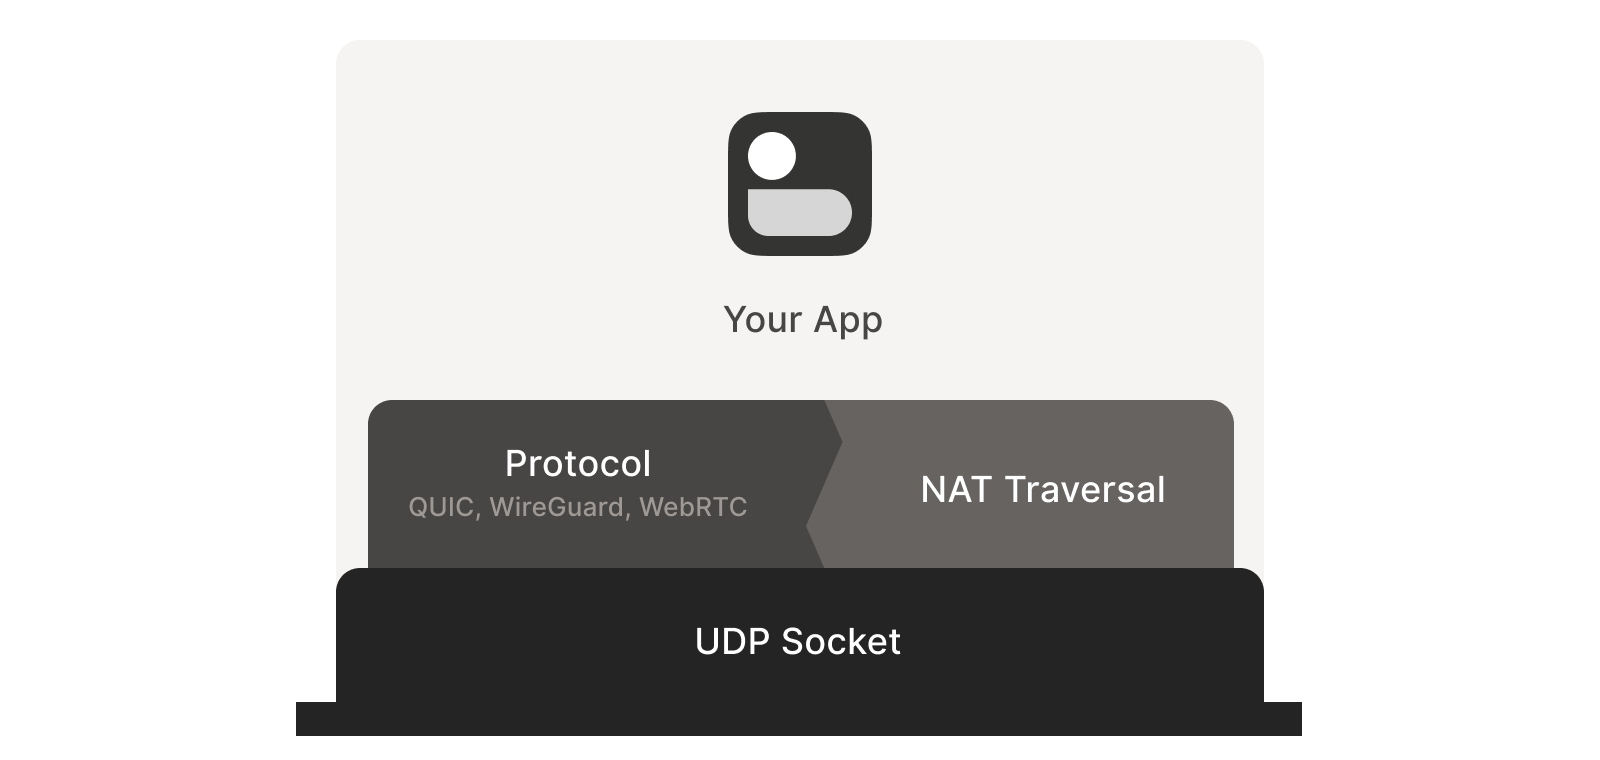
First, the protocol should be based on UDP. You can do NAT traversal with TCP, but it adds another layer of complexity to an already quite complex problem and may even require kernel customizations depending on how deep you want to go. We’re going to focus on UDP for the rest of this series.
If you’re reaching for TCP because you want a stream-oriented connection when the NAT traversal is done, consider using QUIC instead. It builds on top of UDP, so we can focus on UDP for NAT traversal and still have a nice stream protocol at the end.
Second, you need direct control over the network socket that’s sending and receiving network packets. As a rule, you can’t take an existing network library and make it traverse NATs, because you have to send and receive extra packets that aren’t part of the ‘main’ protocol you’re trying to speak. Some protocols tightly integrate the NAT traversal with the rest (such as WebRTC). But if you’re building your own, it’s helpful to think of NAT traversal as a separate entity that shares a socket with your main protocol. Both run in parallel, one enabling the other.
Direct socket access may be tough depending on your situation. One workaround is to run a local proxy. Your protocol speaks to this proxy, and the proxy does both NAT traversal and relaying of your packets to the peer. This layer of indirection lets you benefit from NAT traversal without altering your original program.
With prerequisites out of the way, let’s go through NAT traversal from first principles. Our goal is to get UDP packets flowing bidirectionally between two devices, so that our other protocol (WireGuard, QUIC, WebRTC, and similar) can do something cool. There are two obstacles to having this just work: Stateful firewalls and NAT devices.
Figuring out firewalls
Stateful firewalls are the simpler of our two problems. In fact, most NAT devices include a stateful firewall, so we need to solve this subset before we can tackle NATs.
There are many incarnations to consider. Some you might recognize are the Windows Defender firewall, Ubuntu’s ufw (using iptables/nftables), BSD’s pf (also used by macOS) and AWS’s Security Groups. They’re all very configurable, but the most common configuration allows all ‘outbound’ connections and blocks all ‘inbound’ connections. There might be a few handpicked exceptions, such as allowing inbound SSH.
But connections and ‘direction’ are a figment of the protocol designer’s imagination. On the wire, every connection ends up being bidirectional; it’s all individual packets flying back and forth. How does the firewall know what’s inbound and what’s outbound?
That’s where the stateful part comes in. Stateful firewalls remember what packets they’ve seen in the past and can use that knowledge when deciding what to do with new packets that show up.

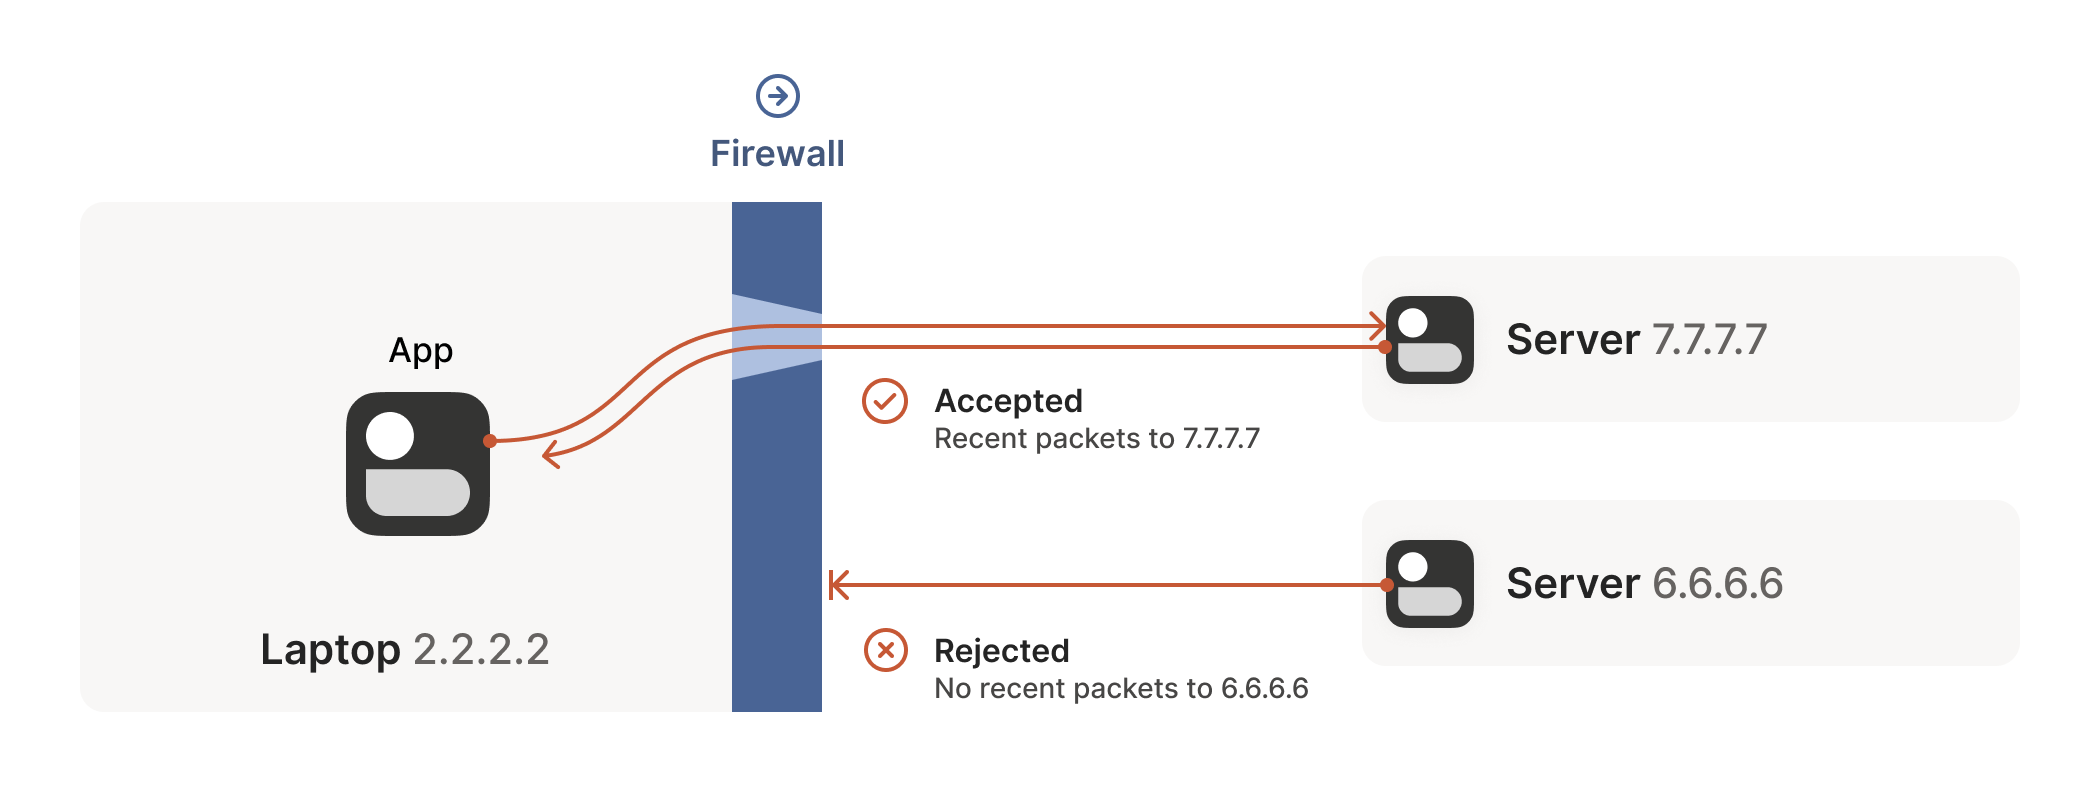
For UDP, the rule is very simple: The firewall allows an inbound UDP packet if it previously saw a matching outbound packet. For example, if our laptop firewall sees a UDP packet leaving the laptop from 2.2.2.2:1234 to 7.7.7.7:5678, it’ll make a note that incoming packets from 7.7.7.7:5678 to 2.2.2.2:1234 are also fine. The trusted side of the world clearly intended to communicate with 7.7.7.7:5678, so we should let them talk back.
As an aside, some very relaxed firewalls might allow traffic from anywhere back to 2.2.2.2:1234 once 2.2.2.2:1234 has communicated with anyone. Such firewalls make our traversal job easier but are increasingly rare.
Firewall face-off
This rule for UDP traffic is only a minor problem for us, as long as all the firewalls on the path are ‘facing’ the same way. That’s usually the case when you’re communicating with a server on the Internet. Our only constraint is that the machine behind the firewall must be the one initiating all connections. Nothing can talk to it, unless it talks first.
This is fine, but not very interesting — we’ve reinvented client/server communication, where the server makes itself easily reachable to clients. In the VPN world, this leads to a hub-and-spoke topology.

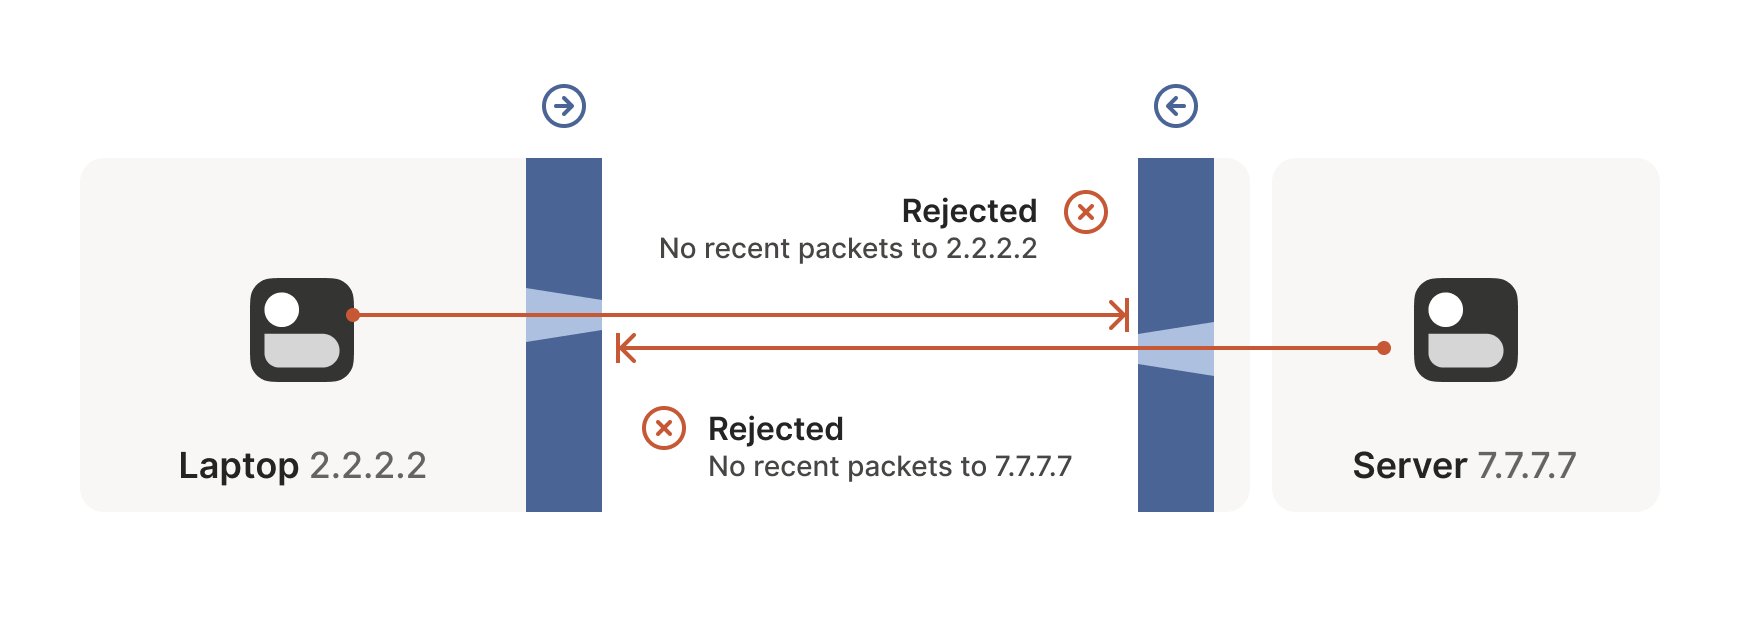
The problems start when two of our ‘clients’ want to talk directly. Now the firewalls are facing each other. According to the rule we established above, this means both sides must go first, but also that neither can go first, because the other side has to go first!
How do we get around this? One way would be to require users to reconfigure one or both firewalls to ‘open a port’ and allow the other machine’s traffic. This is not very user friendly. It also doesn’t scale to mesh networks like Tailscale, in which we expect the peers to be moving around the Internet with some regularity. And, of course, in many cases you don’t have control over the firewalls; you can’t reconfigure the router in your favourite coffee shop, or at the airport (at least, hopefully not!).
We need another option — one that doesn’t involve reconfiguring firewalls.
Finessing finicky firewalls
The trick is to carefully read the rule we established for our stateful firewalls. For UDP, the rule is: Packets must flow out before packets can flow back in.
However, nothing says the packets must be related to each other beyond the IPs and ports lining up correctly. As long as some packet flowed outwards with the right source and destination, any packet that looks like a response will be allowed back in, even if the other side never received your packet!
So, to traverse these multiple stateful firewalls, we need to share some information to get underway — the peers have to know in advance the ip:port their counterpart is using. One approach is to statically configure each peer by hand, but this approach doesn’t scale very far. To move beyond that, we built a coordination server to keep the ip:port information synchronized in a flexible, secure manner.
Then, the peers start sending UDP packets to each other. They must expect some of these packets to get lost, so they can’t carry any precious information unless you’re prepared to retransmit them. This is generally true of UDP, but especially true here. We’re going to lose some packets in this process.
Our laptop and workstation are now listening on fixed ports, so that they both know exactly what ip:port to talk to. Let’s take a look at what happens.
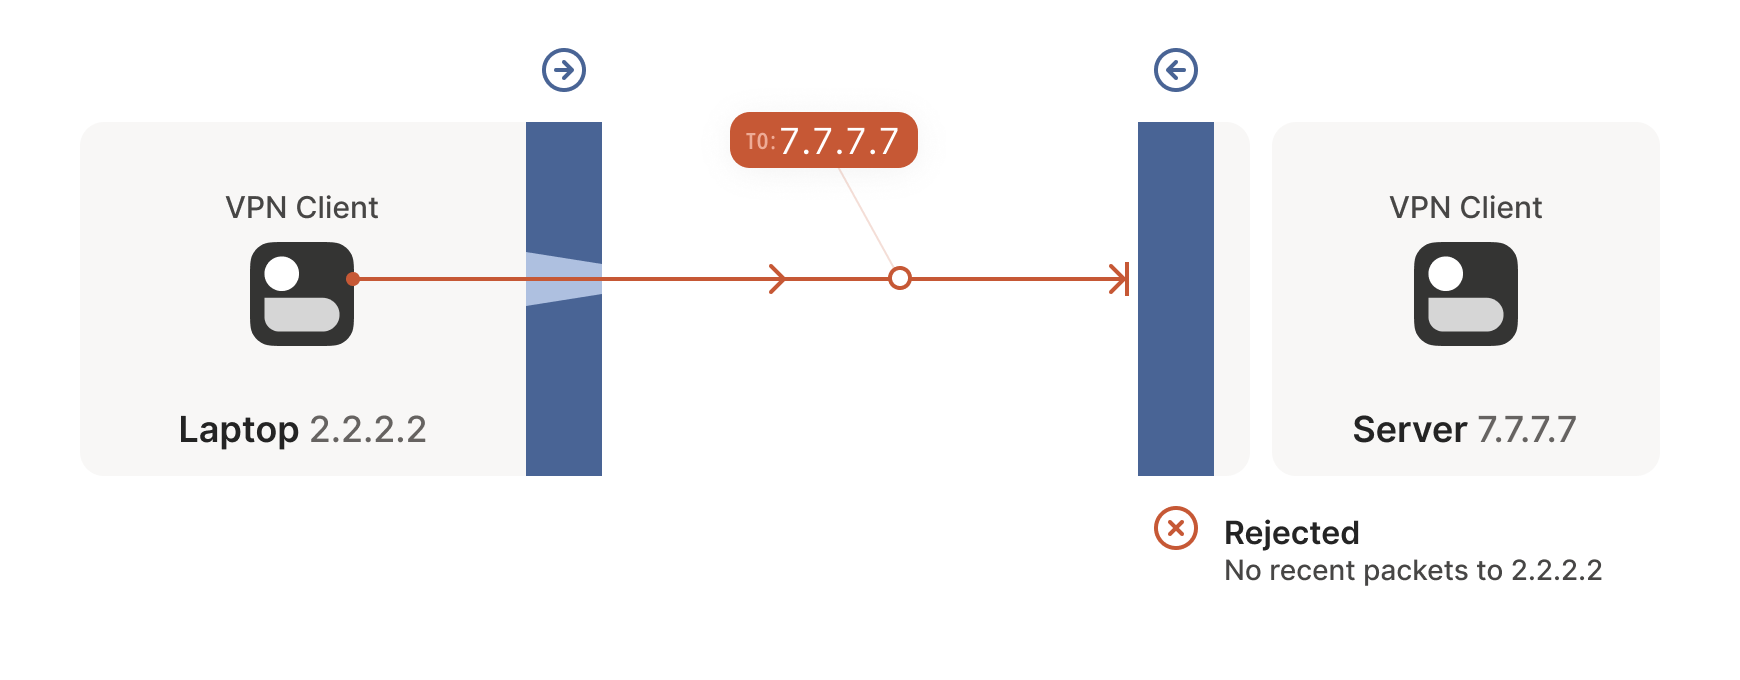
The laptop’s first packet, from 2.2.2.2:1234 to 7.7.7.7:5678, goes through the Windows Defender firewall and out to the Internet. The corporate firewall on the other end blocks the packet since it has no record of 7.7.7.7:5678 ever talking to 2.2.2.2:1234. However, Windows Defender now remembers that it should expect and allow responses from 7.7.7.7:5678 to 2.2.2.2:1234.

Next, the workstation’s first packet from 7.7.7.7:5678 to 2.2.2.2:1234 goes through the corporate firewall and across the Internet. When it arrives at the laptop, Windows Defender thinks ‘ah, a response to that outbound request I saw’, and lets the packet through! Additionally, the corporate firewall now remembers that it should expect responses from 2.2.2.2:1234 to 7.7.7.7:5678, and that those packets are also okay.
Encouraged by the receipt of a packet from the workstation, the laptop sends another packet back. It goes through the Windows Defender firewall, through the corporate firewall (because it’s a ‘response’ to a previously sent packet) and arrives at the workstation.
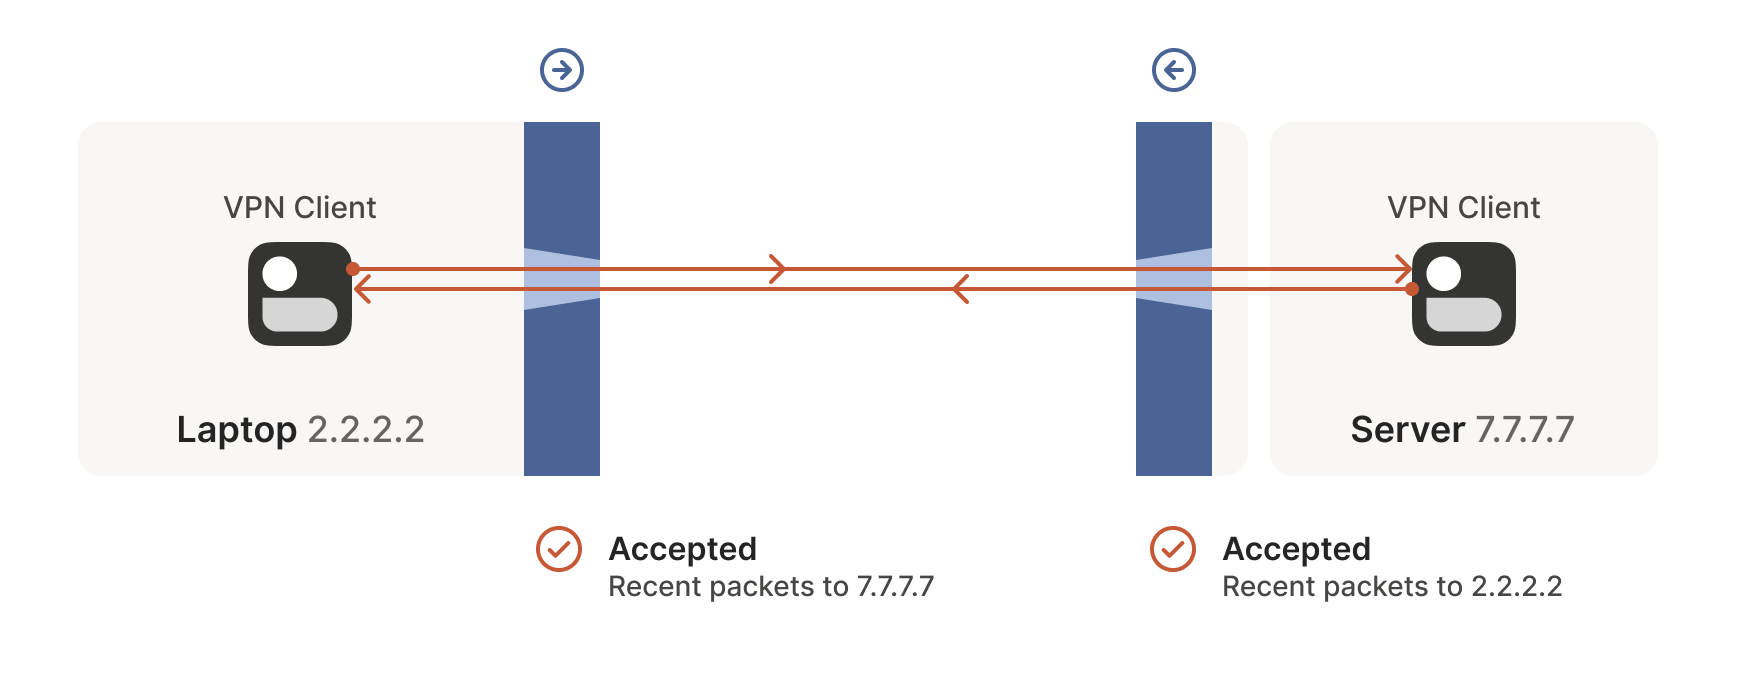
Success! We’ve established two-way communication through a pair of firewalls that, at first glance, would have prevented it.
Creative connectivity caveats
It’s not always so easy. We’re relying on some indirect influence over third-party systems, which requires careful handling. What do we need to keep in mind when managing firewall-traversing connections?
Both endpoints must attempt communication at roughly the same time, so that all the intermediate firewalls open up while both peers are still around. One approach is to have the peers retry continuously, but this is wasteful. Wouldn’t it be better if both peers knew to start establishing a connection at the same time?
This may sound a little recursive; to communicate, first you need to be able to communicate. However, this preexisting ‘side channel’ doesn’t need to be very fancy — it can have a few seconds of latency, and only needs to deliver a few thousand bytes in total, so a tiny VM can easily be a matchmaker for thousands of machines.
In the distant past, I used XMPP chat messages as the side channel, with great results. As another example, WebRTC requires you to come up with your own ‘signalling channel’ (a name that reveals WebRTC’s IP telephony ancestry), and plug it into the WebRTC APIs. In Tailscale, our coordination server and fleet of DERP (Detour Encrypted Routing Protocol) servers act as our side channel.
Stateful firewalls have limited memory, meaning that we need periodic communication to keep connections alive. If no packets are seen for a while (a common value for UDP is 30 seconds), the firewall forgets about the session, and we have to start over. To avoid this, we use a timer and must either send packets regularly to reset the timers, or have some out-of-band way of restarting the connection on demand.
On the plus side, one thing we don’t need to worry about is exactly how many firewalls exist between our two peers. As long as they are stateful and allow outbound connections, the simultaneous transmission technique will get through any number of layers. That’s really nice, because it means we get to implement the logic once, and it’ll work everywhere.
…Right?
Well, not quite. For this to work, our peers need to know in advance what ip:port to use for their counterparts. This is where NATs come into play, and ruin our fun.
In the next post in this series, I’ll look more closely at how NAT traversal works.
David Anderson is a software engineer at Tailscale, interested in distributed systems and cluster management, electronics, and writing write open-source software.
This post is adapted from the original at Tailscale Blog.
The views expressed by the authors of this blog are their own and do not necessarily reflect the views of APNIC. Please note a Code of Conduct applies to this blog.
Good in live