

Note: Content in this post is out of date. Please refer to the following updated post.
This article is the second in a series of ‘how to’ posts on RPKI Route Origin Validation (ROV). In the last post we looked at creating Route Origin Authorizations (ROAs), and in this post we will look at installing the relying party software (or RPKI validator) required to validate ROAs.
This article will show you how to install Routinator, RIPE, OctoRPKI and FORT validators on an Ubuntu Linux system(16.04).
The choice of which validator to use is yours, but please make sure you run at least two validators, not just for redundancy, but also because the validation states change to NOT FOUND for all routes when RPKI-enabled routers lose connection with the validators.
Preparations
Before starting to install the validator of your choice, ensure your packages are up to date.
sudo apt update && sudo apt upgrade
It should also be noted that that by downloading ARIN’s Trust Anchor Locator (TAL) in any of the below steps, you agree to be bound by ARIN’s Relying Party Agreement (RPA).
1. Routinator
Note that on our system, the curl, wget, gcc and rsync packages have been preinstalled.
Since Routinator is written in rust, we will need to install rust using rustup, (which is a rust installer and version management tool) from the official release channels. Run the following curl command, which will fetch a script to download rustup and install rust.
curl https://sh.rustup.rs -sSf | sh

# -f: fail silently (HTTP)
# -sS: show errors if it fails
Now follow the on-screen instructions to install rust.
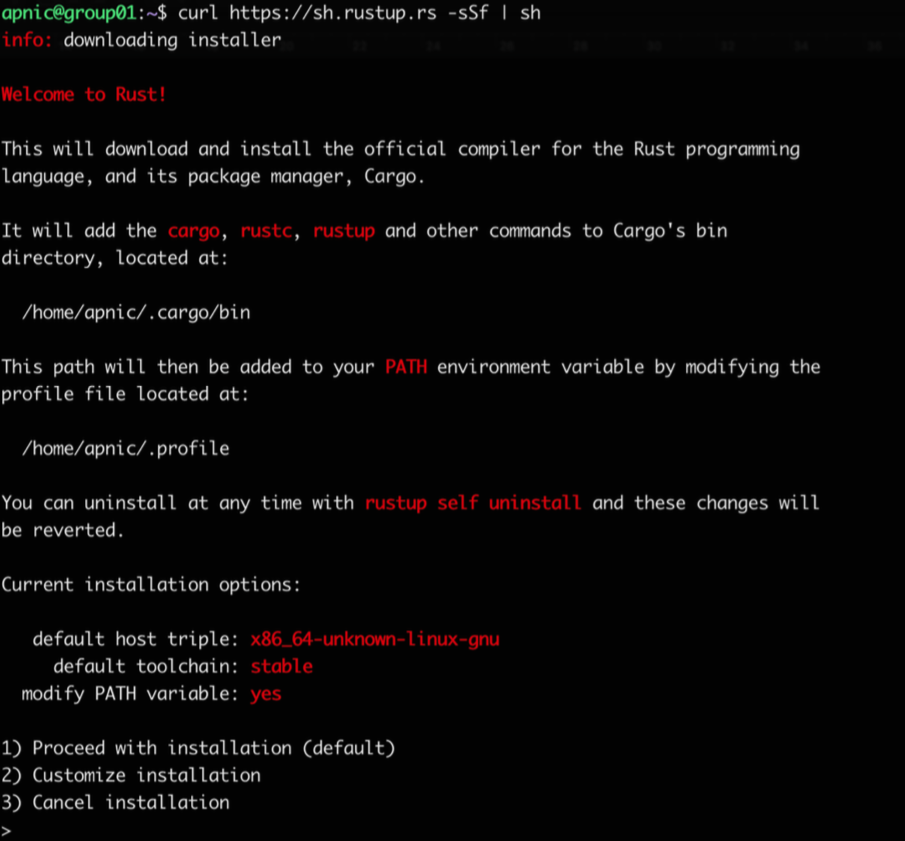
Make sure to set the PATH environment variable as shown in the on-screen instruction.
source $HOME/.cargo/env
Installing Routinator
Before installing Routinator, ensure the gcc toolchain is installed.
gcc --version

Now we will use cargo (the rust package manager) to install Routinator.
cargo install routinator
Running Routinator
Before running Routinator for the first time, we must prepare its working environment (the directory for the RPKI cache as well as the TAL.
routinator init
Since this is the first time we are using Routinator, it will complain that ARIN’s TAL is missing. If you agree to ARIN’s Relying Party Agreement, reissue the command with the --accept-arin-rpa option as shown below.
routinator init --accept-arin-rpa
This will create the rpki cache repository directory as well as a download of the TALs (from the five RIRs) and save it in the relevant directory.

Now it’s time for a test run. Use the following command to pull and list the validated ROA payloads, which produces a list of ASNs and prefixes. Since it will rsync the whole RPKI repo to the local machine (/home/apnic/.rpki-cache/repository/), it will take a while, so don’t worry.
routinator -v vrps
Now you should have all the ROAs from the global RPKI repository on your local validator as a validated cache — ready to to feed to BGP-speaking routers through the RTR protocol.
Setting up an RTR session — validator side
Routinator can act as an RTR server to allow RPKI-enabled routers to connect to it and fetch the validated cache (ROA cache).
IANA has specified a standard port 323 for the RTR, which would require running Routinator as a root. To run Routinator as an RTR server listening on 192.168.30.10 and port 3323, run the following command:
routinator server --rtr 192.168.30.10:3323 --refresh=900
If you don’t specify the refresh time, by default the local repository will be updated and revalidated every one hour (as per RFC 8210). The example above uses a 15-minute (900 seconds) refresh time.
Note: If you have an IPv6 address configured, you can listen on both IPv4 and IPv6 with the following command.
routinator server --rtr 192.168.30.10:3323 --rtr [2001:0DB8::X]:3323 --refresh=900
2. RIPE RPKI Validator
***Please note, the RIPE NCC has ceased maintenance support for RPKI Validator as of 1 July 2021.***
Firstly, we need to install some dependencies required by RPKI Validator: OpenJDK (8 or higher) and rsync. In this example, we’ll go with headless OpenJDK 9.
sudo apt install -y openjdk-9-jre-headless rsync
Now verify the Java version.
java -version

Installing RPKI Validator
Download the latest version of RPKI Validator, then extract it to a desired location.
wget https://ftp.ripe.net/tools/rpki/validator3/prod/generic/rpki-validator-3-latest-dist.tar.gz

mkdir rpki-validator-3

tar xf rpki-validator-3-latest-dist.tar.gz -C rpki-validator-3 --strip-components 1

cd rpki-validator-3
The validator comes with the TALs for each RIR (found in the preconfigured-tals directory) except ARIN. To add ARIN’s TAL, you can download it from here (now removed) and move it to the preconfigured-tals directory as shown below.
wget https://www.arin.net/resources/manage/rpki/arin-ripevalidator.tal

mv arin-ripevalidator.tal preconfigured-tals/
Now you have TALs from each RIR. View them by running:
ls preconfigured-tals/
Running RPKI Validator
Now you are ready to run the validator. Start it with the following command:
sudo nohup ./rpki-validator-3.sh > out 2> err &
Use the following command to retrieve the validated ROA payloads and produce a list of ASNs and prefixes. If this command produces no output, then the validator is still working through the initial synchronization process, which generally takes a few minutes. By default, the server will resynchronize its state every 10 minutes.
curl -H "Accept: text/csv" localhost:8080/api/export.csv
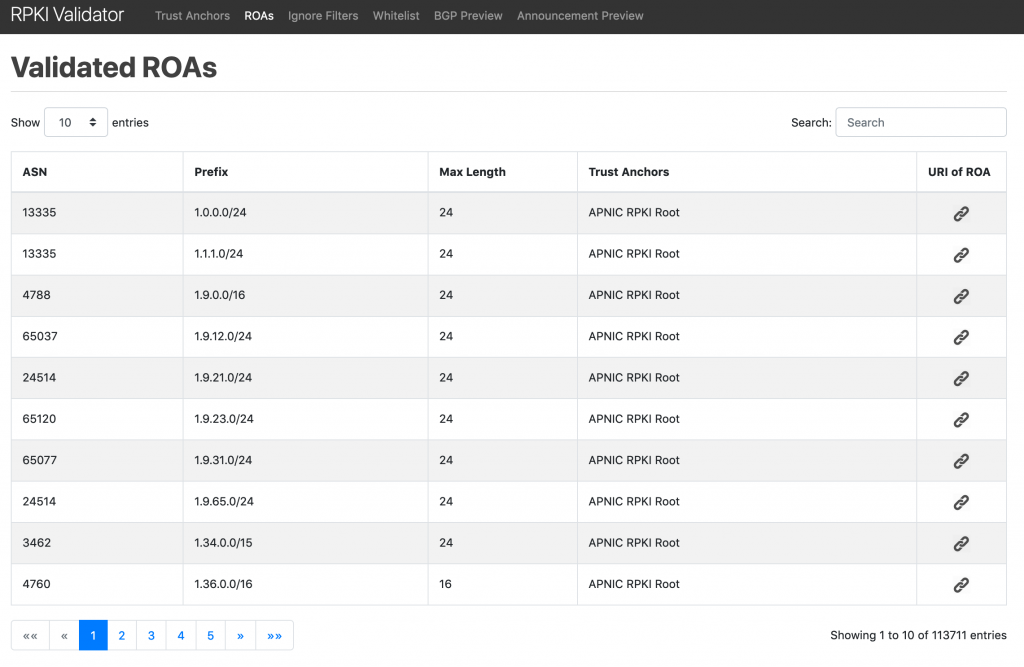
You can also access it through the web interface.
http://<validator-name/validator-address>:8080/roas
Now the validator is ready to feed the validated cache to an RPKI-RTR server, which in turn handles requests from BGP-speaking routers through the RTR protocol.
Setting up an RTR session — validator side
The RPKI-RTR server component of the RIPE validator allows RPKI-enabled routers to connect to it and fetch the validated cache (ROA cache). By default, the server listens for RPKI-RTR requests on port 8323.
Firstly, download and extract the RPKI-RTR server.
wget https://ftp.ripe.net/tools/rpki/validator3/prod/generic/rpki-rtr-server-latest-dist.tar.gz

mkdir rpki-rtr-server

tar xf rpki-rtr-server-latest-dist.tar.gz -C rpki-rtr-server --strip-components 1

cd rpki-rtr-server
Set the address for the RPKI-RTR server by editing the conf/application.properties file. For example set:
rtr.server.address=::
to listen on all interfaces.
Now you’re ready to run the RPKI-RTR server.
nohup ./rpki-rtr-server.sh > out 2> err &
3. OctoRPKI
Installing OctoRPKI
Start by downloading the OctoRPKI validator, then install it.
wget https://github.com/cloudflare/cfrpki/releases/download/v1.1.4/octorpki_1.1.4_amd64.deb

dpkg -i octorpki_1.1.4_amd64.deb
Download the standard TALs for each RIR from the repository.
mkdir tals
cd tals

wget https://raw.githubusercontent.com/cloudflare/cfrpki/master/cmd/octorpki/tals/afrinic.tal

wget https://raw.githubusercontent.com/cloudflare/cfrpki/master/cmd/octorpki/tals/apnic.tal

wget https://raw.githubusercontent.com/cloudflare/cfrpki/master/cmd/octorpki/tals/lacnic.tal

wget https://raw.githubusercontent.com/cloudflare/cfrpki/master/cmd/octorpki/tals/ripe.tal

wget https://www.arin.net/resources/manage/rpki/arin-rfc7730.tal -O arin.tal

cd ..
Running OctoRPKI
Run the validator by issuing the following command.
nohup octorpki -output.sign=false > out 2> err &
Use the following command to retrieve the validated ROA payloads, producing a list of ASNs and prefixes. If this command produces the string ‘File not ready yet’, then the validator is still working through the initial synchronization process, which generally takes a few minutes. By default, the server will resynchronize its state every 20 minutes.
curl localhost:8080/output.json
You can also access it through the web interface, at <validator-name/validator-address>:8080/output.json
Now the validator is ready to feed the validated cache to an RPKI-RTR server, which in turn handles requests from BGP-speaking routers through the RTR protocol.
RTR session — validator side
GoRTR is Cloudflare’s RPKI-RTR server component, which allows RPKI-enabled routers to connect to it and fetch the validated cache (ROA cache).
Firstly, download and install the GoRTR server.
wget https://github.com/cloudflare/gortr/releases/download/0.11.4/gortr_0.11.4_amd64.deb

dpkg -i gortr_0.11.4_amd64.deb
Now run the server, listening for RPKI-RTR requests on port 8282.
nohup gortr -bind=<server_ip_address>:8282 -metrics.addr=:8081 -verify=false -cache=http://localhost:8080/output.json > out 2> err &
4. FORT
FORT has a few dependencies, so ensure that they are installed.
sudo apt install openssl rsync libjansson-dev -y
Now, verify that the OpenSSL version is 1.1. or greater.
openssl version -a
Now download and install the validator — we will install from the Debian package.
wget https://github.com/NICMx/FORT-validator/releases/downloa/v1.1.1/fort_1.1.1-1_amd64.deb

sudo apt install ./fort_1.1.1-1_amd64.deb
Note that there are other install options listed in the vendor documentation
the debian package comes with a systemd service, which allows us to run it as a daemon.
The next step is to edit the configuration file , /etc/fort/config.json to define the server address and port number
{
     "tal": "/etc/fort/tal",
     "server": {
         "address": "192.168.30.X",
         "port": "8323",
         "interval": {
             "validation": 900,
             "refresh": 900,
             "retry": 600,
             "expire": 7200
         }
     },
     "output": {
         "roa": "/tmp/fort/roas.csv"
     }
 }
The parameters in this file are defined as follows:
- validation: Time (in seconds) the validator should wait after updating and validating the ROA cache before updating again from the global repository.
- refresh: Time (in seconds) the RTR client (router) has to wait before trying to poll the validator cache. The RFC8210 default is 3600 seconds.
- retry: Time (in seconds) the RTR client should wait before retrying after a failed refresh of the cache. The RFC8210 default is 600 seconds.
- expire: Time (in seconds) the RTR client can use its validated ROA cache for if cannot refresh the data, after which it should discard. The RFC8210 default is 7200 seconds.
- output: Print validated ROAs to a CSV file.
The FORT validator ships with all RIR TALs except ARIN’s, so again, you need to agree to be bound by ARIN’s RRPA before using it.
Download ARIN’s TAL into the /etc/fort/tal directory.
cd /etc/fort/tal

wget https://www.arin.net/resources/manage/rpki/arin-rfc7730.tal -O arin.tal
Running FORT
To start the validator service, run:
sudo service fort start
FORT will start in server mode, using the parameters defined in /etc/fort/config.json. You can check the status with sudo service fort status.
All logging for FORT will be sent to syslog (/var/log/syslog).
By default, FORT stores a local cache of the repository at /tmp/fort/repository. You can also view the validated ROA cache in /tmp/fort/roas.csv.
Congratulations! You have now installed and configured your validators. Stay tuned for our third and final article in this series on configuring your routers for RPKI.
The views expressed by the authors of this blog are their own and do not necessarily reflect the views of APNIC. Please note a Code of Conduct applies to this blog.
Dear, if we are a multihomed entity with BGP routers and we go to Intetrnet through our ISP, do we have to point our BGP routers to a ROA cache (validator) ??? Or is this a task for our ISP and not ours ??? Thanks a lot.
Hi Alex,
Thanks for the question.
Yes, you would need to have an RTR session between all your eBGP speakers and your validator (to allow you to validate inbound route updates against the ROA cache).
And I would recommend to run your own validator (within your routing domain).
And although there are those who think usptreams/transit networks doing origin validation means there is no need for stub networks to do it, I would strongly argue against it. I would not want to rely on my usptreams/transit providers for BGP security. Example – we should not be seeing any bogons in our BGP table if upstreams did proper filtering!
—
Tashi
Hi Tashi,
Is there a workaround to use RPKI without RTR? We would like to run RPKI filtering on our systems but the routers that we have do not support the RTR protocol.
Cheers,
Simon
Dear,
I am having issue with the installation and would like to seek for advices/idea.
While installing RIPE RPKI Validator at the step to retrieve the validated ROA payloads, I received error “curl: (7) Failed to connect to localhost port 8080: Connection refused”
Any advice about where I should check?
Regards,
Seyma
Hi Seyma.. let us discuss this over unicast
Hi,
I have used UBUNTO and followed the steps all the way
to just before this -curl -H “Accept: text/csv” localhost:8080/api/export.csv .
Need to know purpose of above command and should I
type localhost there?
What does local host mean here?
Also for below command
what is validator name mean and validator address mean here what entries should I put there?
http://:8080/roas
Hi Mahesh.. thanks for the question. Let us discuss this offline (unicast).
—
Tashi
Hello Tashi,
“curl: (7) Failed to connect to localhost port 8080: Connection refused”
I received this kind of error message after executed “””nohup octorpki -output.sign=false > out 2> err & “”” this command. What am I supposed to do?
BRs!
Hi khashkhuder, this post is out of date. Please refer to the following updated post. https://blog.apnic.net/2022/04/06/how-to-installing-an-rpki-validator-2/