

Following my post, Project IPv6-First: A case study in achieving an 80% native IPv6 SOHO network, a reader asked the question I promised to answer: ‘How do you set up Akvorado?’ This is that article.
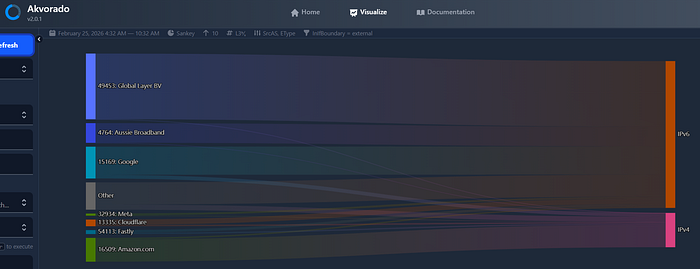
Akvorado is the tool that made the whole IPv6-First project possible. Without it, I would have been flying blind — guessing at which applications were dragging my network’s IPv6 ratio down. With it, I had a real-time, visually compelling Sankey diagram that told me exactly what was going on at every layer: Source Autonomous System Number (ASN), destination ASN, IP version, port, and more.
The good news — the setup is simpler than you might expect, especially at the Small Office/Home Office (SOHO) scale.
What is Akvorado?
Akvorado is an open-source NetFlow/IPFIX collector, enricher, and visualizer. It receives flow data exported from your router, enriches it with ASN and geolocation lookups, stores it in a ClickHouse time-series database, and presents it via a polished web UI.
At the SOHO scale, you do not need an enterprise server to run it. My instance runs on a Blackview NUC housing an AMD Ryzen 5 7430U (6-core, 12-thread) with 32GB RAM and a 1TB SSD. That is comfortably more than required — a modest box with 8GB RAM and a fast SSD would handle a home network without breaking a sweat.
Prerequisites
Before you begin, you need three things in place:
- Docker and Docker Compose installed on your Linux host.
- Simple Network Management Protocol (SNMP) enabled on your NetFlow exporter (your router). Akvorado uses SNMP to resolve interface names and descriptions — without it, you will see interface indices rather than meaningful labels like
WANorether1. - NetFlow v9 (or IPFIX) export configured on your router, pointing at the host running Akvorado.
Step 1: Enable SNMP on your router
Akvorado queries your router via SNMP to map interface indices to human-readable names. For MikroTik routers, enable SNMPv2c with a read-only community string via Winbox, WebFig, or the CLI:
/snmp set enabled=yes
/snmp community add name=public addresses=<akvorado-host-ip>/32 read-access=yes
Replace <akvorado-host-ip> with the IP address of the machine running Akvorado. Restricting access by source address is good practice.
Step 2: Configure NetFlow export on your touter
Configure your router to export NetFlow v9 to the Akvorado host. In the project, only the WAN interface was monitored — the goal was to measure actual Internet traffic, not internal LAN chatter.
In MikroTik (via Winbox), navigate to IP → Traffic Flow:
Traffic Flow Settings — General tab:
- Enabled: ✅
- Interfaces:
WAN - Cache Entries:
4k - Active Flow Timeout:
00:01:00 - Inactive Flow Timeout:
00:00:15 - Packet Sampling: ✅
- Packet Sampling Interval:
50 - Packet Sampling Space:
50
Traffic Flow Settings — Targets tab, add a new target:
- Src. Address: your router’s LAN IP (e.g.
192.168.88.1) - Dst. Address: your Akvorado host IP (e.g.
192.168.88.31) - Port:
2055 - Version:
9
Why sampling? At SOHO line rates, packet sampling captures a statistically representative view of the traffic mix without flooding the collector. For a home connection, you could disable sampling entirely, but leaving it enabled keeps CPU load on the router negligible.
Luckily, Mikrotik is one of the few SOHO router platforms that can do Netflow like this! In future projects, I am looking at using OpenWRT with the same feature, but also using CLAT and NAT64 as part of the experiment.
Step 3: Deploy Akvorado with Docker Compose
Akvorado ships with an official docker-compose quickstart that handles all dependencies — ClickHouse, Kafka (or the embedded alternative), and the Akvorado service itself. Follow the official documentation at akvorado.io to clone the repository and pull the compose file.
The general flow is:
git clone https://github.com/akvorado/akvorado.git
cd akvorado
Review the docker-compose.yml and the default akvorado.yaml configuration file. For a SOHO deployment, the defaults are largely sensible. The key section to edit is the inlet configuration, which tells Akvorado how to receive flows and query your router via SNMP.
A minimal akvorado.yaml snippet for a single MikroTik exporter looks like this:
inlet:
  flow:
    inputs:
      - type: udp
        listen: "0.0.0.0:2055"
        workers: 2
  snmp:
    communities:
      192.168.88.1: "public"
    poller_workers: 1
Once configured, bring the stack up:
docker compose up -d
Docker Compose will pull the images and start all services. The first startup takes a minute or two as ClickHouse initializes its schema.
Step 4: Verify the Flow
Open a browser and navigate to http://<akvorado-host-ip>:8080. You should see the Akvorado web UI. Within a minute or two of your router generating traffic, flows should begin appearing.
In the Visualize section, try a Sankey diagram with:
- Dimensions:
SrcAS,EType(Ethernet type — this is what distinguishes IPv4 from IPv6) - Filter:
InIfBoundary = external
The InIfBoundary = external filter is the key to getting clean results. It tells Akvorado to show only traffic arriving on interfaces it has classified as external (that is, your Wide Area Network (WAN)), filtering out any internal or transit flows.
If you see flows appearing and the Sankey renders, you are done.
Understanding the results
Akvorado enriches every flow with:
- ASN lookup: Who owns the destination IP? (Google, Cloudflare, Amazon, your ISP, and so on.)
- GeoIP: What economy is the traffic destined for?
- EType: Is this IPv4 (
0x800) or IPv6 (0x86DD)? - Interface name: Pulled from your router via SNMP.
This combination is what makes it so powerful for IPv6 analysis. By splitting on EType, you can see at a glance what percentage of your traffic — by volume — is IPv6, and exactly which ASNs are responsible for the IPv4 residual.
In the IPv6-First project, this view immediately revealed that BitTorrent (identified by its destination ASN pattern and port) was the dominant source of IPv4 traffic, despite the network being otherwise well-optimized. One configuration change later, and the whole network’s IPv6 ratio jumped by over 11 percentage points.
Tips and caveats
Monitor only the WAN interface. If you add internal interfaces, you will inflate your flow counts with LAN-to-LAN traffic that has nothing to do with Internet protocol choice. Keep the focus on InIfBoundary = external.
SNMP is required for interface resolution. If interface names appear as numbers rather than labels, double-check your SNMP community string and that the Akvorado host’s IP is permitted in your router’s SNMP ACL.
Note: Akvorado may not even ingest netflow if SNMP is not working; version 2 certainly does throw that error.
ClickHouse storage grows over time. For a SOHO network with sampling enabled, growth is modest — expect a few GB per month. The docker-compose configuration includes retention settings you can tune.
MikroTik and 464XLAT. As discussed in the original post, MikroTik RouterOS does not yet natively support CLAT. If you are looking to push beyond 80%+ IPv6 and achieve a fully IPv6-only internal network, that is the next frontier — please support my feature request submitted to the MikroTik forum.
Terry Sweetser is the Founder and Principal Consultant of The Internet Engineering & Infrastructure Strategic Initiative and is building an advisory, consulting and board portfolio across the Asia Pacific region. His work in the community includes Routing Security, IPv6 Adoption, Fellowships, conference programs and training. He holds a BEng and MBA from QUT in Brisbane, where he has also been a business coach and sessional academic.
Adapted from the original post on Terry’s Medium.
The views expressed by the authors of this blog are their own and do not necessarily reflect the views of APNIC. Please note a Code of Conduct applies to this blog.