

Since its birth, Yara has become a common ground to exchange threat signatures between cybersecurity researchers. It is quintessential for identifying known or related malware, as well as hunting for malware artifacts.
Being independent of any vendor, it is supported by many security products and tools. It’s important to note that when we speak about Yara, we are not only referring to the language itself but also to the default and open-source scanner tool both of which were designed by Victor M. Alvarez.
Yara has well-written documentation and is available free of charge. You can find Yara documentation, source code, and binary releases on the official web page.
Some basic Yara usage was covered in a previous APNIC Blog post and is available through several online tutorials. While, in most cases, Yara is useful as a simple and straightforward pattern detection tool, a more advanced usage of it may bring improved detection for complex scenarios or polymorphic code.
In this series, I will explore real-life examples of such code, generalize it to form an abstract problem, and explore general approaches to solve it, while looking at the pros and cons of possible solutions. The material provided here should be educational for those who are new to Yara but should also be suitable for very experienced Yara users as it uncovers some fundamental issues.
A couple of research problems
Let’s look at a couple of real-life research problems before we generalize the problem definition.
Detecting code evolution
During a recent research project of Lazarus APT, my colleagues and I at Kaspersky came across a dynamic-link library (DLL) file that contains a function with position-independent code, very suitable for process injections. Upon execution, the function simply opens an event object with a hard coded name, gets the current thread and suspends it. This way the malware creates a zombie process, which can later be used to host other malicious injections running in additional threads within the same process.
When the zombie process is no longer needed, the main thread is resumed and the shellcode function immediately calls NtTerminateProcess, which ends the process. The malicious injections hosted in the process can vary depending on the arsenal and objectives of the attackers, but the presence of the DLL inside the address space of a process could serve as a confirmation that the process was compromised and likely part of the attack you are investigating.
So, if you happen to find such a DLL and need to check other systems, including system memory dumps, raw disk images, how do you find all such processes?
Well, one way is to detect the whole function containing the shellcode or some other properties of the DLL (like file hash, or imphash). However, this may not be reliable if the module is replaced on other systems with a modified variant. Also, if you consider using the same signature for future breach detection, you should remember that once the malware component is exposed through a public report, most AV vendors will add detection for it and the attackers will likely notice and change the code, so you need to be prepared for the code evolution in advance. The code can be mixed with unrelated (clean) code or obfuscated in other ways, that is, shuffled on the basic block level.
Let’s have a look at one such example (Figure 1) from a Lazarus DLL (md5: e7aad69ce4de24dc767df2c130e1caf2):
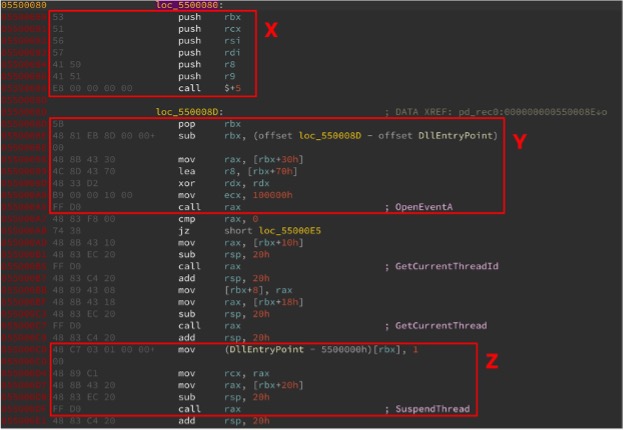
The code inside the DLL is rather short and is likely the only thing that will remain unchanged or similar across different variants of the DLL. I’ve highlighted three basic blocks inside the central function that can be used for detection. We anticipate that the highlighted code blocks can be reordered; a gap between them may be introduced or partially removed. However, the distance between the basic blocks will never be too big — they remain within the same PE file. So, what is the most efficient way to detect such code with Yara?
Detecting shellcodes
Let’s look at another example of the same problem. During our research, we often come across shellcodes that are a part of a weaponized document or used inside a binary executable for process injection.
Shellcodes are normally compiled from assembler code and can be reused in other places, which makes sense as it requires low-level programming knowledge, and it takes time to develop stable and reliable shellcode. It is common for shellcodes to hide the API function names they are using. Instead of using plaintext strings with API function names, shellcodes import functions by the hash of their names. It makes it harder to reverse engineer such shellcode, serves as an obfuscation and detection evasion technique, but also makes code even more compact, especially when the hashes are simple DWORD (4-bytes) values.
Figure 2 shows an example of hard coded API function name hashes in DWORDs found in a Cobaltstrike beacon module, which is very popular among targeted attackers these days.
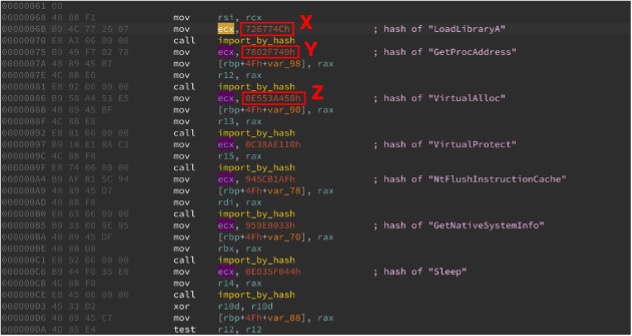
We could detect the presence of several common API hash values here. When they are part of the same shellcode, they must be present within close proximity to one another. To avoid false positives, it makes sense to detect three or more of such DWORD hashes. But how do you detect three patterns and measure the distance between them efficiently?
The problem generalization
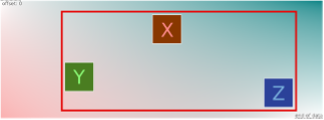
The research problems above break down to the detection of three data patterns, that is, X, Y, Z. Their order and position may change, but the content of every pattern is fixed.
When their position is changed, they can be merged or split by other data of reasonable size. M will be the maximum size of the data covering all three patterns and the gaps between them.
For the sake of simplicity during our experiments, let’s use three simple patterns that represent the target data patterns as follows:
$X = { 11 11 11 11 }
$Y = { 22 22 22 22 }
$Z = { 33 33 33 33 }
The lines above define three hexadecimal data patterns in Yara syntax. M=20 enables the target data to contain the three patterns and have up to eight arbitrary bytes in the gaps separating them.
Simple rule
To start, let’s define a simple rule that detects the presence of three patterns (X, Y, Z) inside a given file:
rule three_body_problem {
  meta:
    description = "Simple rule to detect 3 patterns inside a file."

strings:
  $x = { 11 11 11 11 }
  $y = { 22 22 22 22 }
  $z = { 33 33 33 33 }

condition:
  all of them
}
Let’s look at the pros and cons of using this rule.
Pros:
- The rule quickly detects patterns X, Y, Z in the file(s).

Cons:
- The patterns can be found anywhere in the file; the rule doesn’t include the distance between the patterns. Depending on the choice of the patterns, it may generate false positives. This often happens when you scan larger files that contain multiple unrelated objects, such as memory dump files or raw disk images.
Accounting for distance between the start and the end
Let’s improve our rule by adding an additional condition that limits the distance between X and Z:
rule three_body_problem_2 {
  meta:
    description = "Rule to detect 3 patterns and limit the distance between z and x"

strings:
  $x = { 11 11 11 11 }
  $y = { 22 22 22 22 }
  $z = { 33 33 33 33 }

condition:
  all of them and
  @x < @y and @y < @z and @z-@x <= 16
}
Note: The prefix @ refers to the offset where the respective pattern was discovered. This is called a string offset.
Pros:
- The rule quickly detects patterns X, Y, Z in the file(s) and makes sure that Y is located between X and Z, while the distance between Z and X is no longer than 16 (because M=20 and the last pattern length is 4 bytes).

Cons:
- The obvious problem here is in the strict order of patterns: X, Y, Z. A combination of Z, X, Y located close to each other is not discovered.

In my next post, I will look at measuring the distance between any three elements.
Appendix: Yara test set file generator
Should you like to try out the proposed solution or keep finding the best one, feel free to use the following python script that generates initial test files with some special cases mentioned in this series. Note, that good solutions must detect all sample_good* files and no sample_bad* files.
X = b"\x11\x11\x11\x11"
Y = b"\x22\x22\x22\x22"
Z = b"\x33\x33\x33\x33"
J = b" " #Junk or blank space

with open("sample_good1.dat","wb") as f:
 f.write( X + Y + Z ) and f.close()

with open("sample_good2.dat","wb") as f:

 f.write( Y + X + J*100 + X + Y + Z ) and f.close()

with open("sample_good3.dat","wb") as f:
 f.write( Z + J*4 + Y + X ) and f.close()

with open("sample_good4.dat","wb") as f:
 f.write( (X+J)*90+ J*20 + X + J*4 + Y + J*4 + Z ) and f.close()

with open("sample_good5.dat","wb") as f:
 f.write( X + J*4 + Y + J*4 + Z + \
         J*100 + X + J*4 + Y + Z + \
         J*100 + X + Y + Z )
f.close()

with open("sample_good6.dat","wb") as f:
 f.write( (X+J)*100 + J*2 + Y + J*4 + Z ) and f.close()

with open("sample_bad1.dat","wb") as f:
 f.write( X + 16*J + Y + 16*J + Z ) and f.close()

with open("sample_bad2.dat","wb") as f:
 f.write( X + 8*J + Y ) and f.close()

with open("sample_bad3.dat","wb") as f:
 f.write( X + 8*J + Y + 8*J + Z ) and f.close()

with open("sample_bad4.dat","wb") as f:
 f.write( ( X + 8*J + Y + 8*J + Z+8*J) * 1000 ) and f.close()

with open("sample_bad5.dat","wb") as f:
 f.write( ( X*100 + 8*J + Y + 8*J + Z*100) * 1278) and f.close()
Vitaly Kamluk is Director of the Global Research and Analysis Team for Kaspersky Asia Pacific.
The views expressed by the authors of this blog are their own and do not necessarily reflect the views of APNIC. Please note a Code of Conduct applies to this blog.