

Network operators increasingly rely on tools and features to perform in-depth analysis of Internet routing behaviour to optimize traffic flows, dissect DDoS attacks, or uncover prefix hijacks.
IXP operators, for example, commonly use software routers such as BIRD or Quagga as BGP route servers. However, the implemented data-processing and export features of these tools are somewhat limited.
BIRD does not support continuous BGP exports, MRT dumps allow a post-best-path-selection view only, and tshark‘s BGP filtering capabilities are limited. This makes analyses relying on historic data needlessly cumbersome.
To overcome these limitations, we developed PCAP BGP Parser (pbgpp), a lightweight BGP parser.
Collecting and analysing BGP data made easier
The use case we had in mind allows you to use existing network debugging and administration tools to collect BGP data; namely, tcpdump. While capturing the interface of the software router (or its host), we catch each incoming and outgoing packet. Depending on the local configuration, it makes sense to limit the capturing to BGP port 179 only. The collected data can be analyzed with pbgpp, accepts tcpdump files as input, and is also able to read directly from the network interface using libPCAP.
Powerful filtering options
pbgpp allows network operators to apply a wide range of filters, either on network layer (src IP, dst IP), but foremost BGP fields — for example, prefix, communities, or next hop.
Filters are applied in two steps, improving analysis performance. Before parsing the BGP-specific fields in the captured packet, lower-layer packet header field filters (IP or MAC source or destination) are applied. Thus, we do not parse all packets, but only the matching ones. BGP-specific filters are applied subsequently after parsing.
Using the current version 0.2.10 of pbgpp PCAP BGP Parser, you are able to filter by the following fields:
- PCAP Packet Timestamp
- Message Size
- Message Type (OPEN, UPDATE, KEEPALIVE, etc.)
- Message Subtype (Usable with UPDATE messages: ANNOUNCE, WITHDRAWAL or BOTH)
- Prefix (NLRI)
- Withdrawn Route
- Next Hop
- ASN in AS_PATH attribute
- (Large) Communities
- Source and destination IP address
- Source and destination MAC address
If we use multiple filters at once, they are linked with a logical AND. If we use the same filter more than once, those filters are linked with a logical OR.
The following example will only show BGP messages that are issued by the IP address 192.168.150.150 _and_ are either UPDATE or KEEPALIVE messages.
cat /path/to/file.pcap | pbgpp --filter-source-ip 192.168.150.150 --filter-message-type UPDATE --filter-message-type KEEPALIVE -
Various output formats
After the desired filters are applied, we can output the reduced data in various formats: human-readable format (convenient for small data sets and terminal outputs), JSON, or line-based output.
While the human-readable format consists of the most basic information, the JSON format contains all information contained in the original BGP messages. When using the lines-based output format, we have to specify which BGP fields we want to print to which column.
This lightweight and highly customizable formatting option is a smooth way to integrate pbgpp into existing toolchains. In addition, we are able to choose whether we want to write the output directly into a file, display it on std-out, or push it into an Apache Kafka topic.
The most minimal usage example is piping a tcpdump file and adding the “-” flag to enable input from std-in. pbgpp will set the human-readable output as default formatter and std-out as default output. No filters are applied.
cat /path/to/file.pcap | pbgpp -
When formatting as JSON and directly writing into an output file, we need to modify the command above:
cat /path/to/file.pcap | pbgpp -p FILE -o output_file.json -f JSON -
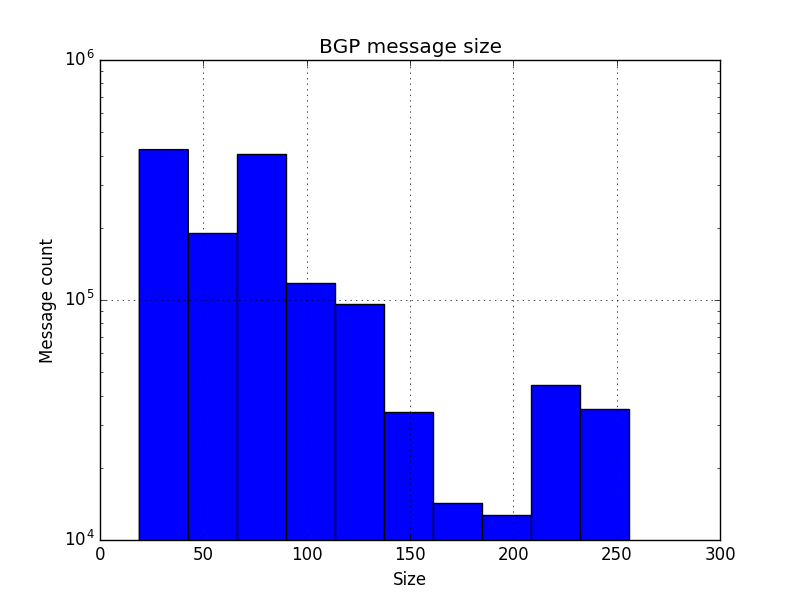
Example: Plot BGP message size
This is an example of how to integrate pbgpp into a toolchain to plot the distribution of BGP message sizes.
Preparations
We want to collect the plot data from a PCAP file. We are interested only in one single value (the message size in bytes) and furthermore we want to use another script to get rid of the plotting. Therefore, we are using line-based output because it’s easy to handle within our plotting script. And we just need to display a single field, because we don’t need any other information out of the BGP messages.
cat dump.pcap | pbgpp -f LINE --fields length -
This easy command will use the PCAP filedump.pcap as an input file and will output the message length (= size in bytes) only. Therefore, there is no need to split out any kind of fields in our plotting script.
Plotting script
We are expecting our data to plot from standard in. The script will use matplotlib.pyplot to create the final image.
import matplotlib.pyplot as plt
import sys

# Empty variable for our incoming data
data = []

# Get data from stdin until EOF
for line in sys.stdin:
try:
# Try to convert incoming data into an integer value
int_data = int(line)

# Add the value to our dataset
data.append(int_data)
except Exception:
# We could do some error handling here
pass

# Create a histogram of the data
plt.hist(data)

# Set title and axis settings
plt.title("BGP message size")
plt.xlabel("Size")
plt.ylabel("Message count")
plt.yscale("log")
plt.grid(True)

# Plot!
plt.show()
Running the example
Now we can combine pbgpp and our plotting script to collect the data and visualize it.
cat dump.pcap | pbgpp -f LINE --fields length - | python plot.py
Output
Let’s have a look on the result!
pbgpp is maintained and published by DE-CIX Research & Development on GitHub under Apache License 2.0. You can find additional examples and implementation details of the parser at GitHub, where we also encourage you to contribute your own extensions, enhancements, or bugfixes. The parser is written in Python and can be obtained using the Python Package Index (PyPI) or by cloning the repository followed by a manual installation. Make sure you have Python 2.7 or higher (the parser is 3.x compatible) installed.
Christoph Dietzel is a PhD student in the INET group at Technische Universität Berlin, and Head of the Research & Development Department at DE-CIX.
The views expressed by the authors of this blog are their own and do not necessarily reflect the views of APNIC. Please note a Code of Conduct applies to this blog.
great and helpful blog to everyone.. thanks a lot for sharing