
Since the beginning, Railway, our software development infrastructure company, has built its computing services on the Google Cloud Platform. The platform supported Railway’s initial journey, but it has caused a multitude of problems that have posed an existential risk to our business. More importantly, building on a hyperscaler prevents us from delivering the best possible platform to our customers.
It directly affected the pricing we could offer (egress fees anyone?), limited the level of service we could deliver, and introduced engineering constraints that restricted the features we could build.
And not only is it rare that we understand why things break upstream, but also despite a multi-million dollar annual spend, we get about as much support from them as you would spending USD 100.
So in response, we kicked off a ‘Railway Metal’ project last year. Nine months later we were live with the first site in California, having designed, spec-ed, and installed everything from the fibre optic cables in the cage to the various contracts with ISPs. We’re lighting up three more data centre regions as we speak.
To deliver an ‘infra-less’ cloud experience to our customers, we’ve needed to get good at building out our own physical infrastructure fast. That’s the topic of our blog post today.
So you want to build a cloud
From kicking off the Railway Metal project in January 2024, it took us five long months to get the first servers plugged in. It took us an additional three months before we felt comfortable letting our users onto the hardware (and an additional few months before we started writing about it here).
The first step was finding some space.
When you go ‘on-prem’ in cloud-speak, you need somewhere to put your shiny servers and reliable power to keep them running. Also, you want enough cooling so they don’t melt down.
In general, you have three main choices: Greenfield buildout (buying or leasing a data centre), cage co-location (getting a private space inside a provider’s data centre enclosed by mesh walls), or rack co-location (leasing individual racks or partitions of racks in a co-location data centre).
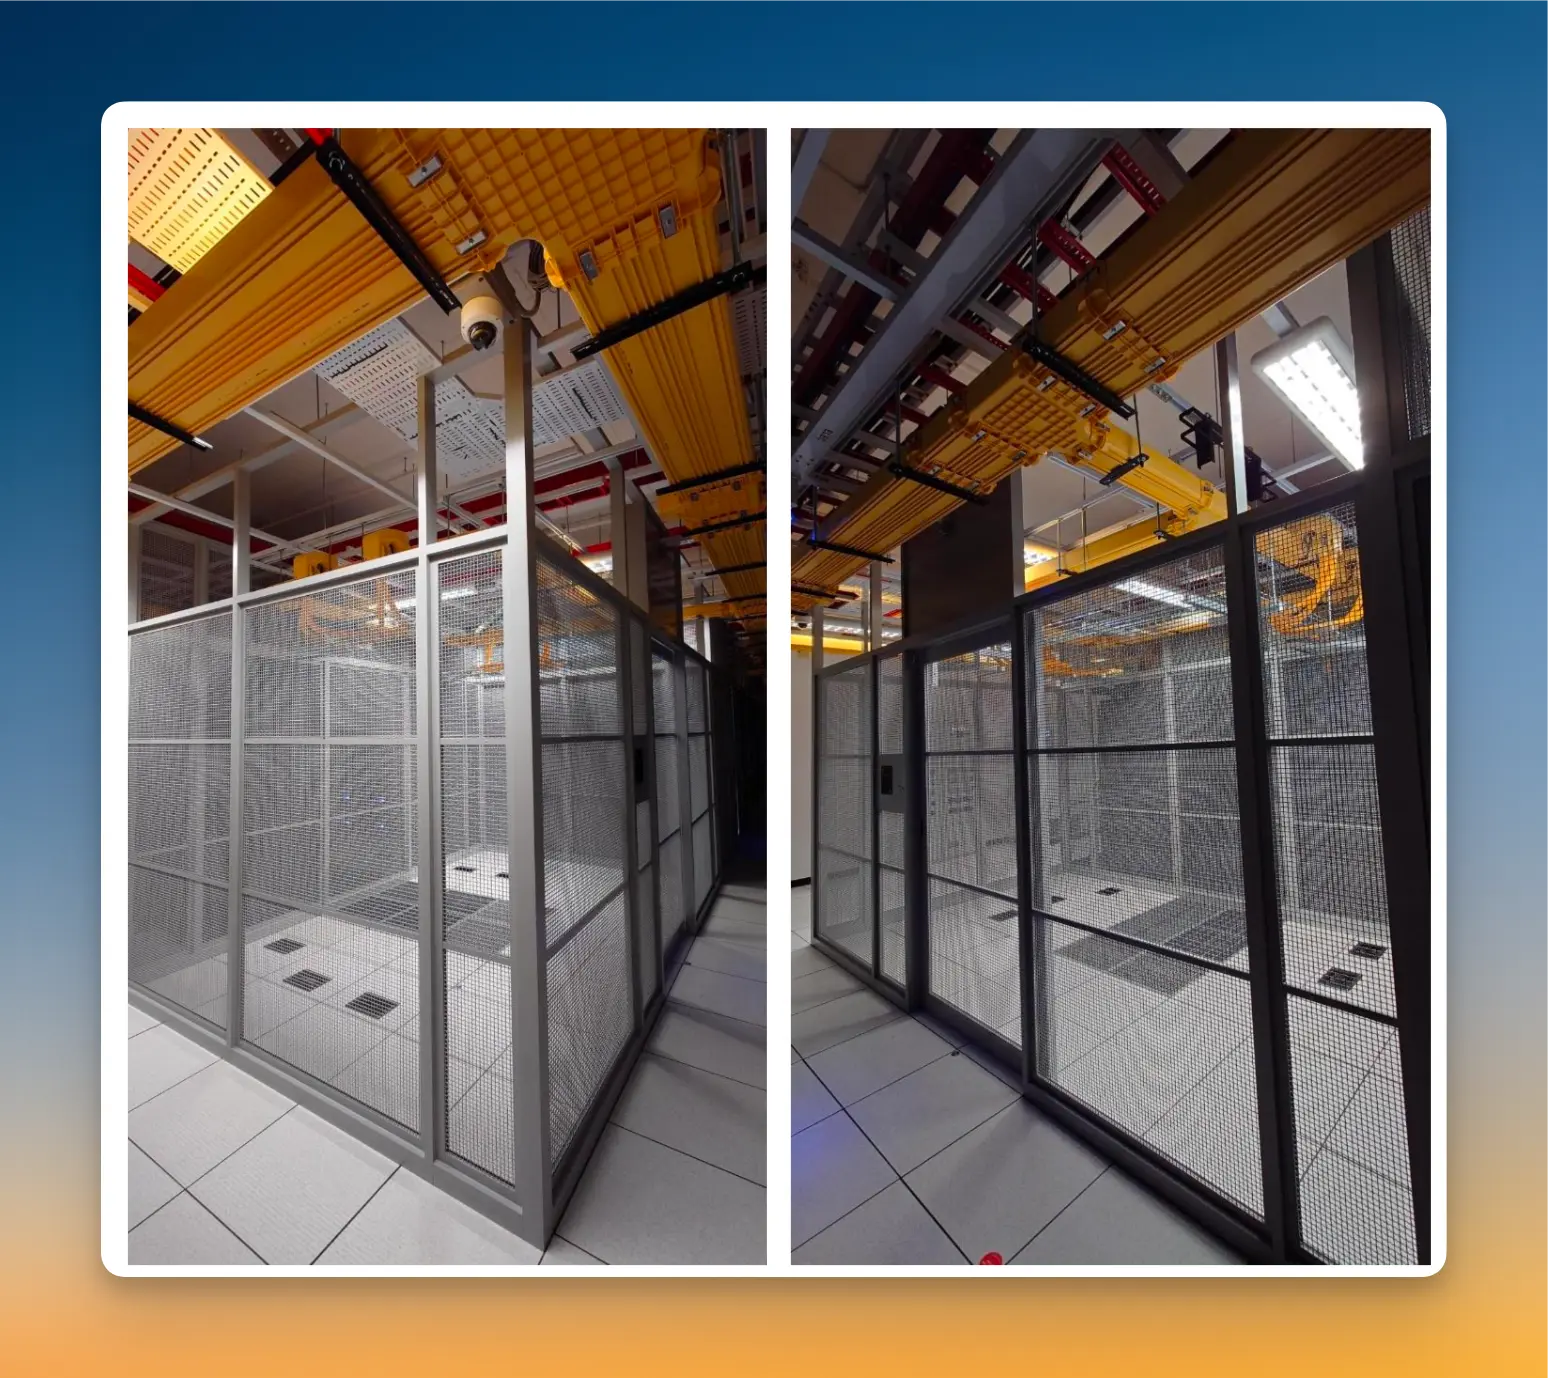
We chose the second option: A cage to give us four walls, a secure door, and a blank slate for everything else.
The space itself doesn’t cost much, but power (and by proxy, cooling) costs the most. Depending on the geography, the $/kW rate can vary hugely — on the US West Coast for example, we may pay less than half as much as we pay in Singapore. Power is paid for as a fixed monthly commit, regardless of whether it’s consumed or not, to guarantee it will be available on demand.
But how much power do you need?
With great power comes great responsibility
Ideally, if you’ve embarked on your data centre migration mission, you should have an idea of the rough amount of compute you want to deploy. We started with a target number of vCPUs, GBs of RAM, and TBs of NVMe to match our capacity on GCP.
Using these figures, we converged on a server and CPU choice. There are many knobs to turn when doing this computation — probably worth a blog post in itself — but the single biggest factor for us was power density, for example, how do we get the compute density we want inside of a specific power draw.
The calculations aren’t as simple as summing watts though, especially with 3-phase feeds — Cloudflare has a great blog post covering this topic.
Power is the most critical resource for data centres, and a power outage can have extremely long recovery times. So redundancy is critical, and it’s important to have two fully independent power feeds per rack. Both feeds will share load under normal operation, but the design must be resilient to a feed going down.
To deliver this power to your servers, you’ll also want a Power Distribution Unit (PDU), which you’ll select based on the number of sockets and management features it provides. The basic ones are glorified extension cords, while the ones we deploy allow control and metering of individual sockets.
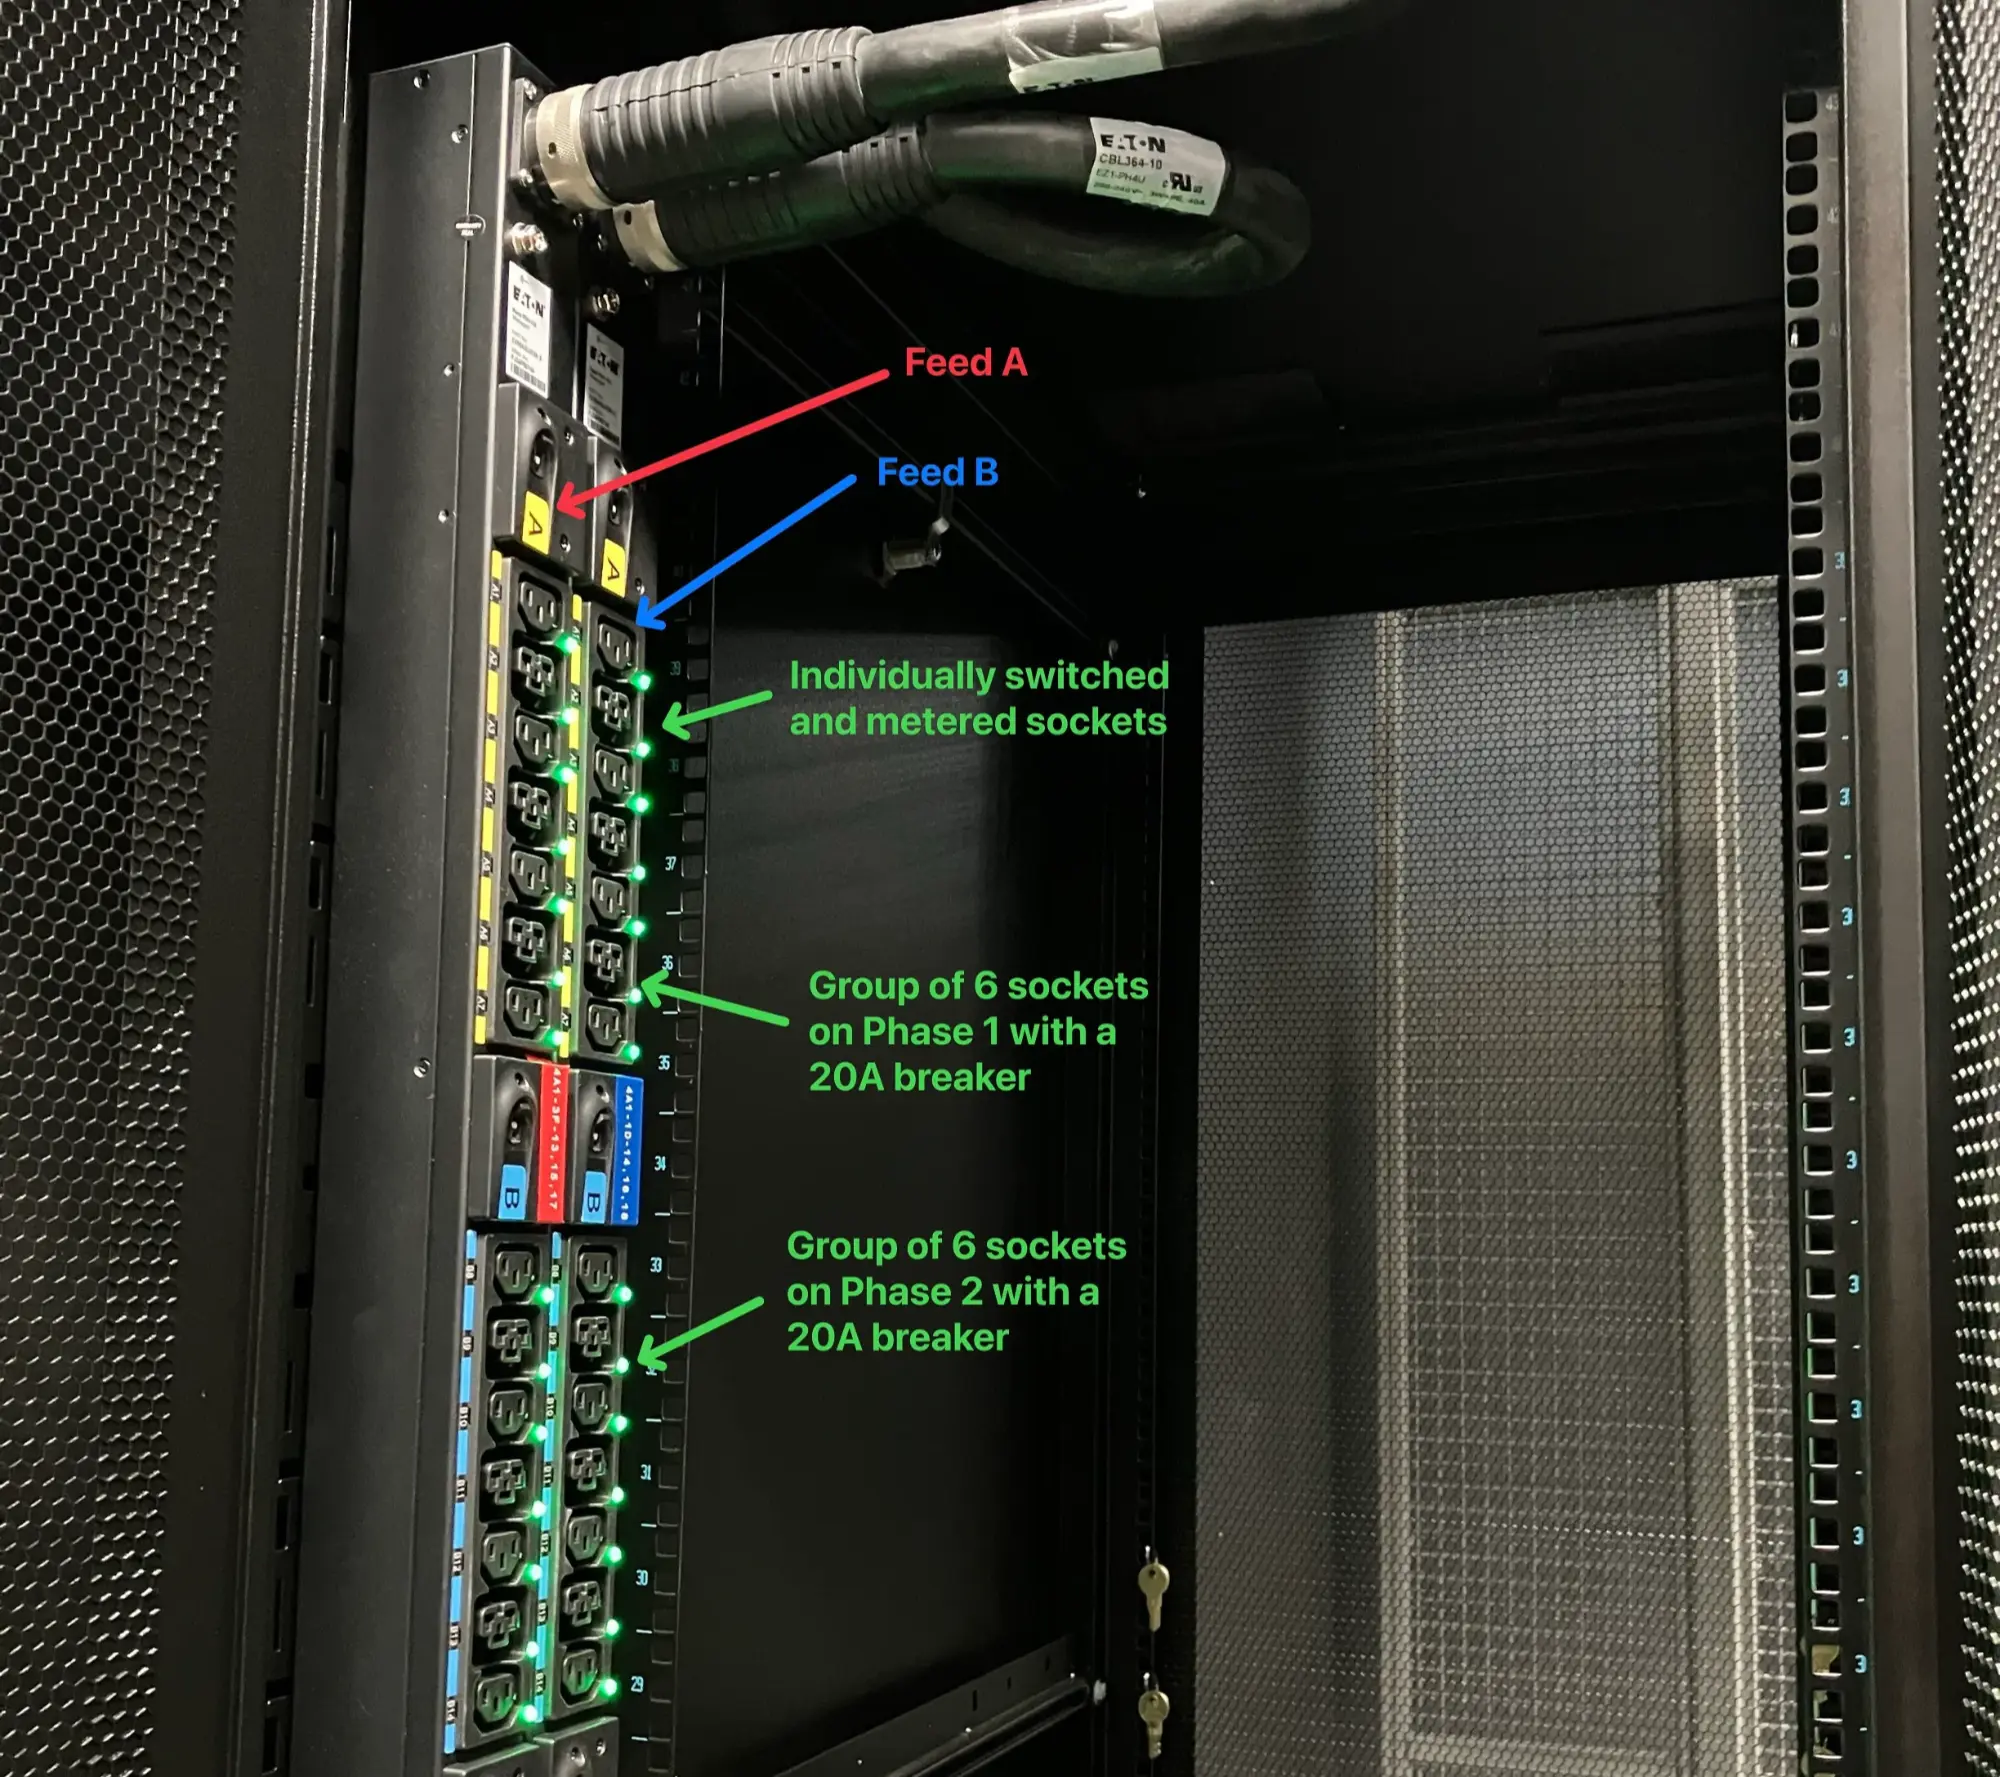
With that, power is now available in the cage.
Let there be light
No cloud machine is an island and that’s where networks come into play.
To achieve the lowest possible latency on Railway, we need to set you up with solid connections to the rest of the world.
We look for data centre facilities that are on-network with Tier 1 Internet Service Providers (ISPs), are part of an Internet Exchange (IX), and have available fibre to other data centres in close proximity.
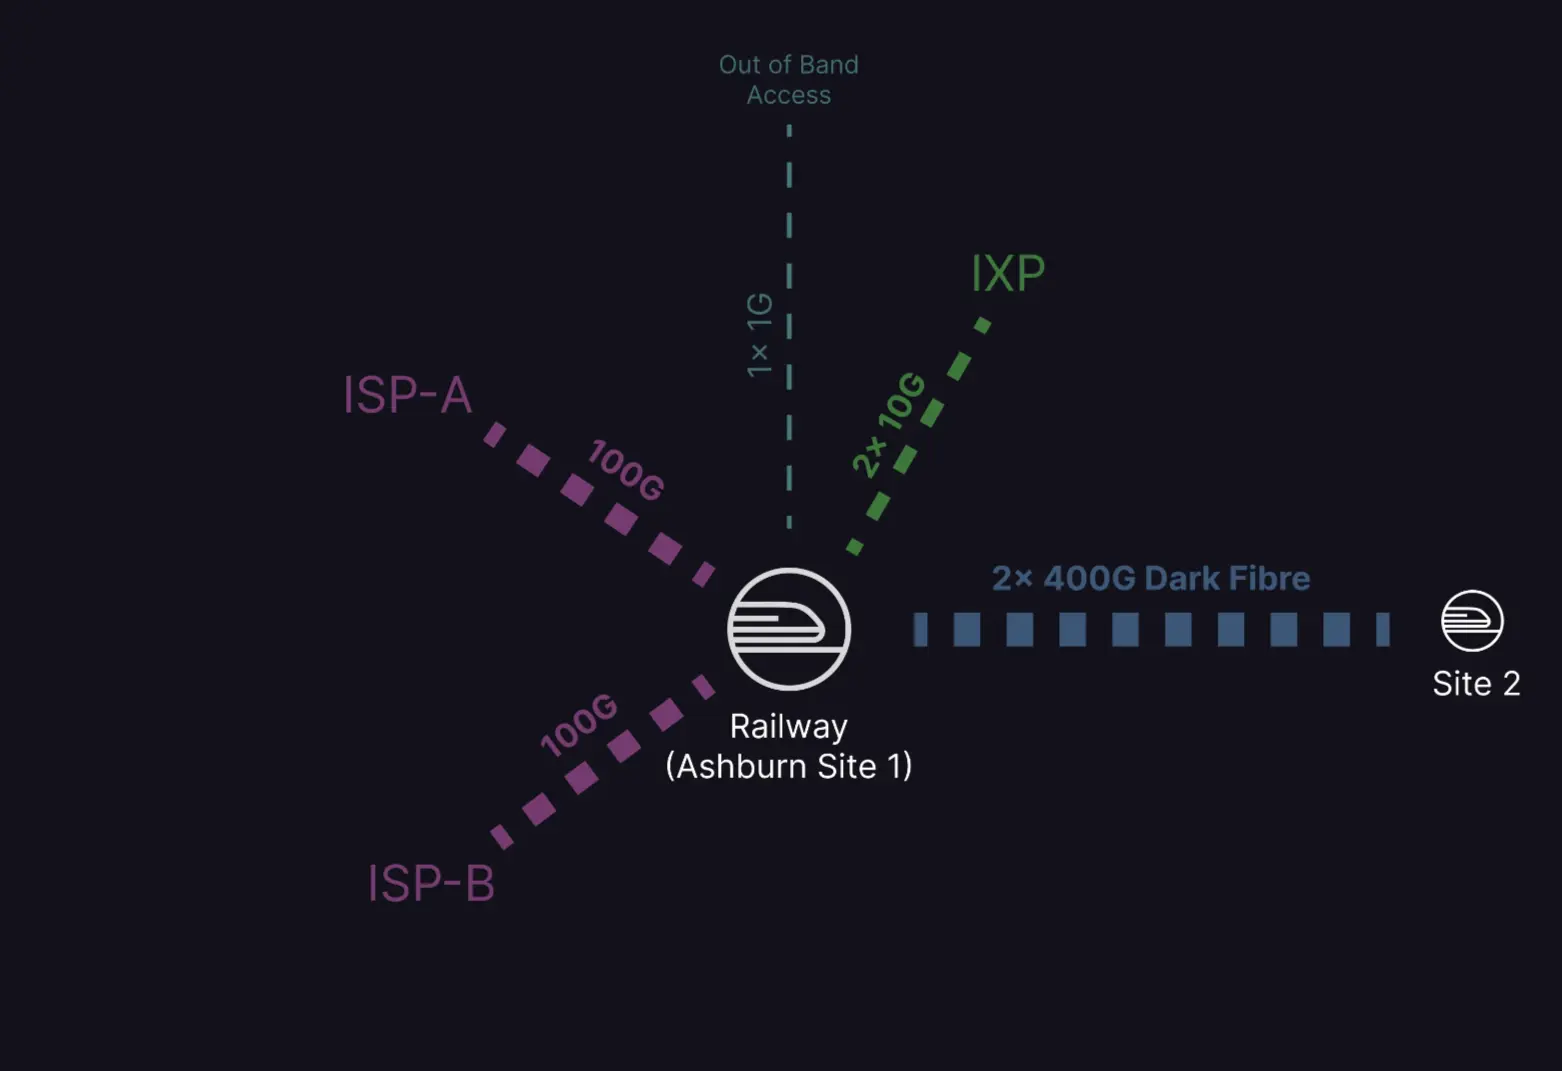
Your applications deployed to Railway will want to connect to a diverse mix of endpoints over the network — be it a home Internet user in Sydney, Australia or an API hosted on an AWS server in the US. To get you the best possible latency and the lowest bandwidth cost, we contract with a mix of Internet providers, optimized for each use case.
We select ISPs for the maturity of their networks in each geography we target. Partnering with the wrong ISP in a region can lead to extra network hops (and thus latency) to reach specific target markets — or in the worst case — convoluted network routes. So for each region, we pick at least two separate networks based on their regional footprints.
Once connected, we receive full Internet routing tables from each ISP and consolidate them on our network switches to resolve the best path for each IP prefix. If you have an end user in Australia trying to reach an app deployed to Singapore, we’ll likely hand those packets off directly to Telstra who have one of the densest access networks in Australia. If that same app needs to send packets to an end user or server in Japan, then we’d likely be handing them over to PCCW who peer directly with NTT in Japan and have a dense footprint in Asia Pacific.
Peering information is public. Head over to bgp.tools to see how your favourite networks interconnect.
For redundancy, we’re building out multiple zones in each region, and interconnectivity between these sites is also critical for our expansion. There are several tools such as dark fibre or wavelength services that we look for to plan this expansion. The result is that your apps won’t notice if your database is in the same room or if it’s four blocks over in a neighbouring building — this is a feature, not a bug — as it builds resilience against the failure of an individual data centre.
Ok, now that you’ve found a space you like, signed a deal with a data centre, and signed deals with several ISPs, you’re all-systems-go to install some servers, right?
Well, not exactly. First, you need a bunch of other things to give your server a nice snug home to warm up in.
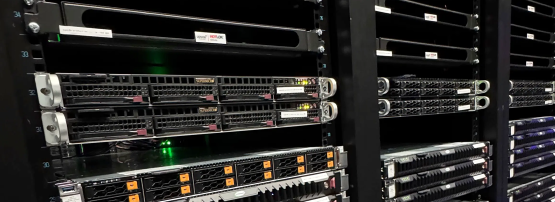
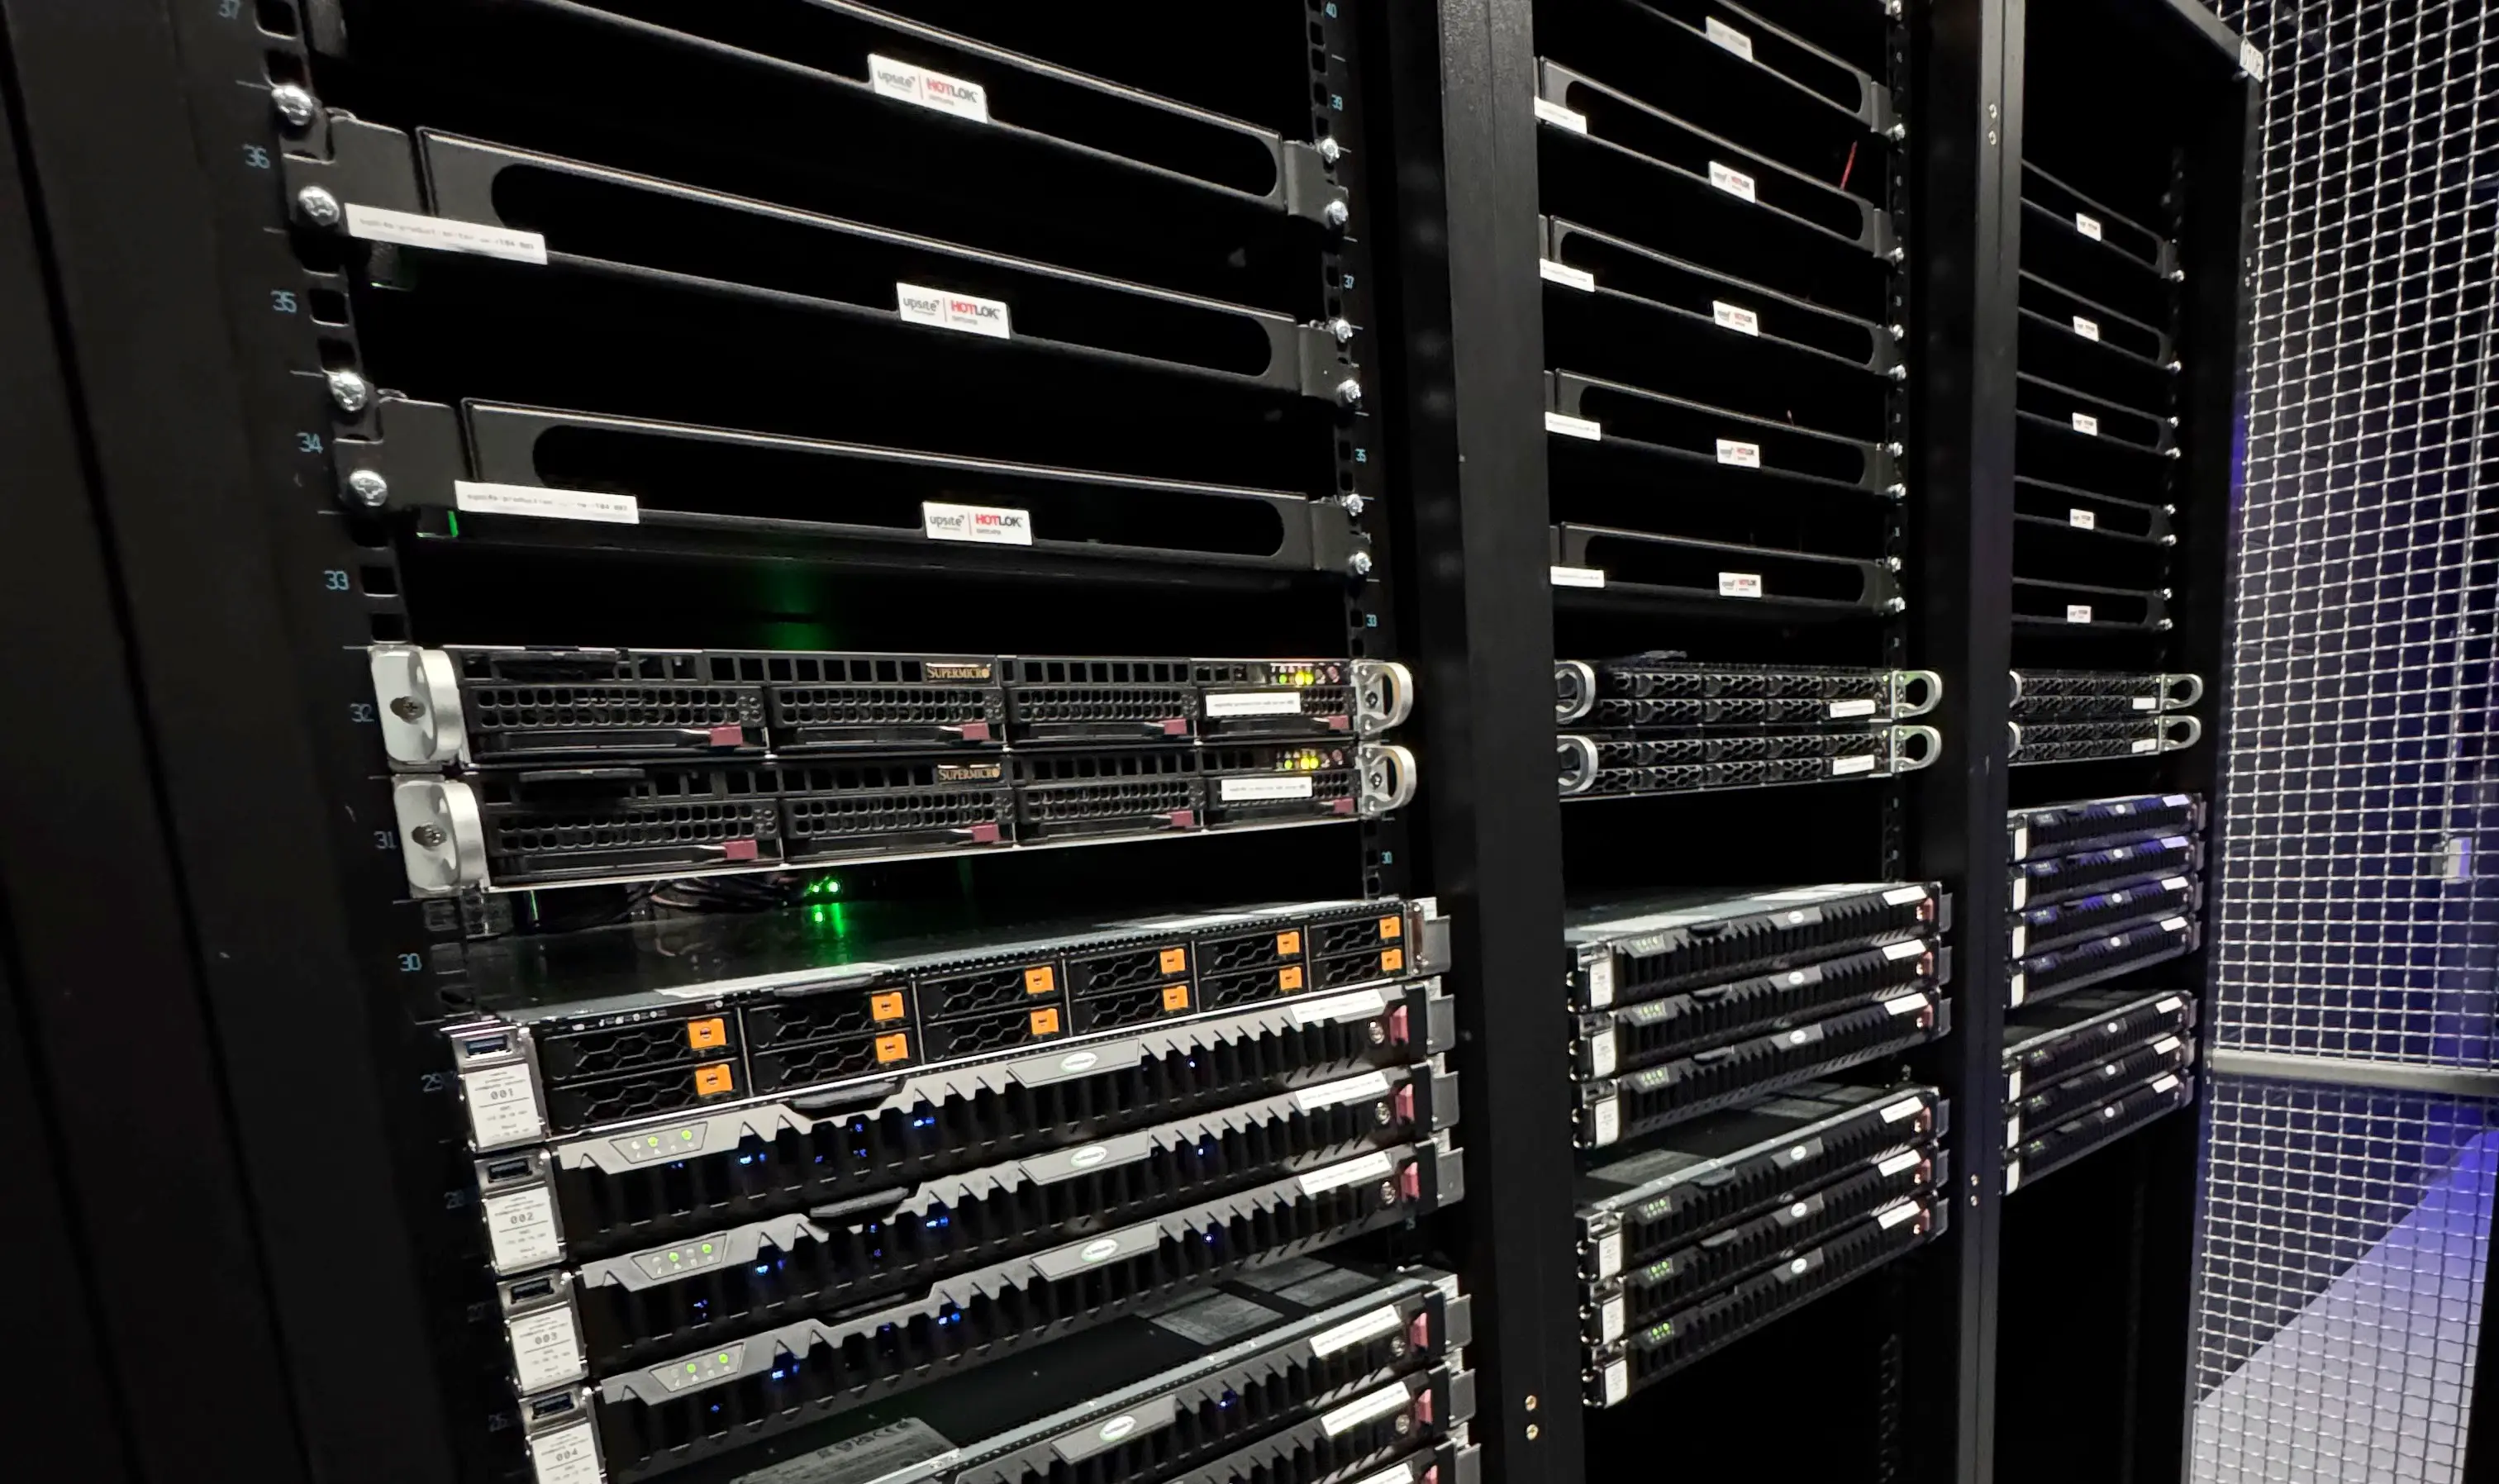
Aisles, racks and overhead infrastructure
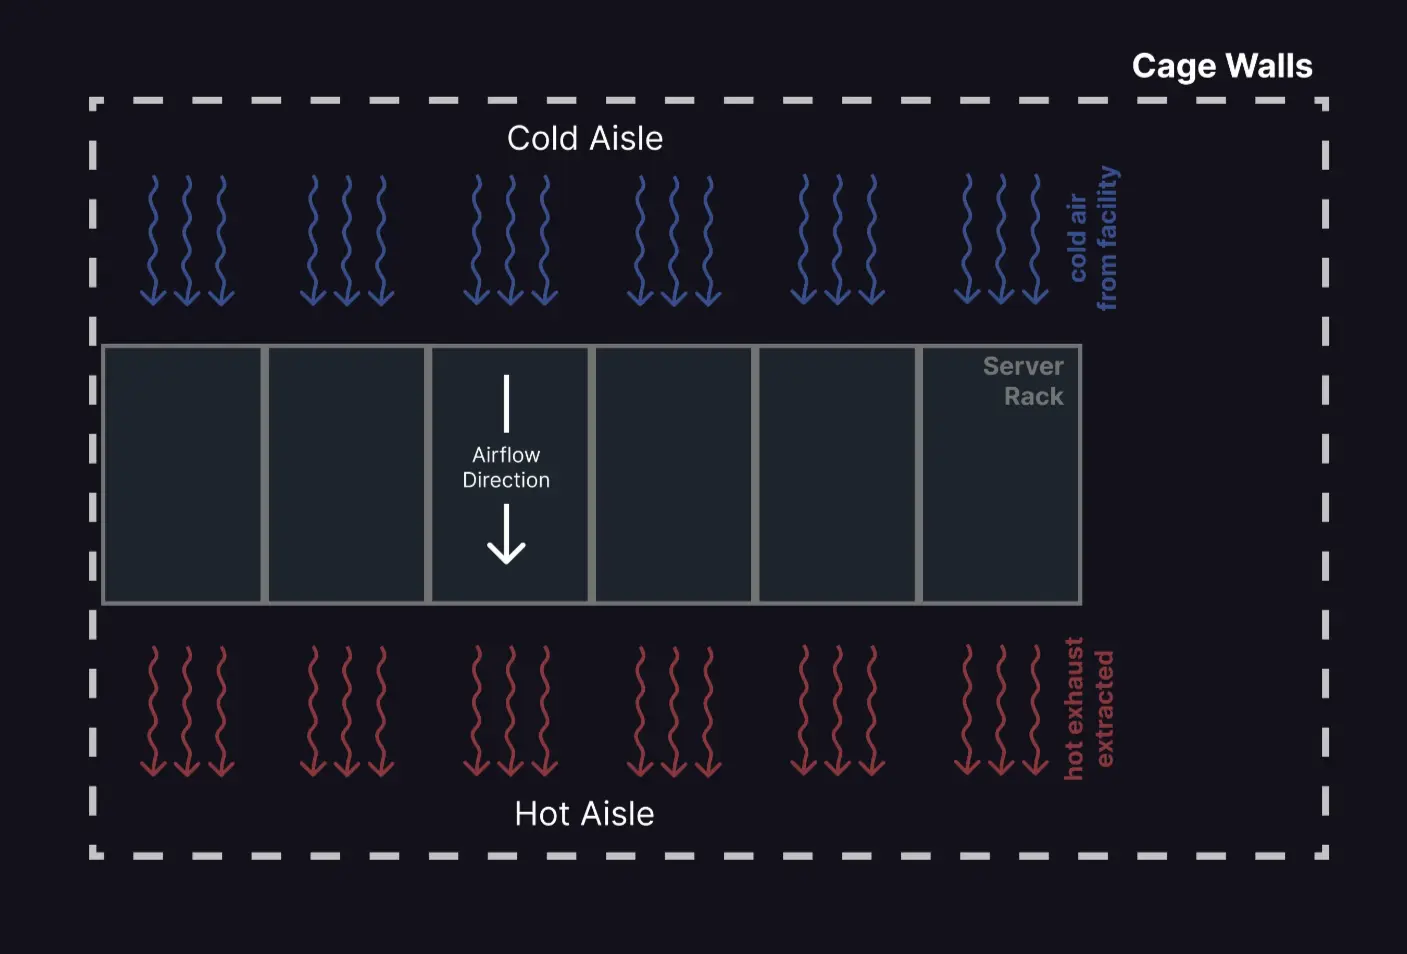
In a data centre, racks are arranged in rows, and the space between racks, the aisle, is used for airflow.
The cold aisle is where cold air is blown in from the data centre facility, and servers in your rack suck this air up and exhaust it towards the rear onto the hot aisle. The data centre facility will remove this hot air from the hot aisle. For optimum efficiency, you don’t want air between these aisles to mix.
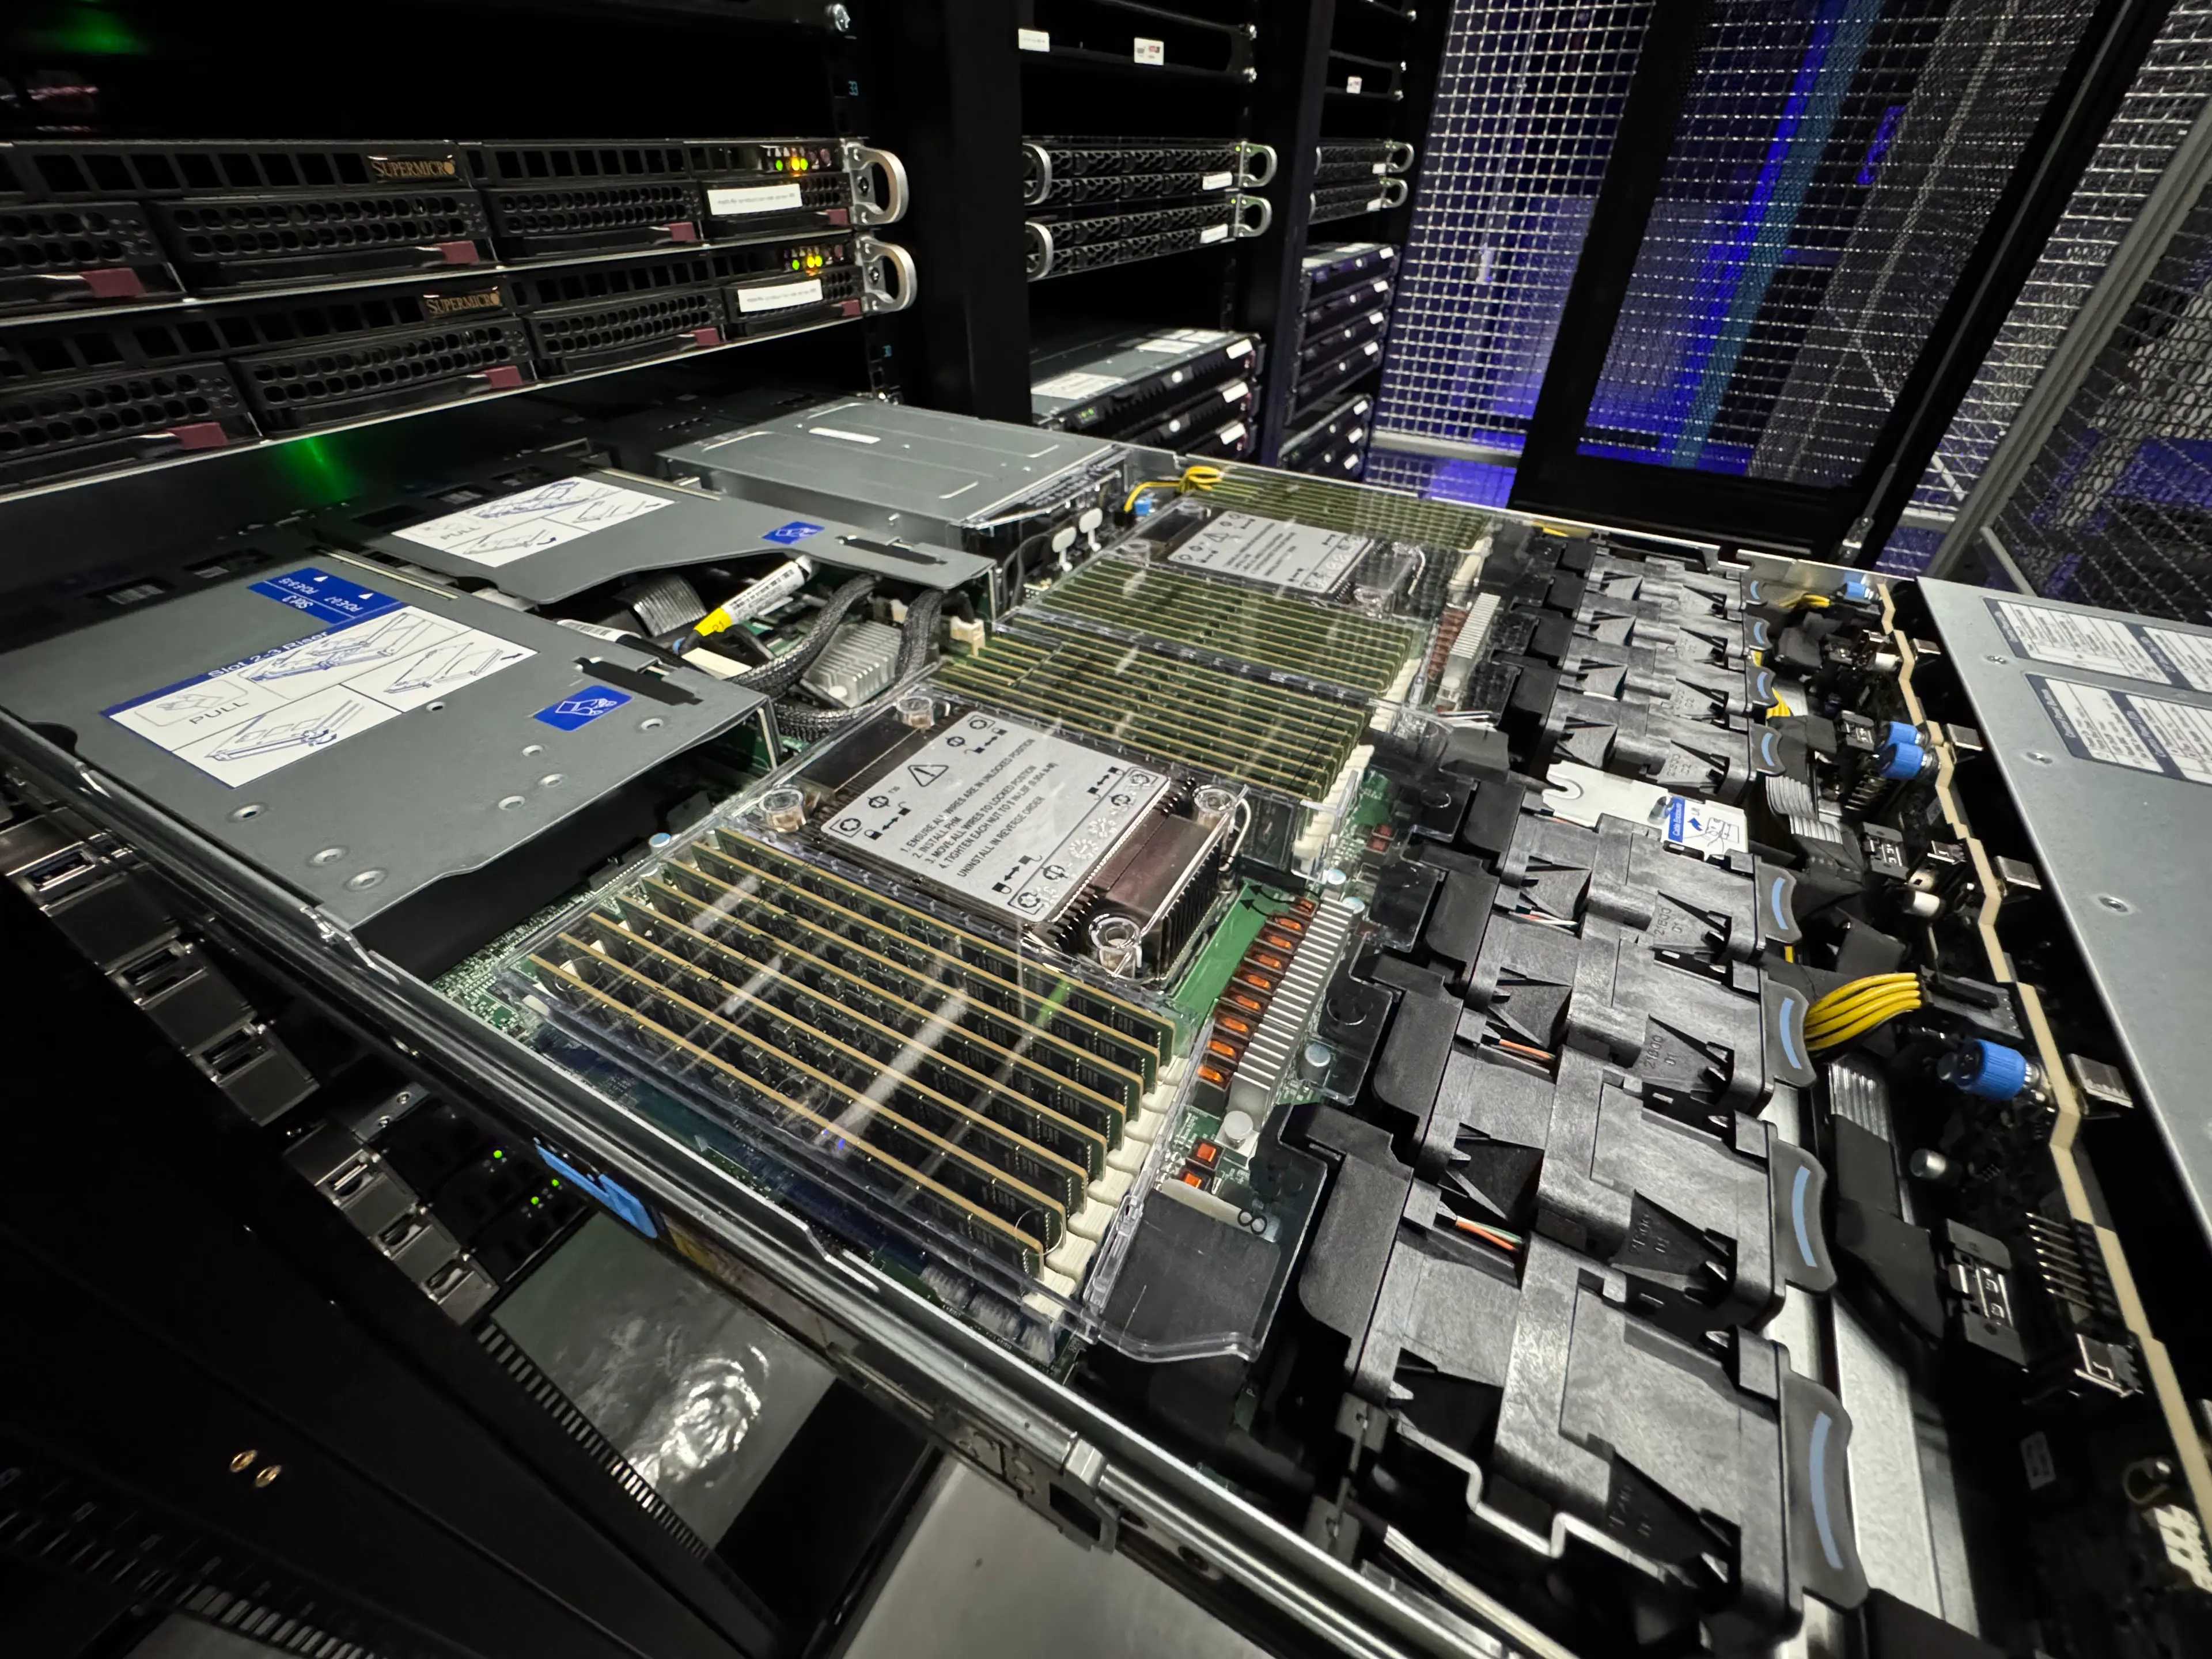
The racks themselves have some variability, even if you opt to use conventional 19-inch wide equipment. You can select the height, width, and depth to suit your equipment and cabling needs.
Most server equipment can slide on rails to allow for easy maintenance, so it’s important to ensure that cage dimensions allow for this. Cabling and cable management also require some space, so there’s a tradeoff to be made with how crowded you want each rack to be versus how many racks you can fit into a cage.
In our experience, power and cooling is often the limiting factor rather than the actual space available. In newer sites, we opt for wider 800mm racks to allow for better airflow by getting cables out of the way of the exhausts.
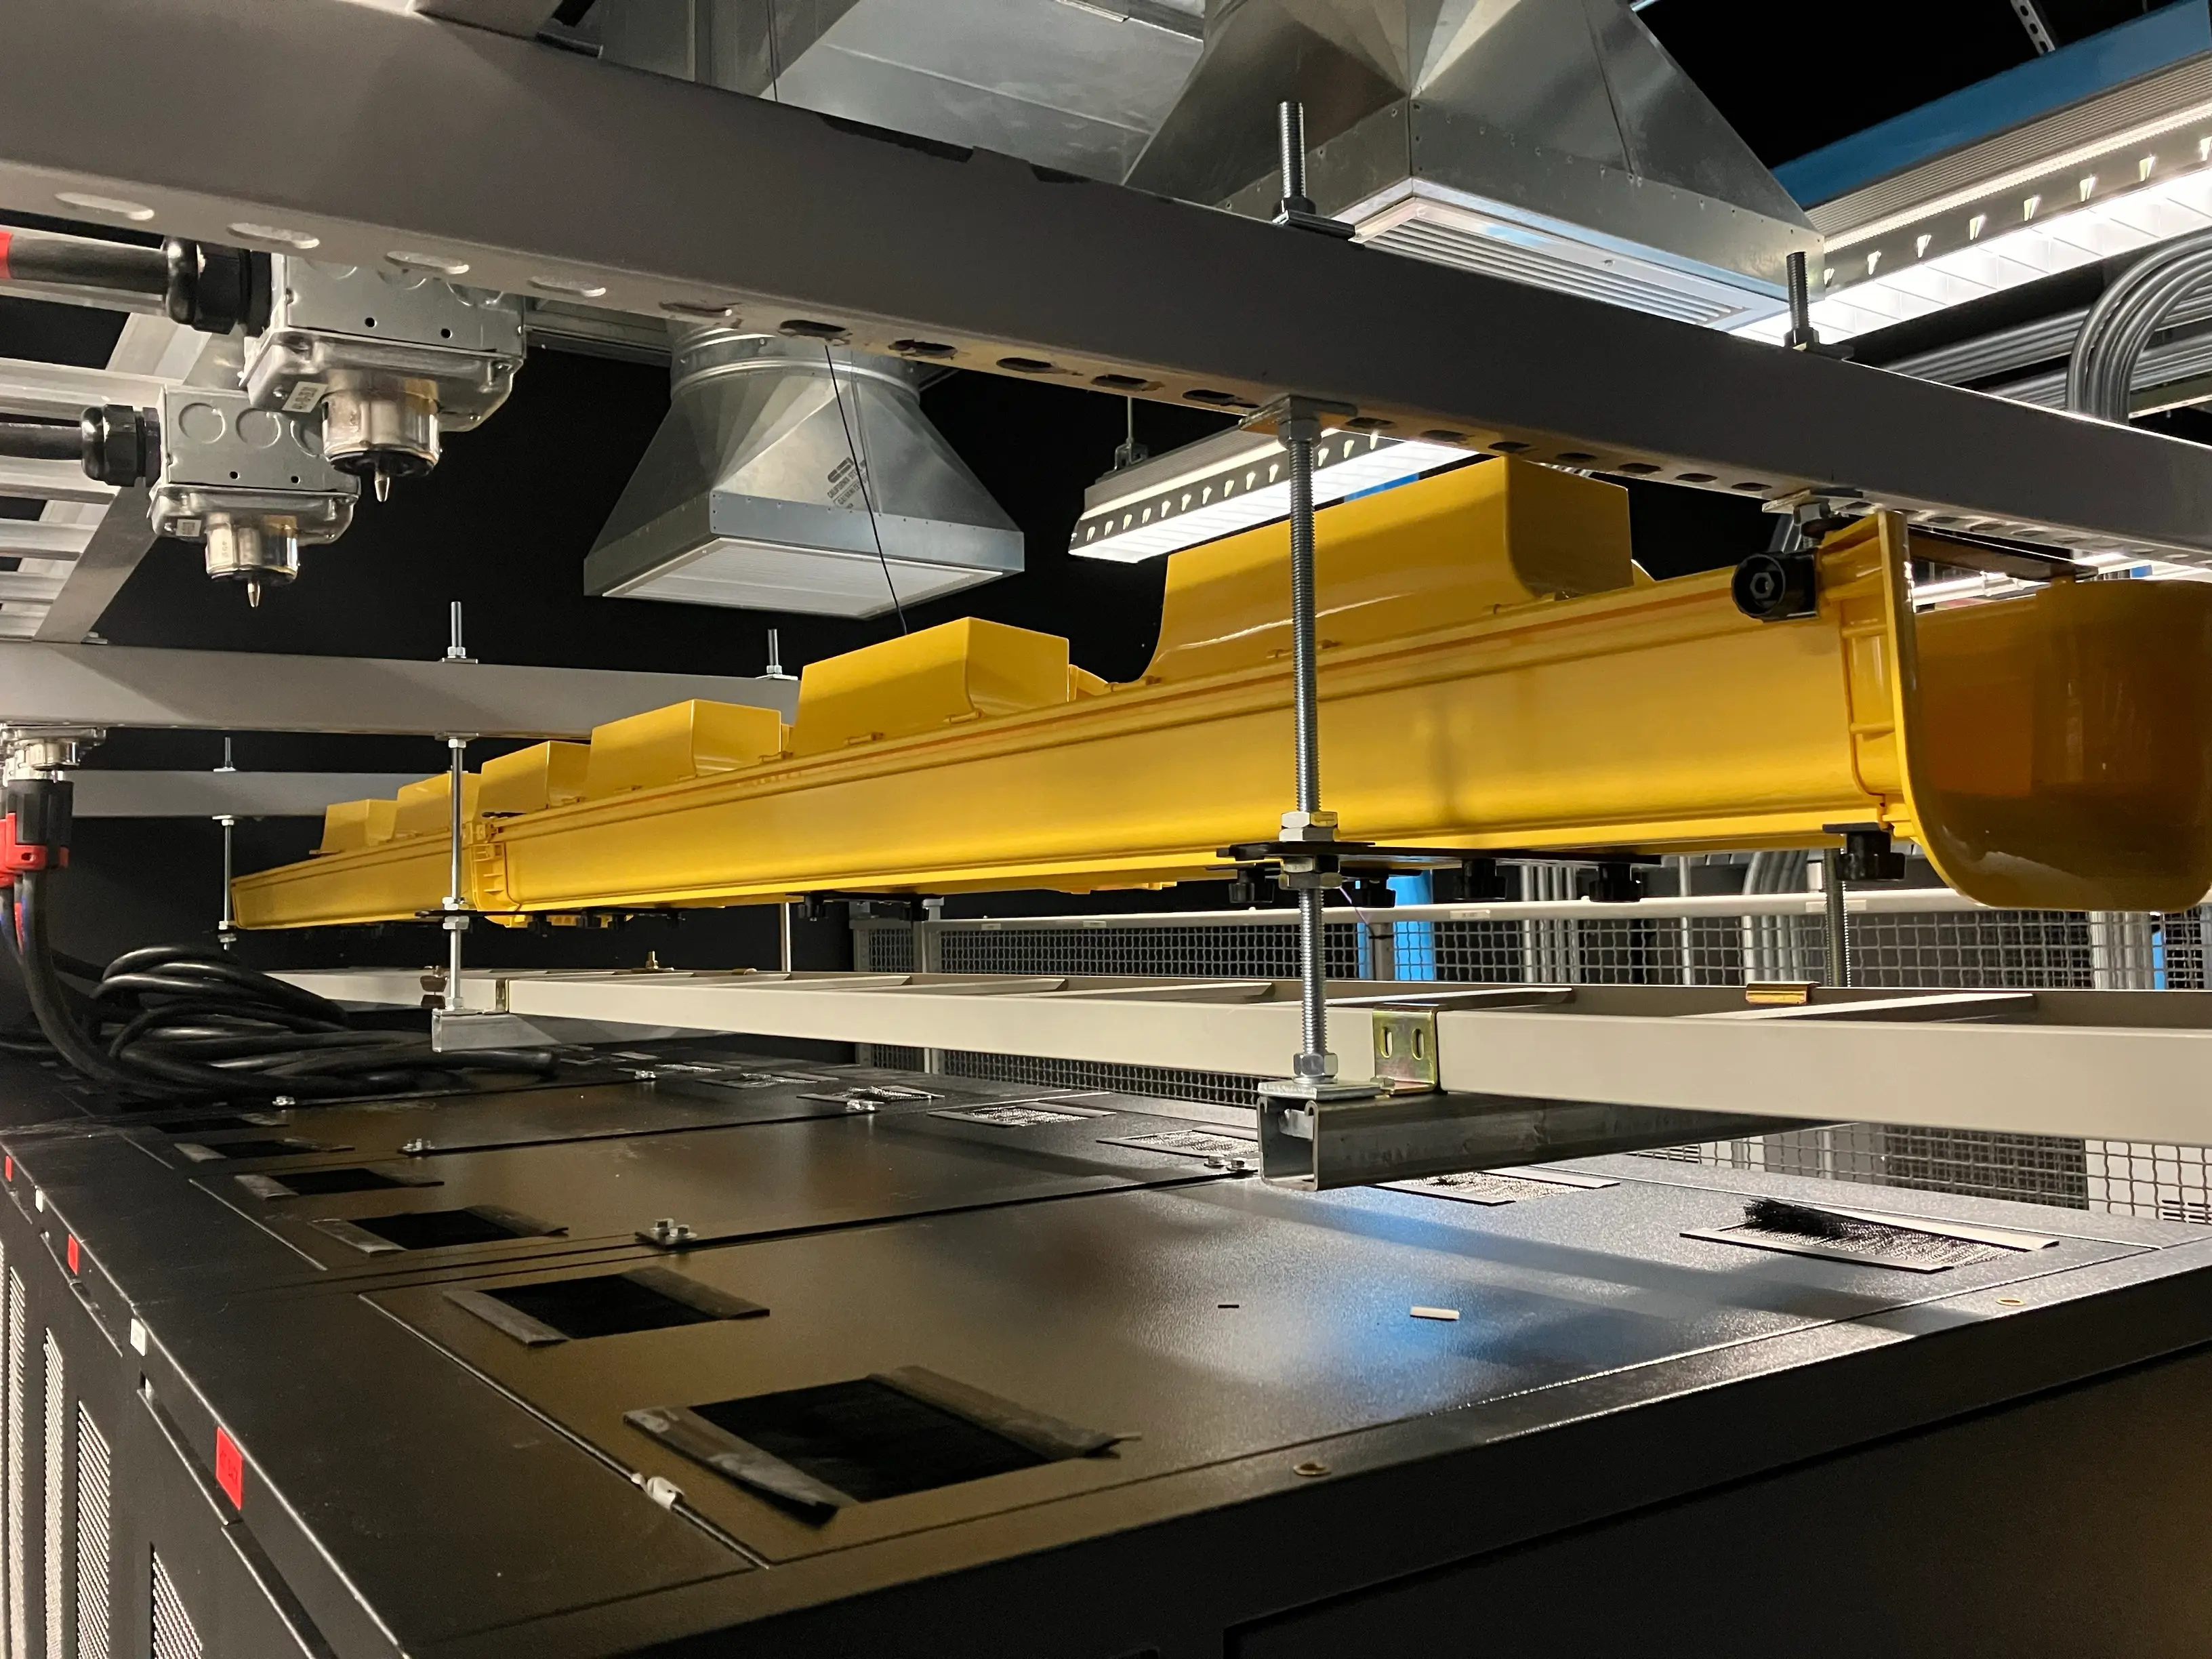
In addition to racks, you’ll need several bits of infrastructure to get power and data to your racks. This will likely involve installing some overhead infrastructure and trays that let you route fibre cables from the edge of your cage to each of your racks, and to route cables between racks. This is something the data centre operator will throw in when quoting the cage.
Depending on your design, you’ll want to optimize for short cable paths by ensuring your overhead infrastructure, rack local cabling, and device orientations align. Because our racks have dense switch-to-server fibre cabling in each rack, we buy switches that have their ports oriented to the back of the rack (these are called reverse airflow switches because they exhaust air on the side with the network ports).
This allows us to align the cable trays such that all cabling happens on one side of the rack and there’s no zig-zagging of cables between the front and back of the rack.
So you’ve got the space, signed up ISPs, ordered the hardware, got the racks, and a pretty good picture of how to lay it all out. But it’s still a pretty expensive Lego set sitting in the loading bay of a data centre. To assemble it you now need to leverage the most versatile programming tool ever devised in the history of mankind … Microsoft Excel.
The rack and stack
Let’s first step back and publish a disclaimer: Neat and organized cabling requires a lot of practice. We tried it ourselves first with … mixed … results.
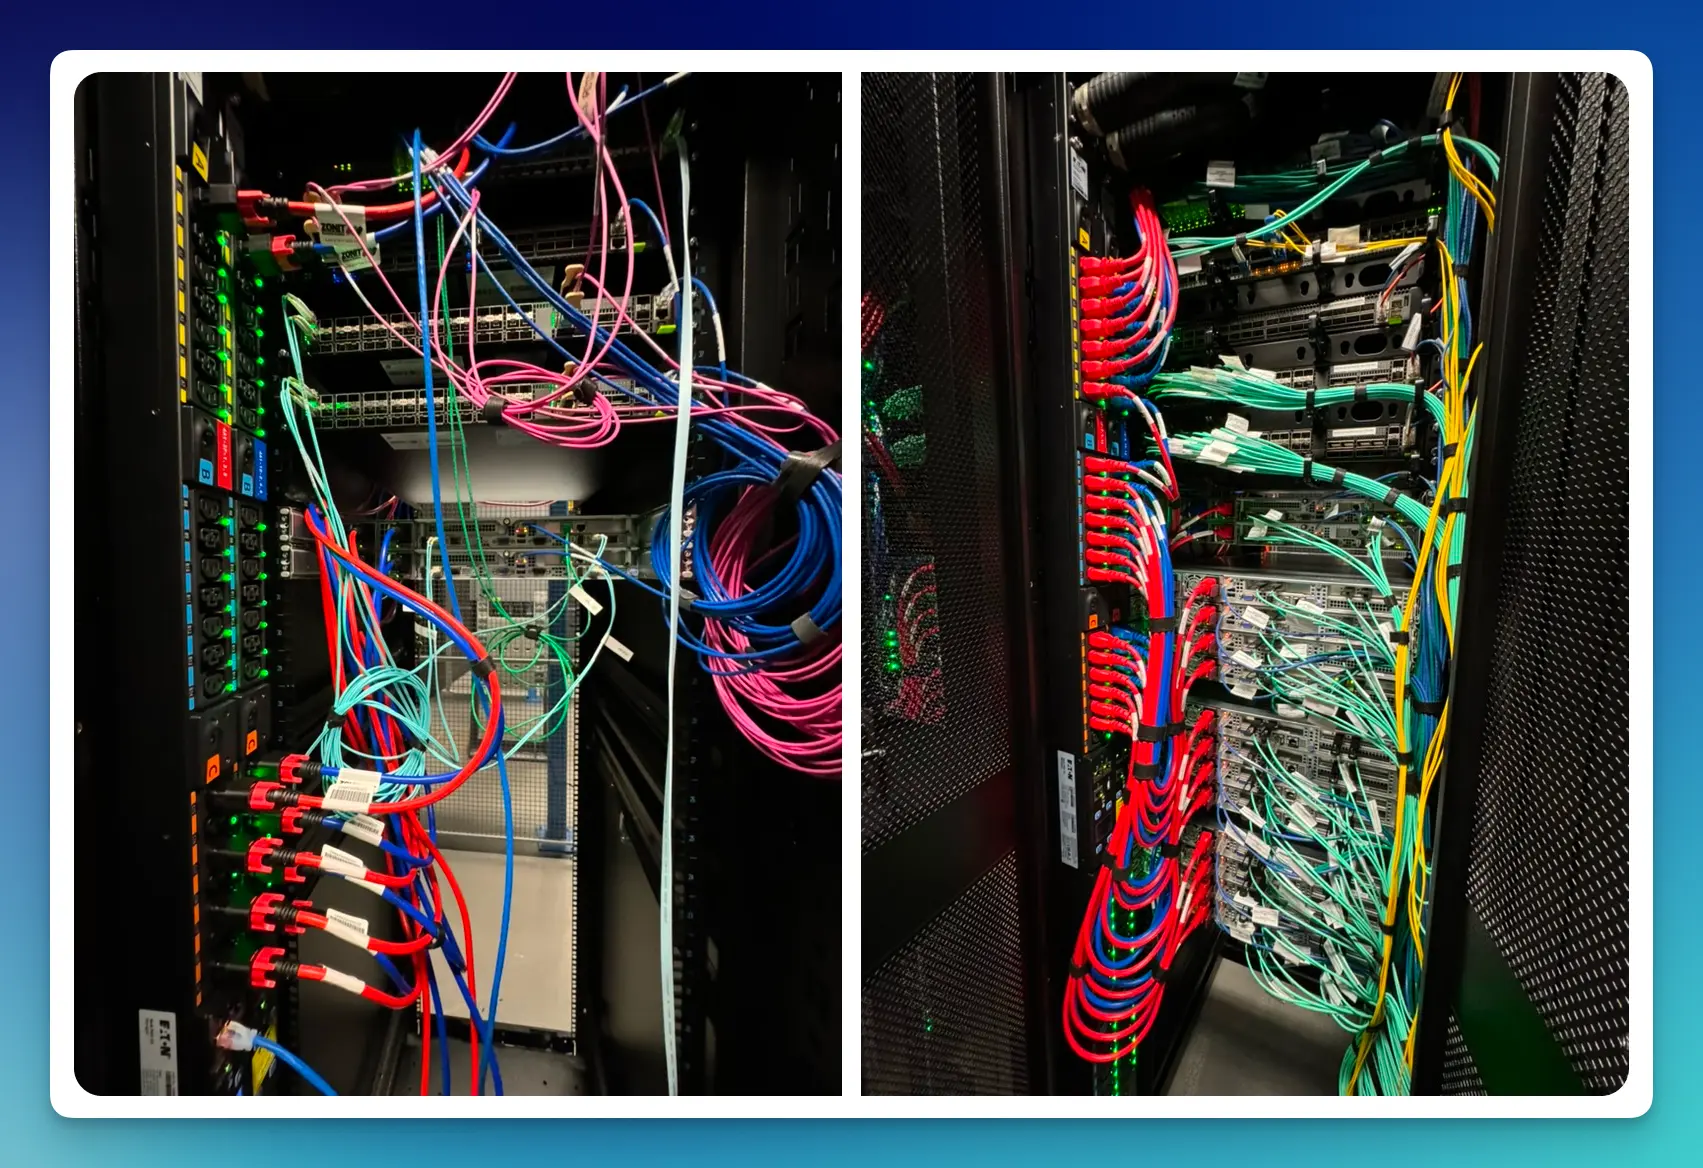
To install it properly, we bring in professionals, but the professionals need to know what to install. A comprehensive documentation pack is essential. A cabling matrix and rack elevation are common documents that communicate to contractors how to rack and wire up servers.
A cabling matrix describes the termination of each cable, specifying the device position and port for each side of the connection, along with the specification of the cable itself (type of fibre, length, and so on). The rack elevation is a visual representation of the rack itself, showing the position and orientation of each device.
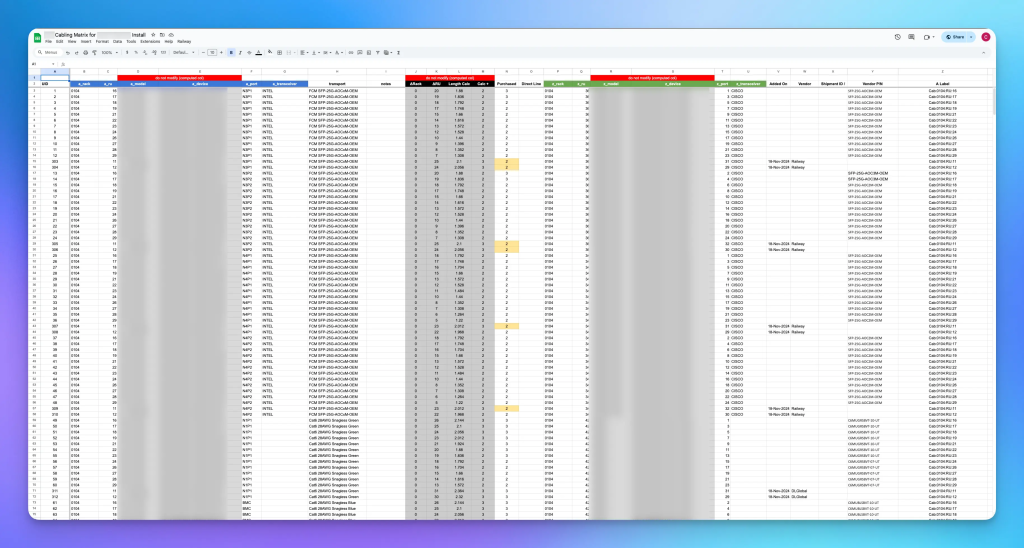
The documentation exercise can be intense. Each of our installation phases involved 60+ devices, 300+ discrete cables, and dozens of little details. This was all handcrafted into written specifications and spreadsheets we used as a basis for the installation and commissioning. From the materials being on site to getting everything installed takes us about 6 to 14 days.

This all seems very far removed from software, DevOps, or what you’d typically think of as ‘infrastructure’, and that is very true — building a data centre cage is probably closer to building a house than deploying a Terraform stack.
To compound this, every data centre facility, contractor and vendor will do things slightly differently, even within the same organization. The operational aspect requires you to stay on your toes and be extremely detail-oriented.
Some ‘what the’ moments we’ve had thus far:
- Contractor: ‘We need longer power cables’ — the PDUs at that site were upside down because the power came in from the floor, so our socket numbering was reversed in the plan.
- Phone call from Amsterdam: ‘There’s no demarcation point at the site?’ — a specific facility installs external fibre links directly to a box in one of our racks rather than via a dedicated demarcation point overhead.
- Railway Discord quote: ‘Why are the phases wired so weirdly on this PDU?’ — the facility was wired differently to our other sites and the power sockets were wired phase-to-neutral vs phase-to-phase (WYE vs Delta circuits for you electrical engineers).
- Contractor: ‘Your data cables are too short’ — the contractor didn’t realise the network gear was reverse-airflow and tried to mount things the wrong way around.
- Us raising a support ticket: ‘There’s no link coming up on this cable’ — the fibre was wired in the wrong polarity; we learnt what ‘rolling fibre cables’ was that day… it’s when they rip out the plugs from the LC connector and swap them around.
- Railway Discord quote: ‘I brought a rubber mallet from HomeDepot today’ — a batch of nearly 24 PDUs from one vendor was delivered with faulty sockets that didn’t properly engage with the power plugs, even with
appropriateextreme mechanical force being applied.
But from this point, the hardware is in place and the task begins to feel more familiar. We now need to do some BGP, install some OSes, set up monitoring and bring everything up.
Pedal on metal
The installed cage is a blank canvas — the network devices need configuring, the router config needs writing, Regional Internet Registry (RIR) records need updating, and we must interact with the likes of Redfish APIs (HTTP APIs to dedicated controllers on server motherboards and PDUs) and Preboot Execution Environment (PXE) (a protocol to boot servers over the network) to get everything up and running.
We’ve also not discussed how networking works. Our design uses FRRouting and white box network switches running SONiC to build a Layer 3-only software-driven network that deeply integrates with our control plane.
We’ve regaled you with tales from the frontline … but any more and you’d be here all day. So, in a future post, we’ll discuss how we go from a bunch of servers in a room to a functional Railway zone. In the space of the last few months, we’ve built two new software tools, Railyard and MetalCP, to enable a button-click experience from designing a new cage, tracing and visualizing the cabling, to installing OSes on servers and getting them on the Internet.
Charith Amarasinghe is an Infrastructure Engineer for Railway.
Originally published on Railway’s blog.
The views expressed by the authors of this blog are their own and do not necessarily reflect the views of APNIC. Please note a Code of Conduct applies to this blog.
Hi Charith