

Every server instance with a publicly facing IP address is constantly targeted by malicious network scanning bots.
These bots are usually harmless but they have the potential to start a DDoS attack or discover a vulnerability. Additionally, they are obfuscating the SSH access logs and using up some of the server resources.
In this post, I will explain how to hide your Amazon Web Services Elastic Compute Cloud (AWS EC2) server from those scanners using IPv6. The address range for Internet Protocol version 6 is ~7.9×1028 times larger than IPv4, so, in practice, it’s currently not targeted by bots.
We’ll deep dive into AWS VPC and security groups configuration to limit SSH access to IPv6 clients only. Some knowledge of AWS is required to complete this tutorial, but I will link to the complementary resources.
Let’s start by checking whether the bots are knocking on your doors.
SSH access logs
You can check how often your server is targeted by scanner bots by SSHing into it and running these commands:
grep "invalid" /var/log/auth.log
grep "failed" /var/log/auth.log
/var/log/auth.log is the default SSH log file for Ubuntu systems. You should see the similar output:
Oct 25 07:15:44 : Disconnected from invalid user test 1.2.3.4 port 43401 [preauth]
Oct 25 08:07:33 : Disconnected from invalid user user 1.2.3.4 port 34930 [preauth]
Oct 25 09:20:01 : Disconnected from invalid user admin 1.2.3.4 port 38688 [preauth]
Oct 25 09:53:27 : Disconnected from invalid user guest3 1.2.3.4 port 59294 [preauth]
Bot login attempts are failing in the preauth phase because they are using passwords, and your server is configured only to accept public/private key-base logins.
If you’ve enabled password authentication to your server by adding this line to the etc/ssh/sshd_config file —
PasswordAuthentication yes— you could also see a similar output:
Oct 25 10:06:19 : Failed password for ubuntu from 1.2.3.4 port 50703 ssh2
Oct 25 10:22:32 : Failed password for admin from 1.2.3.4 port 50703 ssh2
Oct 25 10:22:36 : Failed password for user from 1.2.3.4 port 50703 ssh2
Unless absolutely necessary, enabling password-based login should be avoided.
If you don’t see any output, it looks like your server is currently not targeted. It was not the case for my AWS EC2 instances. All of them started receiving unwanted visitors just minutes after provisioning.
AWS Guard Duty
You can also get a high-level overview of unauthorized access attempts using AWS Guard Duty.
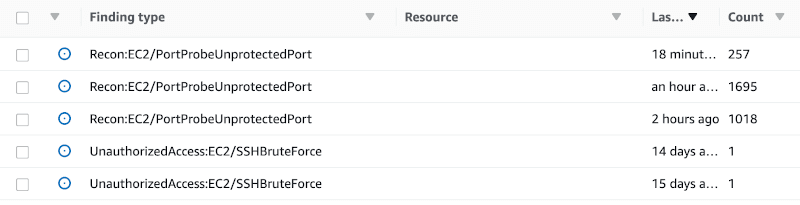
As you can see, my servers are currently receiving a couple of dozen ‘pings’ a day.
Enable SSH access via IPv6
By default, the newly provisioned EC2 instances have an IPv4 public IP address. We will need to reconfigure our default Virtual Private Cloud to enable SSH (port 22) access only via the IPv6 address. HTTP (port 80) and HTTPS (port 443) will still be available via both IPv4 and IPv6, but I will describe options for securing them later.
Check out the official AWS docs about adding IPv6 for a more detailed guide. Below I describe steps necessary to add IPv6 to the default VPC and an already provisioned EC2 instance.
Adding IPv6 to the default VPC
You need to start by going to the VPC section of the AWS console. Next, choose Your VPCs and select Actions > Edit CIDRs for your default VPC. Now click on Add IPv6 CIDR.
Next, you need to reconfigure your subnets. You should check which subnet your provisioned EC2 instance belongs to, or add IPv6 CIDR for all of them. Depending on the region, you might have two or more default subnets.
Choose your subnet, select Actions > Edit IPv6 CIDRs than Add IPv6 CIDR.
The last component that you need to configure is a routing table. Select Route Tables, choose your default route table and click Actions > Edit Routes. Now you need to add a wildcard IPv6 ::/0 destination targeting the same Internet gateway as your default IPv4 0.0.0.0/0 destination. It will enable public Internet access to associated subnets for all IPv6 clients.
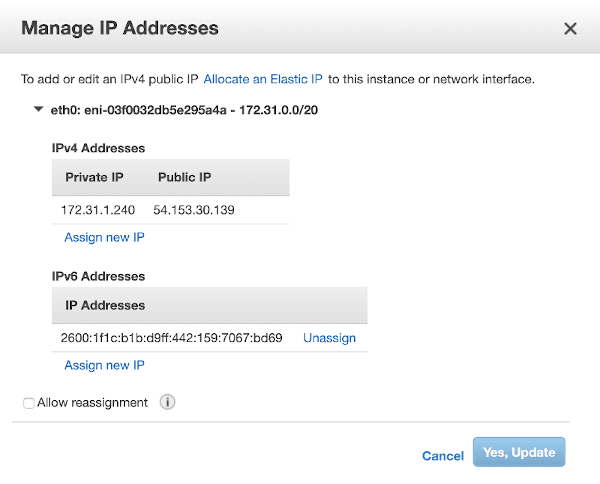
Configure EC2 instance IPv6
Now go back to the EC2 console. In the Instances section, select your instance and choose Actions > Networking > Manage IP Addresses. If you performed the VPC configuration correctly, you should now be able to assign a public IPv6 address to your instance.
Now we need to configure the security groups to only allow SSH access for IPv6 clients and HTTP for IPv4 and IPv6.
To do this, go to the Security Groups tab, click Create Security Group, and configure your security group (see Figure 3 for a sample config). It might differ depending on your particular use case. The important part is to open port 22 only for the IPv6 ::/0 source.

Ideally, I would like to whitelist only my own IP addresses in the security group. Unfortunately, it is impossible because my Internet Service Provider does not offer a static IP. Also, if I wanted to access my server when travelling, then every time I would need to reconfigure the security group.
The last step is to assign our new security group to the EC2 instance. You can do this by going back to the EC2 tab, selecting your instance, and clicking Actions > Networking > Change Security Groups.
That’s it! Now your EC2 instance can only be accessed via its IPv6 address, effectively hiding it from SSH network scanning bots.
Protect HTTP ports with Cloudflare’s Bot Fight Mode
If you are running a publicly accessible web server, then hiding HTTP ports in IPv6 random address space is not the best idea. It has to be discoverable by HTTP clients, both good and malicious ones.
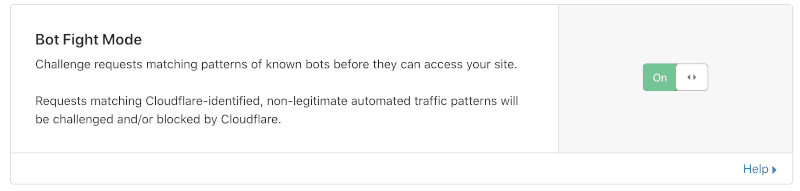
I use Cloudflare as a DNS provider. Recently they’ve introduced a free Bot Fight Mode. Enabling it should eliminate many HTTP scanner bots.
One loophole that remains is HTTP scanner bots that might directly target your AWS instance IP address, bypassing the Cloudflare proxy. You can check out this blog post for an elegant solution on how to cut them off using a custom security group dynamically updated via the Lambda function.
Disadvantages and alternative to IPv6-based solution
According to Google stats, the IPv6 adoption rate is currently around 30%. Before you restrict your server SSH access to IPv6 clients, make sure you can use it by going to this website.
If you want to access the server when travelling, you are dependent on your Internet providers to support IPv6, but it should only be getting easier as adoption increases.
It’s still security by obscurity, so it does not replace the need for following other security best practices.
An alternative solution could be an AWS Sessions Manager but it is not compatible with git-based Dokku deployments I am using for my blog and Abot. Another problem of this approach is that you can no longer simply SSH into your server and always need an AWS CLI installed.
Using a vast IPv6 address pool to hide your server from unwanted guests is a technique that’s worth considering for some use cases. Scanner bots are prevalent and potentially harmful, so cutting them off in advance might save you troubles down the road.
Adapted from original post which appeared on Paweł Urbanek’s Full Stack Blog.
Paweł Urbanek is a Full Stack web development consultant, specializing in Ruby on Rails, JavaScript, website performance and SEO.
The views expressed by the authors of this blog are their own and do not necessarily reflect the views of APNIC. Please note a Code of Conduct applies to this blog.
Interesting read, I see you recommend two best known providers, but what about smaller or newer ones? Do you have a review for Surfshark or CactusVPN? Would be interesting to see what you think about those.