

There is a frequently quoted adage in communications that goes along the lines of “Good, Fast, Cheap: pick any two!”. It may well be applied to many other forms of service design and delivery, but the basic idea is that high-quality, high-speed services are costly to obtain, and if you want a cheaper service, you need to compromise either on the speed of the service or its quality.
If you looked at the realm of security, and X.509 certificate-based secure systems, we appear to be in the worst of all worlds: it can be expensive, inherently compromisable and slow to set up and access. So somehow, we’ve managed to achieve “Security: Poor, Slow and Expensive!”. However, this environment is changing, and it may no longer be the case.
In this post, I’d like to walk through the process of setting up good, inexpensive and accessible security using several public tools.
Below is a step-by-step log of my efforts to set up a secure web service using Let’s Encrypt Domain Name public key X.509 certificates and DNSA TLSA records. I’m using a platform of a FreeBSD system running an Apache web server in this example. While the precise commands and configuration may be different for other OS platforms and other web servers, the underlying steps are much the same, and these steps can be readily ported.
Let’s start with the domain name that is already delegated. The first step is to add DNSSEC to the web server’s domain name.
1. DNSSEC
We’ll use the tools provided with the BIND distribution.
The first step to signing a DNS zone is to generate two keys: one key, the Key-signing Key (KSK), is the secure entry point for the zone. This key is used to sign over the “working key”, which is the Zone Signing Key (ZSK). The ZSK is the key that is used to generate the signed zone for DNSSEC.
First, the keys need to be generated. I’ll generate 2,048-bit RSA keys for both the KSK and the ZSK:
$ dnssec-keygen -r/dev/random -f KSK -a RSASHA1 -b 2048 -n ZONE www.dotnxdomain.net

Generating key pair....+++ ..........................................+++

Kwww.dotnxdomain.net.+005+35836
$ dnssec-keygen -r/dev/random -a RSASHA1 -b 2048 -n ZONE www.dotnxdomain.net

Generating key pair........+++ ..................................+++

Kwww.dotnxdomain.net.+005+57561
We now have two key pairs in the working directory:
$ ls -al K*

-rw-r--r-- 1 gih gih 621 Dec 22 23:13 Kwww.dotnxdomain.net.+005+35836.key

-rw------- 1 gih gih 1774 Dec 22 23:13 Kwww.dotnxdomain.net.+005+35836.private

-rw-r--r-- 1 gih gih 622 Dec 22 23:14 Kwww.dotnxdomain.net.+005+57561.key

-rw------- 1 gih gih 1774 Dec 22 23:14 Kwww.dotnxdomain.net.+005+57561.private
We now need to add these keys into the dotnxdomain.net DNS zone file. BIND has a convenient way of doing this via $include macros.
$ cp Kwww.dotnxdomain.net.+005+35836.key keys/Kksk.dotnxdomain.net.key

$ cp Kwww.dotnxdomain.net.+005+35836.private keys/Kksk.dotnxdomain.net.private

$ cp Kwww.dotnxdomain.net.+005+57561.key keys/Kzsk.dotnxdomain.net.key

$ cp Kwww.dotnxdomain.net.+005+57561.private keys/Kzsk.dotnxdomain.neet.private
$ head -14 dotnxdomain.net

$TTL 15m

@                       IN SOA  ns1.dotnxdomain.net. research.apnic.net. (
2016122202 ; serial
900 ; refresh (15 min)
900 ; retry (15 minutes)
1 ; expire (1 second)
1 ; minimum (1 second)
)
NS      ns1.dotnxdomain.net.

NS      ns2.dotnxdomain.net.
$include keys/Kksk.dotnxdomain.net.key

$include keys/Kzsk.dotnxdomain.net.key
This zone now needs to be signed. Again, BIND has a convenient tool to do this via dnssec-signzone:
$ /usr/local/sbin/dnssec-signzone -K ../keys -e 20200724235900 -r /dev/random -d . -o dotnxdomain.net -k

Kksk.dotnxdomain.net.key dotnxdomain.net Kzsk.dotnxdomain.net.key

Verifying the zone using the following algorithms: RSASHA1.

Zone fully signed:

Algorithm: RSASHA1: KSKs: 1 active, 0 stand-by, 0 revoked
 ZSKs: 1 active, 0 stand-by, 0 revoked

dotnxdomain.net.signed
At this point, we have a signed zone that can be added to the local name server configuration.
We also have the DS records that can be passed to the parent zone for publication along with the NS delegation records in the parent zone:
$ cat dsset-dotnxdomain.net.

dotnxdomain.net.   IN DS 8614 5 1 7D6703DDA3BA3321152460F6904034C3E8EAFDE4

dotnxdomain.net.   IN DS 8614 5 2 EE02E918ED6DABC74F77D51CC346CFA6F8D95D2E4FA98CE93749A546 49CC60AA
Assuming that the name server of the parent zone has updated by including these DS records, then all that’s required to complete the process of DNSSEC zone signing is to refresh the authoritative name server:
$ kill -HUP ‘/etc/named.pid’
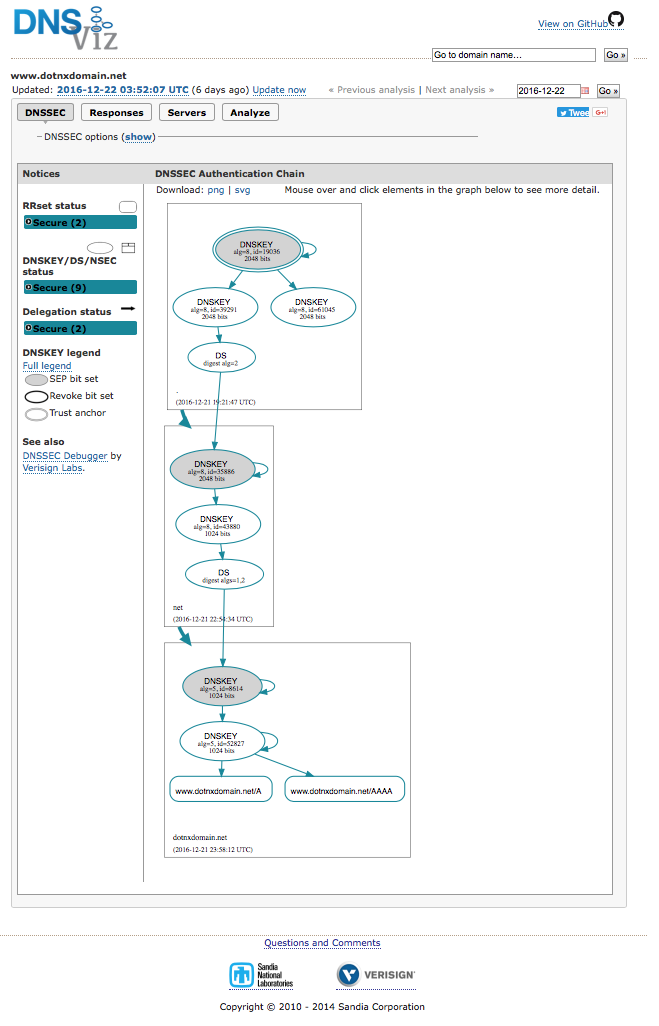
It’s probably a good idea to check the outcome. One of the best tools to do this is Casey Deccio’s DNSviz tool.
Figure 1 shows the output from DNSviz, showing the chain of inter-locked digital signatures that starts with the KSK of the root zone which signs over the ZSK of the root zone. This ZSK is used to sign the DS record of the delegated .net zone that was generated by the .net KSK. Again, this KSK signs over the .net ZSK, which signs over the KSK of the .dotnxdomain.net delegation entry.
This is the key we’ve generated above, and I now will walk through the signature structure we’ve just set up. The .dotnxdomain.net KSK signs over the ZSK, and this is used to sign the entry for www.dotnxdomain.net.
We now have a DNSSEC-signed zonefile to work with.
2. Domain Name Certificates with Let’s Encrypt
A convenient starting point to issue Let’s Encrypt certificates is where the domain name is being served via a Web Server. In this case, I’m using Apache, so the virtual host clause in the Apache configuration is:
<VirtualHost *:80>
DocumentRoot /usr/local/www/dotnxdomain/data
ServerName www.dotnxdomain.net
<Directory “/usr/local/www/dotnxdomain/data”>
Require all granted
</Directory>
</VirtualHost>
At this point, we are ready to generate the Let’s Encrypt domain name certificate. On FreeBSD, I’ll use the EFF’s certbot. This is a Python implementation of the ACME protocol used to fetch certificates.
Once certbot has been installed, it’s now possible to request Let’s Encrypt domain name certificates:
# certbot certonly –webroot -w /usr/local/www/dotnxdomain/data -d www.dotnxdomain.net
The certificate, the private key, and the validation certificate chain are all stored in the /usr/local/etc/letsencrypt directory:
# ls /usr/local/etc/letsencrypt/live/www.dotnxdomain.net/

cert.pem

chain.pem

fullchain.pem

privkey.pem
We can now configure TLS in the Apache server, using this certificates to open a TLS session whenever this domain name is used for a secure session. The Apache virtual host config segment needs to be configured, and here I used the following configuration settings:
<VirtualHost *:443>

SSLEngine on

SSLCipherSuite ECDHE-RSA-AES256-GCM-SHA384:ECDHE-RSA-AES128-GCM-SHA256:DHE-RSA-AES256-GCM-SHA384:

DHE-RSA-AES128-GCM-SHA256:ECDHE-RSA-AES256-SHA384:ECDHE-RSA-AES128-SHA256:ECDHE-RSA-AES256-SHA:

ECDHE-RSA-AES128-SHA:DHE-RSA-AES256-SHA256:DHE-RSA-AES128-SHA256:DHE-RSA-AES256-SHA:

DHE-RSA-AES128-SHA:ECDHE-RSA-DES-CBC3-SHA:EDH-RSA-DES-CBC3-SHA:AES256-GCM-SHA384:

AES128-GCM-SHA256:AES256-SHA256:AES128-SHA256:AES256-SHA:AES128-SHA:DES-CBC3-SHA:

HIGH:!aNULL:!eNULL:!EXPORT:!DES:!MD5:!PSK:!RC4

SSLCertificateFile “/usr/local/etc/letsencrypt/live/www.dotnxdomain.net/cert.pem”

SSLCertificateKeyFile “/usr/local/etc/letsencrypt/live/www.dotnxdomain.net/privkey.pem”

SSLCertificateChainFile “/usr/local/etc/letsencrypt/live/www.dotnxdomain.net/fullchain.pem”

CustomLog “/var/log/httpd-ssl_request.log”  “%t %h %{SSL_PROTOCOL}x %{SSL_CIPHER}x \”%r\” %b”
ServerName www.dotnxdomain.net:443
<Directory “/usr/local/www/dotnxdomain/data”>
Require all granted
</Directory>
At this point, the URL https://www.dotnxdomain.net/ will respond with the web page over a TLS connection.
3. DANE TLSA record
Now for the final step: the DANE TLSA record.
Why do this?
The underlying problem with domain name certificates is that the client (the Relying Party in security parlance) has no knowledge as to exactly which CA issued the certificate that is presented to the client on connection. The vulnerability lies in the observation that if an attacker can corrupt any single CA from the set of CAs that the client trusts (and most clients trust a lot of CAs!), and coerce this corrupted CA to issue a fake certificate for a particular name (*.google.com appears to be a favourite choice) , then it’s possible to mount a man-in-the-middle attack on users who communicate with this particular named service.
This is not just a hypothetical supposition and as an example, a relatively recent incident is described in some detail in a post on the Google Security Blog. There was also the Diginotar hack back in 2011 that achieved some prominence at the time, perhaps because the man-in-the-middle in this particular attack may have been a state actor attempting to electronically eavesdrop on its citizens.
The man-in-the-middle attacker intercepts the user’s connection handshake with a named entity and substitutes its own certificate for that name to the user. Unless the user’s application has some additional knowledge about what particular certificate it should receive at this point, which is in most cases unlikely, it will accept any CA’s certificate that it can validate using its local CA trust set. The attacker then opens their own connection with the user’s intended endpoint and acts as a relay between the user and the endpoint. The attacker then relays the transactions in both directions, using one session key with the user and a second session key with the actual service. This way the entire conversation is exposed to the middle-man attacker, but neither the user nor the service platform are aware of the attacker’s manipulation of the supposedly secure session.
The advantage of DANE and secure TLSA records in a secured DNS record is that it’s not possible to pass the user a fake certificate for a given domain name.
Why not?
Because when the user is passed a domain name certificate as part of the initial TLS handshake the client can check the certificate’s details against a TLSA record published in the DNS for the service name. Because the DNS entry is signed using DNSSEC, the user has a high level of assurance that the DNS information is both genuine and current, and therefore can make an informed judgement as to whether to accept the offered certificate.
Let’s generate a DANE TLSA record for the Let’s Encrypt certificate we obtained in the previous step.
I found Shumon Huque’s online DANE tools useful at this point.
I chose to generate a TLSA record using a SHA-512 hash of the entire Let’s Encrypt certificate [Note: see the Postscript below, as I should have opted for SHA-256]. The response from this web page is the TLSA record to add to the zone file.
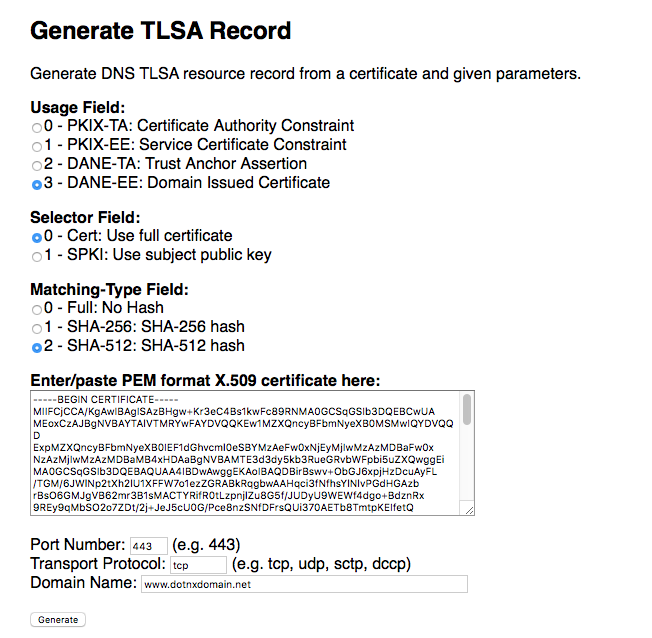 Figure 2. Generating a TLSA record using the gen_tlsa web service.
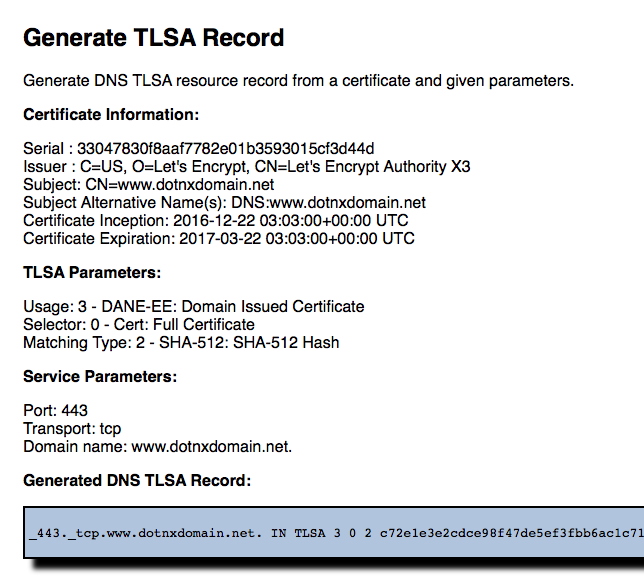 Figure 3. Generating a TLSA record, gen_tlsa response.
This TLSA record is added to the domain zone file with an updated SOA record, the entire zone is re-signed for DNSSEC with the ZSK and the name server is signalled to reload the zone file.
$ add_tlsa www.dotnxdomain.net www.dotnxdomain.net.tlsa >>dotnxdomain.net

$ increment_soa dotnxdomain.net

$ signzone dotnxdomain.net

$ kill -HUP ‘/etc/named.pid’
There are several diagnostic tools that allow you to check if this has all worked. Shumon Huque’s online DANE tools include one such checker (Figure 4).
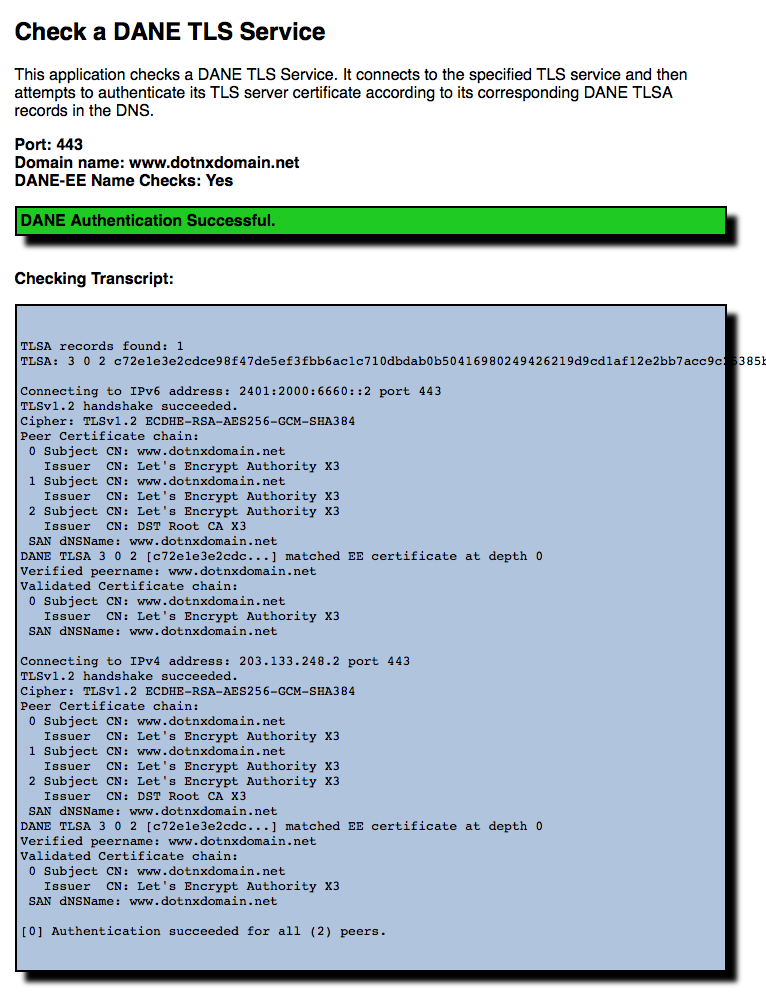
Figure 4 – Checking a TLSA record.
This record is then added to the zone file, and the zone is re-signed with the ZSK.
4. Validation using the DANE TLSA record
I’ve added the DANE validation tool published by CZ.NIC to my browser.
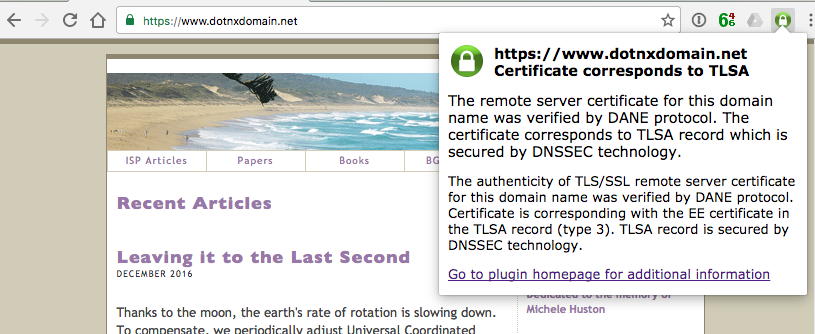
Figure 5 – The CZ.NIC DANE plug-in in a browser.
5. Certificate re-issuance
Let’s Encrypt certificates have a 90-day validity, so you need to renew these certificates on a regular basis. The certbot tool has a convenient option to perform this, which can be loaded into crontab:
$ certbot -renew
Of course, you also need to regenerate the TLSA record each time the Let’s Encrypt certificate is re-issued. Shumon Huque has written up how to do this by using the command line interface to openssl. The basic approach is simple: convert the certificate to the binary DER encoding and take the 512-bit SHA hash of the certificate. Here’s what that looks like using calls to openssl:
># openssl x509 -in /usr/local/etc/letsencrypt/live/www.dotnxdomain.net/cert.pem

-outform DER | openssl sha512
We can generate the DNS TLSA record with a small amount of additional scripting.
This new TLSA record needs to be placed into the zone file. The remaining tasks are to update the SOA index number, re-sign the zonefile, and signal the BIND daemon to re-read the zonefile to serve the new TLSA record.
# openssl x509 -in /usr/local/etc/letsencrypt/live/www.dotnxdomain.net/cert.pem

-outform DER | openssl sha512 | cut -d ‘ ‘ -f 2 |

awk ‘{print “_443._tcp.www.dotnxdomain.net. IN TLSA 3 0 2 ” $1}’

>www.dotnxdomain.net.tlsa

$ add_tlsa www.dotnxdomain.net

www.dotnxdomain.net.tlsa >>dotnxdomain.net

$ increment_soa dotnxdomain.net

$ signzone dotnxdomain.net

$ kill -HUP ‘/etc/named.pid’
It’s that easy!
For many years, we’ve seen Domain Name certificates priced as a luxury add-on, costing many times more than the original name registration fees. Let’s Encrypt has broken that model and now basic security is freely available to anyone.
But the CA model itself is not all that robust, and there are still some critical vulnerabilities that can be exploited by a well-resourced attacker. Adding DANE TSLA records to the DNS signed zone and equipping user applications, such as browsers, with an additional DNS lookup to fetch and validate the TLSA record is a small step, but a significant improvement to the overall security picture.
If you run your own DNS and operate your own web assets, then setting this up is a relatively quick process. My investment was a couple of hours on Google to pick up the Let’s Encrypt and DANE tools and put all this together, and I’m sure that if you are in a similar situation it should be just as quick!
And if everyone did this, then it would make various forms of pernicious man-in-the-middle meddling attacks so much harder.
Postscript
Jacob Schlyter has kindly pointed out to me some issues with the approach I have taken here, which I should note. There is a useful commentary in RFC7671, including the following recommendation:
More specifically, it is RECOMMENDED that at most sites TLSA records
published for DANE servers be “DANE-EE(3) SPKI(1) SHA2-256(1)”
records. Selector SPKI(1) is chosen because it is compatible with
raw public keys [RFC7250] and the resulting TLSA record need not
change across certificate renewals with the same key. Matching type
SHA2-256(1) is chosen because all DANE implementations are required
to support SHA2-256. This TLSA record type easily supports hosting
arrangements with a single certificate matching all hosted domains.
It is also the easiest to implement correctly in the client. [RFC 7671]
First, my choice of 0 as a Selector Field means that the hash of the full certificate is included in the DANE TLSA record and, as I’ve noted above, this implies that each time the certificate is re-issued I’ll need to update the DNS TLSA record.
However, “updating the DNS” is not an instant action, as there may be resolvers that have cached the old DNS TLSA record, and they will not be updating their local cache until the cache TTL timer expires. The problem is that at the point in time when the server presents the new certificate as part of its TLS startup we need to have taken adequate precautions to ensure that the old TLSA record has been flushed from resolvers’ caches.
That means that certificate rollover, which happens every three months with Let’s Encrypt certificates, is slightly more involved than I’ve described above. There are steps need to include a period where new and old TLSA records are published in the DNS, and only when the new TLSA record has been picked up by clients, and the resolvers that they use, can the new certificate be used in the TLS session. So the steps in certificate rollover are:
- Fetch the new Let’s Encrypt Certificate
- Generate the new TLSA record
- Publish both the old and new TLSA records in the DNS
- Wait for a minimum of twice the Cache TTL as specified in the DNS
- Switch TLS certificates in the web server configuration
- Withdraw the old TLSA record.
There is potentially an easier way, and that is to use Selector Field value 1, which is a hash of the Subject Public Key Info (SPKI) field of the Domain Name Certificate. It might appear that this is not all that secure, in that any third party could take the SPKI from the public certificate and generate a certificate from this public key, using itself as an issuer. However, the strength in the DANE approach lies in the observation that the DANE TLSA record using the SPKI selector is in effect binding the server’s private key to the server’s name and it is this bound key that is used as an input to the TLS session key. Irrespective of the certificate used to perform a SPKI validation, it’s the server’s private key that matters in terms of providing assurance that the client is connecting to the intended named service.
As long as the certificate renewal process uses a constant server private key, then the regular process of certificate renewal with Let’s Encrypt certificates need not change the DNS TLSA record, and the new certificate can be used immediately. As far as I can tell, this is the reasoning behind the recommendation to the the SPKI Selector Field in RFC7671.
However, it appears that the default action for certbot is to change the private key on certificate renewal, so the SPKI value changes with each certificate renewal.
There are arguments for and against changing the private key on a regular basis. Constant changes of the private key imply continual re-keying, and this entails additional moving parts and increased risk of breakage. On the other hand, long-lived private keys increase the risk of compromise of the private key and opens the window of vulnerability on decryption of past transactions. A regular change of key material limits the risk of consequent vulnerability if any instance of the private key is compromised.
If we accept the certbot default behaviour, and accept the re-generation of private keys every three months, then much of the argument in favour of using a TLSA value based on a hash of the SPKI over and above a hash of the entire certificate is neutralized. In either case, certbot’s default certificate renewal action forces a roll in the DANE TLSA records, and requires the use of a staged roll of the DANE TLSA records, using a process described above. In this case, the use of the Certificate Selector Field Value, as compared to the use of the SPKI value, appears to be a choice which has no particular argument in preference of one way or the other.
The other point from RFC7671 is that my choice of a SHA-512 hash was ill-advised, and a conservative approach would be to use a SHA-256 hash to generate the TLSA record.
The views expressed by the authors of this blog are their own and do not necessarily reflect the views of APNIC. Please note a Code of Conduct applies to this blog.
Thanks for the Article and the chain of the interesting links.
I was trying to look into DANE and it was helpful for me.
Hi Geoff. Great article as always.
For DANE, you can also use the Let’s Encrypt X3 root certificate for authenticating the server, together with DANE option 2 0 1, rather than your host-specific certificate with option 3 0 1.
Advantage is that the root only rolls over every 5 years or so. The remote client will check the trust anchor is valid, and your server-specific certificate via the chain, rather than your server-specific certificate directly.
You can find this Let’s Encrypt root certificate in the /etc/letsencrypt/live/ directory as part of the fullchain.pem. Use your favourite text editor to extract this to a file x3-root.pem
FYI this is currently:
Serial : a0141420000015385736a0b85eca708
Issuer : O=Digital Signature Trust Co., CN=DST Root CA X3
Subject: C=US, O=Let’s Encrypt, CN=Let’s Encrypt Authority X3
Certificate Inception: 2016-03-17 16:40:46+00:00 UTC
Certificate Expiration: 2021-03-17 16:40:46+00:00 UTC
Then generate the TSLA record using openssl.
openssl x509 -in x3-root.pem -outform DER | openssl dgst -sha256 -hex | awk ‘{print “_443._tcp.www IN TLSA 2 0 1”, $NF}’
This results in
_443._tcp.www IN TLSA 2 0 1 25847d668eb4f04fdd40b12b6b0740c567da7d024308eb6c2c96fe41d9de218d
A few years later, your extremely useful article still helped me out to figure out how to ‘survive’ the Let’s Encrypt constant certificate/key rollover.
Well, not quite… because I gave up on certbot and I’m currently using the acme.sh script. I guess it’s just a question of choice; the former has better (read: official) support, while the latter has a few extra features which, in my case, are essential for my (somewhat) complex setup (ironically, those ‘extra features’ are part of ACME, and Let’s Encrypt does support them fully — just not on certbot, for some unfathomable reason…).
In particular, in my case, I use CloudFlare as my DNS provider, and just run a local caching nameserver. That, by itself, is not an issue: it’s just that, instead of directly updating DNS records on a local machine, I call (via cURL) CloudFlare’s API to do that on my behalf. Not surprisingly, this happens blindingly fast — faster, in fact, than doing it locally, because CloudFlare’s DNS servers magically propagate changes all over the Internet in picoseconds, which is certainly not the case with my local setup 🙂
But in essence the problem is the same, and, with some adaptations, it’s something I still have to figure out and implement correctly, but this article of yours certainly pointed me in the right direction. So, again, thanks so much for your help!