In our Inter(net) -connected world, geolocation accuracy is more important than ever. From streaming to shopping, a lot of what we do online relies on accurate location data to deliver the right experience. That’s where Geofeed comes in — a handy tool for network operators to ensure that location data is spot-on. Ready to dive in? Let’s break it down into easy steps.
First things first: What is geolocation?
Geolocation is just a fancy way of saying, ‘Where’s this IP address located?’ It’s how websites know to display content in your local language, show local content on social media, or follow regulations about what you can see online.
When geolocation data is wrong, it can lead to frustrating issues like being matched with opponents from a completely different region in PubG, users being unable to access services because they’re identified as being ‘in the wrong country’ or encountering poorly targeted ads or language that doesn’t align with the actual location.
If your network’s IPs are showing up in the ‘wrong country’, users might find themselves locked out of apps, gaming sites, or streaming services. This can lead to access issues, frustrated users and terrible user experience!
Here’s where Geofeed saves the day.
So, what exactly is Geofeed?
Introduced in RFC 8805, Geofeed is like a digital address book for your network — it lets you publish location data for IP prefixes you manage. Instead of relying on external geolocation providers (which can sometimes be a bit slow on updates), Geofeed lets operators post geolocation data themselves in an easy, standardized way. Once you’ve set it up, geolocation providers like MaxMind, IP2Location, and others can pull from your Geofeed information and keep everyone up to date.
In short, with Geofeed, you’re in control, and it’s one central file you can update anytime. Easy!
Why use Geofeed?
Here are some benefits of using Geofeed:
- Accuracy: Control your IP location data and avoid geolocation issues.
- Reliability: Only custodians of IPs with authorized access can link Geofeed information to IPs via MyAPNIC. This should provide peace of mind regarding its authenticity.
- Simplicity: Maintain one file with the locations of all your IPs.
Geofeed benefits both the network operators and geolocation providers, as the former can ensure accurate representation of their IP location, while the latter gains access to up-to-date, authoritative data.
What does Geofeed look like?
Geofeed uses a simple comma-separated format that defines specific attributes. The Geofeed format is described in RFC 8805 as a string ‘prefix,country,region,city,zip’.
Specifications of Geofeed format below:
- Prefix or IP.
- Two-letter CC in ISO 3166-1 format (optional).
- Subdivision/region code in ISO 3166-2 format (optional).
- City name in UTF-8 text (optional).
- Zip code (optional, deprecated). (The zip code should not be used due to privacy concerns).
Examples of valid Geofeeds:
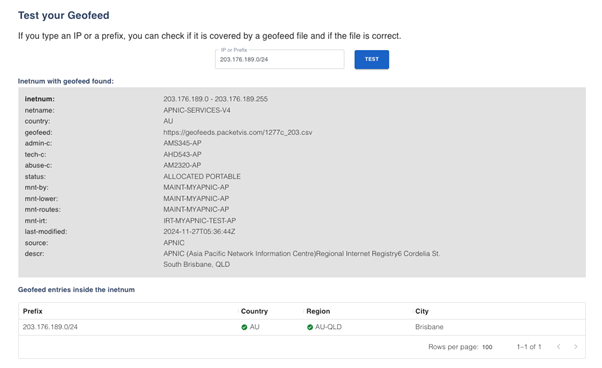
203.176.189.0/24,AU,AU-QLD,Brisbane,
This prefix is used in Brisbane, Queensland, Australia

2001:DF0:90::/48,SG,,,
This prefix is used in Singapore

2401:4600::/32,,,,
This prefix should not be geolocated
Try creating one line for your IP prefix!
Getting started with Geofeed in three steps
Setting up Geofeed is simpler than it sounds. Let’s begin.
Step 1: Create a CSV file with Geofeed information
Think of the CSV file as a ‘location directory’ for your IPs. Each line gives geolocation providers a quick snapshot of an IP range and where it’s based. Create a line for each IP range you manage in the format described in the previous section and save it as a .csv file.
Easy so far, right?
Let’s make it easier. If you want to skip creating Geofeed lines and files yourself, you can use a free service like GitHub or PacketVis to generate the CSV file with Geofeed information and URL (use your discretion if using a third-party service). In this scenario, move to Step 3 directly.
Step 2: Host the CSV File over HTTPS
Next, you’ll want to make this file available on the Internet so providers can find it. You can host this over your own domain or use a third party. Just make sure the file’s accessible over https via a public link.
Step 3: Add the Geofeed URL to your APNIC whois record
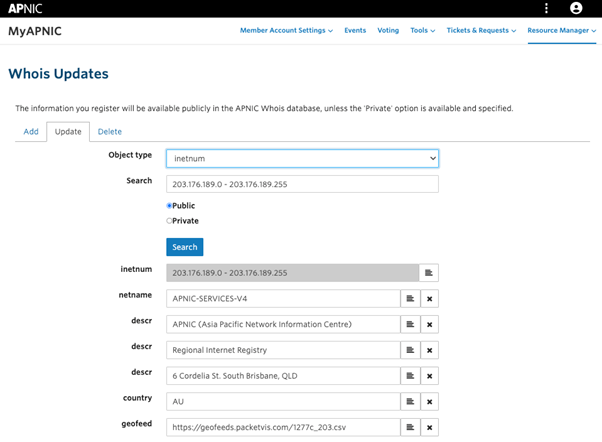
This is the finishing touch! Go to the MyAPNIC portal and link the URL to your IPs.
Log into MyAPNIC and go to:
- Resource Manager > Internet Resources > IPv4/IPv6
- Select the IP prefix to find the associated inetnum/inet6num object
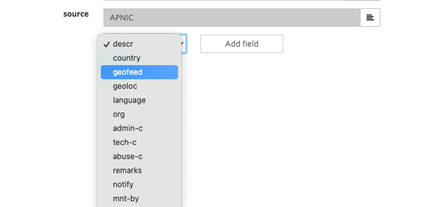
- Select ‘geofeed’ from the drop-down list at the bottom of the page > Add field > Enter the URL > Click ‘Update’
All done! Several geolocation providers will now be able to auto-discover your Geofeed data and start using it.
You may ask how is ‘geofeed’ different to the ‘country’ attribute that already exists in whois objects? The short answer is that the ‘country’ attribute in whois objects is not intended for network location. For records maintained by APNIC, the economy where the organization is legally registered is recorded in the ‘country’ attribute which might be different to the network location.
Need to check if it’s working?
After you’ve added your Geofeed URL, give it some time to propagate. Then, head over to Geolocatemuch and query your prefix to verify that your Geofeed data is showing up correctly.

Ready to give it a try?
Add Geofeed to your IPs using MyAPNIC now. If you need any assistance, the APNIC team is always there to help. We greatly appreciate your feedback, so please reach out to us and help shape APNIC’s products and services for the community, or let us know via the APNIC User Feedback Group on Orbit.
Happy geolocating!
The views expressed by the authors of this blog are their own and do not necessarily reflect the views of APNIC. Please note a Code of Conduct applies to this blog.


