

Poorly secured mail servers can be a malicious actor’s best friend — they can enable social engineering, phishing, fraud, and the spread of malware, not to mention that mail servers allowing open relay create the perfect conditions for the spoofing of sender addresses and the sending of spam.
You also don’t have to look too far in the news to come across reports of sensitive or personal data being exposed as a result of an email leak.
Securing email is clearly important for these reasons alone, but also remember that your standard mail server:
- Does not encrypt data at rest
- Often uses weak authentication (username/password)
- Is often entrusted to a 3rd party provider.
So what can be done to secure email?
There are a large number of things that can be done to secure email, including:
- Information classification — who needs to know?
- Prevent spoofing by verifying the sending server and message integrity (using SPF, DKIM, DMARC).
- Infrastructure security — hardening, patch management, access control, multi-factor authentication.
- User awareness (of phishing and good security practices).
- Malicious attachments (filtering based on blacklists, scanning links, and so forth).
- Availability — redundancy and backups.
In this post we’ll cover how to ensure sender and message integrity by using SPF, DKIM and DMARC.
Who actually sent that email?
Spoofed emails are often used to conduct social engineering attacks against organizations. Spoofing the sender’s address makes an email look much more legitimate, increasing the chances of someone opening an email or its attachment.
Spoofed emails may open the door for attackers to perform a Business Email Compromise (BEC) — an attack that has been particularly prevalent lately, with attackers gaining access to employee email accounts.
One way to reduce the likelihood of your domain being used to support fake emails is to implement Sender Policy Framework (SPF) and Domain-based Message Authentication, Reporting and Conformance (DMARC). Using Domain Keys Identified Mail (DKIM) provides further safety. Let’s take a look at them.
SPF
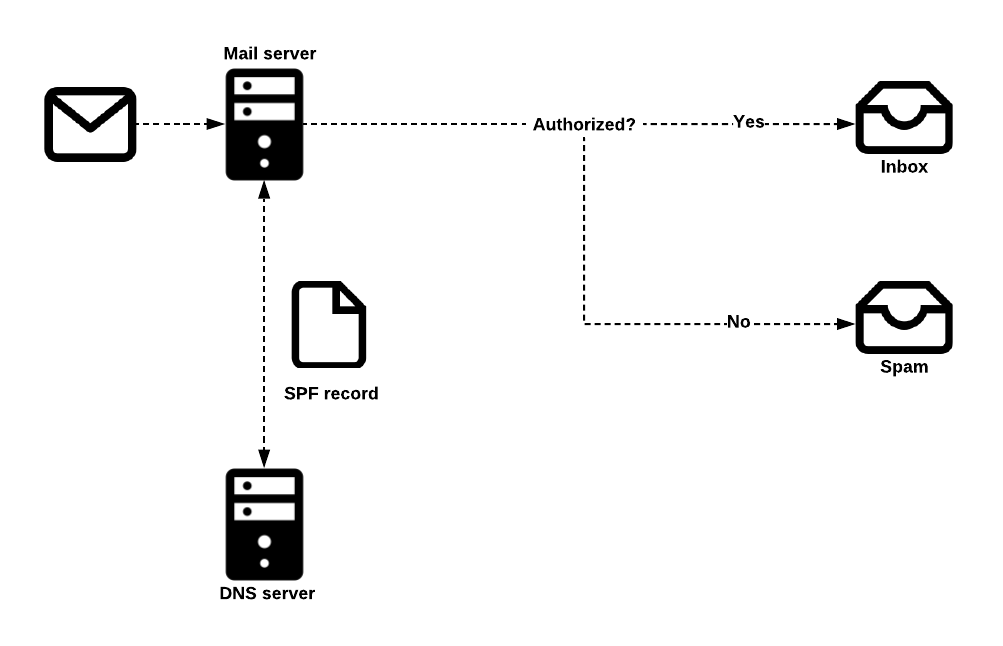
SPF is a system designed to enable the detection of fake emails. A domain owner publishes SPF records in DNS, indicating which mail servers are allowed to send email for that domain.
When a mail server receives an email, it can check the sending server’s identity against the published SPF record. If the sending server is not listed, verification fails. Otherwise, the email is forwarded to your Inbox as usual.
DKIM
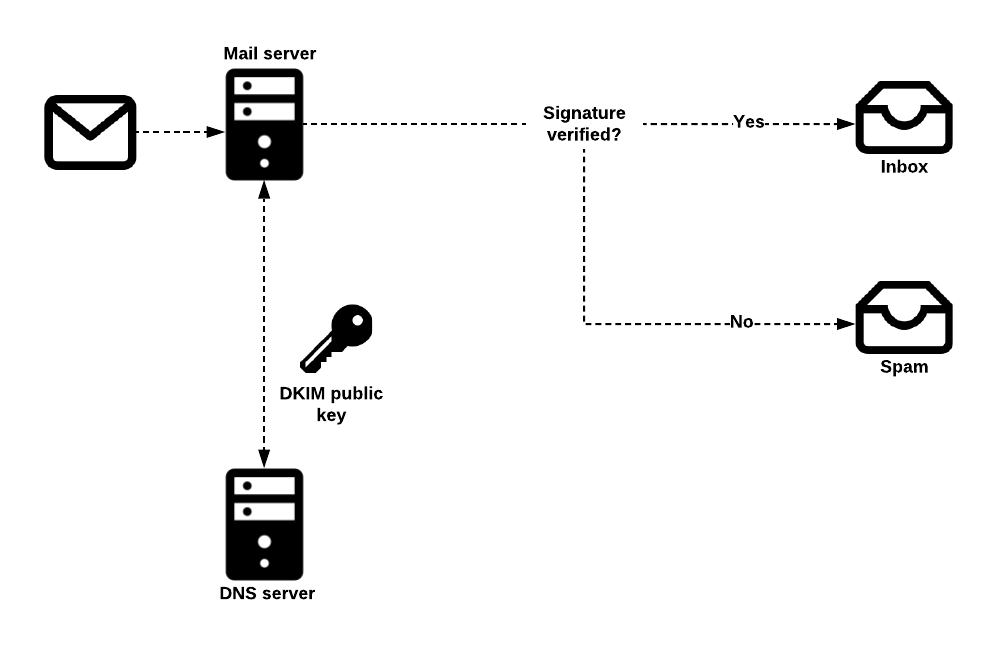
DKIM uses public key cryptography to allow sending mail servers to sign outgoing messages, and for receiving mail servers to verify those signatures.
To set up DKIM, a domain’s owner generates a private/public key pair and publishes the public key in DNS. Then, the mail server is configured to sign emails using the private key.
This allows receivers to verify the digital signature attached to an email by referring to the public key in the DNS. As long as the email has not been tampered with, verification will succeed and the email will be delivered.
DMARC
DMARC allows domain owners to advise recipient mail servers of policy decisions that should be made when handing email from their domain.
Domain owners can ask receiving servers to:
- Allow, quarantine or reject emails that fail SPF and/or DKIM verification
- Collect statistics about failures and notify the domain owner of emails falsely claiming to be from their domain.
- Send the domain owner data extracted from a failed email, such as header information and web addresses from the email body.
DMARC notifications and statistics can also be sent back to the sending server as aggregate reports and forensic reports. Aggregate reports provide high-level information about emails, such as which IP address failed messages have come from. Forensic reports are sent in real time and provide detailed information on why a particular message failed verification, along with content such as headers and attachments.

Implementing SPF
Note: The examples provided in this post are for illustration purposes and should not be considered a complete implementation of any of the techniques mentioned.
First of all, you need to know what your organization’s mail servers are. If you don’t already know, perform a dig mx on your domain name.
Next, construct an SPF record, which is specified in a DNS TXT record. An example of an SPF record might be: v=spf1 a mx a:<domain/host> ip4:<ipaddress> -all where:
v=spf1defines the version of SPF being useda,mx,a:<domain/host>andip4:<ipaddress>are examples of how to specify which servers are authorized to send email.-allspecifies a hard fail directing receivers to drop emails sent from your domain if the sending server is not authorized.
For help in constructing SPF records, tools such as spfwizard.net can come in very handy.
It’s important to note that SPF records are not inherited by subdomains, which means that if you have subdomains, you need to set an SPF record for them as well. You should also explicitly state if a domain or subdomain does not send emails by specifying v=spf1 -all in the SPF record.
Once you’re done creating SPF records, you can test them using a tool such as mxtoolbox.com.
In the examples above, we have implemented a ‘hard fail’ policy by using -all, but when testing you might want a ‘soft fail’, using ~all. The meaningful difference between a hard and soft fail is a failed message being rejected versus being accepted but tagged.
Implementing DKIM
The first decision you have to make is which sections of an email message you wish to sign. The more sections you sign, the more protected you are from adversaries sending fake email that appears to come from you. At a minimum the body and the following headers should be signed:
| to | sender | references |
| cc | reply-to | in-reply-to |
| date | references | return-path |
| from | mime-version | content-disposition |
| subject | content-type | content-transfer-encoding |
Table 1 — Header fields that should be signed.
Also note that DKIM verification may fail if a message is changed during delivery. For this reason, it is important to understand your email infrastructure and know at what point emails might be changed (adding signatures or legal disclaimers for example), and make sure that signing occurs after any modification operations. Typically, if you can sign emails at the final stage before leaving your infrastructure, you reduce the chances of unintended changes.
Next, use a tool such as opendkim-genkey to create your key pair. For example, sudo opendkim-genkey -s mail -d example.com
Be sure to store the private key in a secure location.
The public key you’ve just generated will be added to your domain’s zone file in the form <selector>._domainkey.yourorganisation.org where selector must be different for every public/private key pair. The content of the record itself will be similar, for example: v=DKIM1; k=rsa; p=<your public key>
mail._domainkey IN TXT "v=DKIM1; k=rsa; p=MIGfMA0GCSqGSIb3DQEBAQUAA4GNADCBiQKBgQC5N3lnvvrYgPCRSoqn+awTpE+iGYcKBPpo8HHbcFfCIIV10H
wo4PhCoGZSaKVHOjDm4yefKXhQjM7iKzEPuBatE7O47hAx1CJpNuIdLxhILSbEmbMxJrJAG0HZVn8z6EAoOHZNaPH
mK2h4UUrjOG8zA5BHfzJf7tGwI+K619fFUwIDAQAB" ;
If you have domains that do not send email, you should explicitly state this in the DNS by specifying v=DKIM1; p= in the DKIM record for those domains.
You can test your DKIM configuration by sending email to a gmail address or check-auth@verifier.port25.com , which will return you a list of results such as the one from gmail below.
Authentication-Results: mx.google.com;
spf=pass (google.com: domain of contact@example.com designates --- as permitted
sender) smtp.mail=contact@example.com; dkim=pass header.i=@example.com;
================================================

======== Summary of Results =====================

========

SPF check: pass
DomainKeys check: neutral
DKIM check: pass
Sender-ID check: pass
SpamAssassin check: ham
Implementing DMARC
DMARC is implemented by publishing a TXT record in the DNS. This record will apply to subdomains unless another policy is explicitly defined.
It is recommended to initially implement DMARC in monitoring mode, followed by quarantine mode (which will mark emails that fail SPF and DKIM as spam), then only using reject mode once you are confident your system is performing as expected.
An example DMARC record might look like:
v=DMARC1; pct=50; p=none; sp=quarantine; ruf=mailto:authfail@yourorganisation.com.au;
rua=mailto:aggrep@yourorganisation.com.au
where:
- v=DMARC1 defines the version of DMARC being used
- pct=50 specifies the percentage of emails subjected to filtering
- p=none specifies the policy for your organisation domain
- sp=quarantine specifies the policy for all organisation subdomains
- ruf=mailto:authfail@yourorganisation.com.au states the email address to which forensic reports should be sent
- rua=mailto:aggrep@yourorganisation.com.au states the email address to which aggregate reports should be sent
If you’re interested in experimenting further with SPF, DKIM and DMARC, a great way to do so is to check out projects such as mailcow and Mail-in-a-Box, which allow you to get a mail server or servers up and running quickly.
If you’re in need of more information, there are a lot of great resources available about how to configure SPF, DKIM and DMARC, such as the UK National Cyber Security Centre and the Australian Cyber Security Centre. The Global Cyber Alliance also has a lot of useful information on DMARC specifically.
The views expressed by the authors of this blog are their own and do not necessarily reflect the views of APNIC. Please note a Code of Conduct applies to this blog.